

This tutorial was written by Monti on August 29th 2006 and reworked on 11th October 2014. It's concept is copyrighted to Monti. Any creation you make from my ideas are yours. You may print out this tutorial for your own personal use, but please do not copy it in any way to put online, pass out or rewrite without my permission or worse yet attempt to claim as your own.
This was written for psp 9 but will work in other versions.
For this tutorial you will need:
Paint Shop Pro
Toadies What Are You?
Available at www.photoshop.msk.ru
Mura Meisters Cloud
Available at www.oocities.org/murakuma/mmplugins.html
DSB Flux
Available at www.grafnet.com.pl/Filters/DSB-Flux
Font of your choice
I used Ambience BT
An Image and a Tube of your choice OR 2 Tubes of your choice.
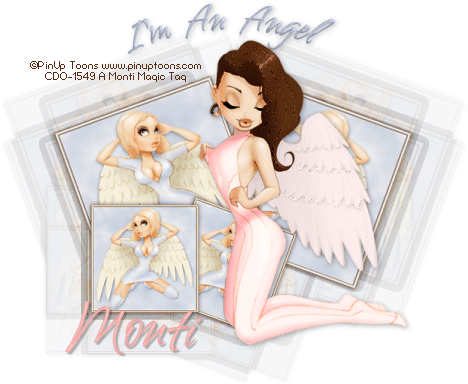
I am using the wonderful art of PinUpToons used with a license from CDO.
You can purchase a license to use his work from www.cdoestore.com.
Ok we are ready to start.
REMEMBER TO SAVE OFTEN
Step 1:
Open a new 700 x 700 transparent image and flood fill with white.
Open your first image or tube, press Shift D to duplicate and close the original.
If you are using a tube follow the step below, if you are using an image skip ahead to step 2.
Add a new layer to your tube and drag it to the bottom of the layer palette.
Set your Foreground to a dark colour from your tube and the background to a lighter colour from the tube.
With the new layer activated go to Mura Meisters Clouds, with the default settings but you can adjust the Amount until you are happy with the colour. I set my Amount to 110.
Activate your original tube layer and add a Drop Shadow of choice. I used
Vertical: 4
Horizontal: 4
Opacity: 40
Blur: 15
Colour: Black
Step 2:
Go to Image - Add Border - 2 Pixels - A dark colour from your tube.
Go to Image - Add Border - 9 Pixels - A light colour from the tube.
Go to Image - Add Border - 2 Pixels - A dark colour from your tube.
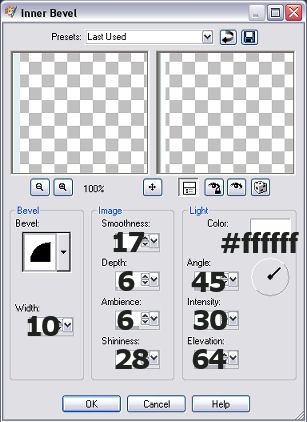
Use your magic wand Tolerance and Feather 0 and select the light border. Add the following Inner Bevel
Resize the image to a maximum width of 260 pixels using Weighted Average - Resize all layers.
Go to Adjust - Sharpen - Unsharp mask using the settings below.
Radius: 1 - Strength: 50 - Clipping: 13
Copy and paste as a new layer on your large canvas and move towards the right. DO NOT close the original.
Go to Image - Rotate - Free Rotate - 20 degrees Right. Make sure ALL layers is UNchecked.
Go to Image - Duplicate - Image - Mirror.
Resize your original image to 65% and copy and paste it as a new layer on your main image. Move it to the left.
Duplicate this layer and rotate 20 degrees to the right. Move it down and to the right a bit. See my tag as a guide.
Add the following drop shadow to each of the image layers
Vertical: 0
Horizontal: 0
Opacity: 60
Blur: 10
Colour : Black
Hide your white background layer and merge all visible. Duplicate the merged layer and resize it by 85%.
Set your background colour to a medium colour from your tube. Activate the original merged layer and go to Effects - Toadies - What Are You? using the default settings.
Step 3:
Acitvate your top layer.
Set your Foreground to a bright colour not used in your tube (any colour as this will be deleted later). Set your background to null.
Activate your preset shapes and choose Eclipse - Line width 1. Draw an eclipse and use your nodes to stretch and move it so that the top sits nicely above the What Are You? effect.
DO NOT convert to raster layer.
Layers - new Raster layer and activate your text tool.
Set your Foreground and Background to a dark colour from your tube.
Select the text tool with a font of your choice. I used Ambience BT, size 48 and move your cursor up towards the top centre of the vector until you get an A with a semi circle under it. Click to type your text and type in "I'm An Angel".
Go to Objects - Align - Horizontal in Canvas and convert to raster layer.
Delete your shape layer.
Apply an Inner Bevel of your choice.
Add a blurred drop shadow. I used
Vertical: 2
Horizontal: 2
Opacity: 30
Blur: 10
Colour: Black
Step 4:
Activate the top layer and copy and paste your second tube as a new layer, resize if needed and add a drop shadow of choice.
Hide the white background layer and Crop - Merged Opaque.
Resize now if you want your image smaller.
Add your artists copyright and your watermark.
Set your Foreground to a dark colour from your second tube and your background to a lighter shade.
Select a font of your choice and type your name.
I used Ambience BT - size 60 - Vector. Position it towards the bottom left and add the following drop shadow
Vertical: 2
Horizontal: 2
Opacity: 30
Blur: 2
Colour: Black
If you want to save without animation then save now.
Step 5: Animation
If you wish to add a sparkle to your tube like I did in her hair and wings then follow the instructions below.
Hide all layers apart from your second tube layer and activate it.
Use your lasso tool to select the areas you wish to animate.
Once you have them selected promote to layer.
Once you have all the selected areas promoted to layers, hide the original tube layer and merge the promoted ones visible.
Duplicate your promoted layer twice for a total of 3 layers.
On the bottom layer apply DSB flux intensity 30 and press mix once.
On the middle layer press mix twice.
On the top layer press mix 3 times.
Hide the top 2 (dsb flux) layers and unhide all the others.
Open Animation Shop.
In psp go to Copy - Merged. Paste as a New image in Animation Shop.
Back in psp hide the bottom dsb flux layer and unhide the middle one. Copy merged and paste after the first frame in animation shop.
Back in psp hide the middle dsb flux layer and unhide the top one. Copy merged and paste after the second frame in animation shop.
Edit select all - Frame properties 10.
Save your tag.
No comments:
Post a Comment