


This tutorial was written by Monti on January 3rd 2014. It's concept is copyrighted to Monti. Any creation you make from my ideas are yours. You may print out this tutorial for your own personal use, but please do not copy it in any way to put online, pass out or rewrite without my permission or worse yet attempt to claim as your own.
For this tutorial you will need
Paint Shop Pro
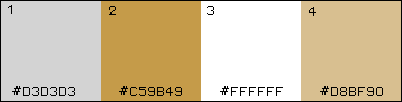
The Following Colour Chart
Save and then open in PSP.
This colour chart is just a guide, feel free to use whatever colours you want.
Ok we are ready to start.
REMEMBER TO SAVE OFTEN
Step 1: - Outline
We will be starting with the outline using the count shown below
To make this easier I have numbered all pixels over 1.
I decided not to split the main Champagne Glass into pieces and needed to make the count quite large.
Because of this I can't load it onto this page so please click the small image below which will open the main count. Right click and save this and open in PSP.
To help you keep count of what you have done you can add a new layer to the count in PSP and draw a line through the pixels you have drawn to keep your place.

Open a new image 100 x 100 and fill with black so you can see what you are working on.
Add a new raster layer and select the brush tool with the following settings.
Size: 1 - Hardness, Opacity and Density: 100
Zoom in to about 800% - 1000%
Set your foreground to colour 1 on the colour chart (#D3D3D3) and start at either the top or the bottom of the glass. Change the colour as you go.
The champagne area is colour 2 on the colour chart (#C59B49)
______________________________
Step 2: - Fills
When the outline is complete select your magic wand with the following settings.
With your Magic Wand on the settings shown above click inside the top of the glass area.
Add a new raster layer and set your Foreground to Colour 3 (#FFFFFF) on your colour chart and flood fill this selection.
Keep selected.
Selections float, Effects 3D effects, Cutout with the following settings
Vertical: 0
Horizontal: 0
Opacity: 100
Blur: 9
Shadow colour: Colour 1 (#D3D3D3) on your colour chart
Make sure fill interior with colour is UNchecked.
Deselect.
______________________________
Activate the Outline layer.
With your Magic Wand click inside the bottom of the glass area.
Set your Foreground to Colour 3 (#FFFFFF) on your colour chart and making sure you are on the Fill layer flood fill this selection.
Keep selected.
Selections float, Effects 3D effects, Cutout with the following settings
Vertical: 0
Horizontal: 0
Opacity: 100
Blur: 6
Shadow colour: Colour 1 (#D3D3D3) on your colour chart
Make sure fill interior with colour is UNchecked.
Deselect.
Lower the opacity of the Fill layer to 50%.
______________________________
With your Magic Wand click inside the champagne area of the glass.
Add a new raster layer.
Set your Foreground to Colour 4 (#D8BF90) on your colour chart and flood fill this selection.
Keep selected.
Selections float, Effects 3D effects, Cutout with the following settings
Vertical: 0
Horizontal: 0
Opacity: 100
Blur: 13
Shadow colour: Colour 2 (#C59B49) on your colour chart
Make sure fill interior with colour is UNchecked.
Do NOT Deselect.
Adjust - Add/Remove Noise - Add noise - Gaussian and Monochrome checked - 5%
Deselect.
______________________________
Hide the black background layer and save as a png.
If you want two glasses, hide the black background, merge all visible, duplicate and move one to the right and slightly behind the other.
No comments:
Post a Comment