


This tutorial was written by Monti on December 30th 2006. It's concept is copyrighted to Monti. Any creation you make from my ideas are yours. You may print out this tutorial for your own personal use, but please do not copy it in any way to put online, pass out or rewrite without my permission or worse yet attempt to claim as your own.
This was written for PSP 9 but will work in other versions.
For this tutorial you will need:
Paint Shop Pro
Script Font of your Choice
I used MsMadi which is a pay font so I cannot supply it.
A Tube of your choice
The image used in this tutorial is ©Barbara Jensen.
If you wish to use her work please visit www.barbarajensentubes.com to purchase a license.
A Pattern of your choice
I am using one by Barbara Jensen but there are a lot of lovely ones around.
My Supplies
You will need the Picture Frame and the Shapes supplied. These came as standard with my PSP but I am supplying them for those of you who may not have them with your version of PSP.
Put the Objects.jsl into your Paint Shop Pro preset shapes folder and the Edge Circles 01.pspFrame into your Paint Shop Pro picture frame folder.
You can download them Here
Simple Quick Tile
Download at http://grafnet.com.pl/Filters/Simple and install in your plugins folder.
Ok we are ready to start.
REMEMBER TO SAVE OFTEN
Step 1:
Open your pattern in PSP, and promote Background to Layer if it is a .jpg.
If you are using Barbara Jensen's hearts, use your selection tool to select the coloured part of the image only. Copy and paste as a new Image.
Apply Simple Quick tile to give you a seamless pattern. Minimize.
Open a new image 700 x 600 and flood fill with white.
Activate your Preset Shapes tool and find shape X3 in your shapes. Make sure Antialias and Create as Vector are checked.
Set your foreground to black and your background to white and set your line width to 5.
Draw out an X on your canvas, (size between 350 x 350 and 400 x 400).
Move it to the right of the canvas and convert to raster layer.
Rename X
Change your selected shape to an Ellipse and draw out a circle using the same settings as before.
Position in the middle of the canvas towards the bottom. Convert to raster layer.
Null your background and draw another smaller ellipse in the middle of that one moving it slightly to the right of the first one.
See Screen Shot below for an example.
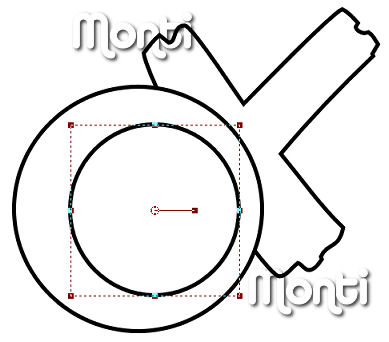
Convert to Raster Layer.
Select your magic wand with the following settings and click inside the center of the smaller circle.
Go to Selections - Modify Expand by 2. Activate Layer 2 on the layer palette and hit delete on your keyboard.
Hide your background layer so you can check it has deleted.
Hide your X layer and merge visible the 2 parts of the circle. Rename O
Unhide your X layer and the background.
Duplicate your X layer and move it to the top of your layer palette.
Use your mover tool to move it to the left of the canvas. Rename X2.
Position it where you are happy with it. See my tag for an example.
Step 2:
Set your Foreground to the pattern fill you prepared earlier.
Select your Magic Wand. Change the feather to 1, leave all the other settings as we used earlier, and click inside the white part X2. Go to Selections - Modify Expand by 1.
Add a new Raster Layer and fill with your pattern. Deselect.
Lower the opacity on the pattern layer to 58.
Hide all layers apart from the X2 and the pattern fill layer and merge visible. Rename X2.
Hide the X2 layer and unhide the O layer.
Repeat the steps above to fill this with your pattern.
Merge visible and rename O.
Hide the O layer and unhide the X layer.
Repeat the steps above to fill this with your pattern.
Merge visible and rename X.
Unhide all layers.
Add the following Drop Shadow to each of the shape layers
Vertical: 3
Horizontal: 3
Opacity: 56
Blur: 6
Colour: Black
Step 3:
Open the tube you wish to use and copy and paste it as a new layer on your canvas. Rename tube and resize if neccessary.
Add the same Drop Shadow.
Duplicate the tube layer and move the duplicate below your O layer.
Activate the top tube layer and use your selection tool to select any parts of her legs on top of the circle so that it looks like she is coming through the circle. Hit delete on your keyboard.
You don't have to be too acurate as the bottom tube layer will replace any parts you went over by.
Once you have done that and are happy with all your placements, hide the white background layer, merge visible and crop to size.
Step 4:
Activate your background layer and add a new raster layer. Fill with your pattern fill you used for the X and O fill. Lower the opacity to between 15 and 20.
Go to Image - Picture Frame and find your Edge Circles 01 Frame.
Make sure Frame Current Layer and Frame Inside of Image are checked. Click ok.
Click on the top layer to activate it.
Activate your text tool and change your foreground and background to black. Settings and size will depend on what font you use. Make sure Vector is selected.
Type your name and go to Image Rotate with the following settings.

Add the same Drop Shadow we used earlier.
Resize as desired making sure bicubic is selected and then dd your artists copyright and your watermark.
Save.
Tags Made With This Tut


No comments:
Post a Comment