This tutorial was written by Monti on November 12th 2007. It's concept is copyrighted to Monti. Any creation you make from my ideas are yours. You may print out this tutorial for your own personal use, but please do not copy it in any way to put online, pass out or rewrite without my permission or worse yet attempt to claim as your own.
For this tutorial you will need
Paint Shop Pro
The Following Colour Chart
Save and then open in PSP
Of course you are free to use any colours you want.
Ok we are ready to start.
REMEMBER TO SAVE OFTEN
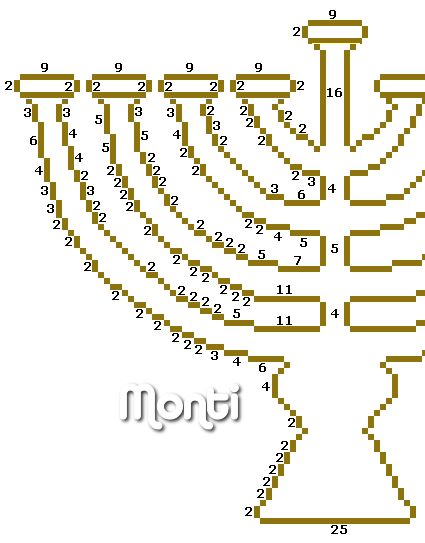
We will be be making the Hanukiah shown above. The outline below has been resized a lot so you can see it clearly.
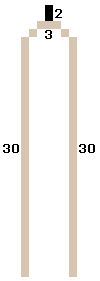
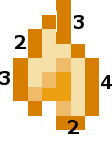
The outline is in 3 parts, the Hanukiah, the candles and the flame.
To make this easier I have numbered all pixels over 1.
The Hanukiah is symmetrical so I have just given the count for the left side. Once you have done that half, you can duplicate that layer and mirror it and use your mover tool to line it up.
Step 1: Hanukiah Outline
Open a new image 200 x 200 transparent.
Select the brush tool with the following settings.
Size: 1 - Hardness, Opacity and Density: 100
Zoom in to about 800% - 1000%
Set your foreground to colour 1 on the outline colour chart (#8E740E) and start drawing your outline.
I started at the top center of the hanukiah.
When you have completed the half shown in the outline, duplicate that layer, mirror it and use your mover tool to line it up. Make sure you have only 25 pixels at the bottom and 9 on the center candle holder.
Merge visible.
Step 2: Hanukiah Fill
When your outline is complete, select your magic wand with the following settings and click inside the hanukiah.
Flood fill this selection with colour 2 on your colour chart (#E5C659).
Keep selected.
Selections float, Effects 3D effects, Cutout with the following settings
Vertical: -1
Horizontal: 1
Opacity: 80
Blur: 5
Shadow colour: Use your hanukiah outline (#8E740E).
Make sure fill interior with colour is UNchecked.
Deselect.
________________________________
Select your magic wand and click inside one of the small candle holders.
Flood fill this selection with colour 2 on your colour chart (#E5C659).
Keep selected.
Selections float, Effects 3D effects, Cutout with the following settings
Vertical: -1
Horizontal: 1
Opacity: 80
Blur: 3
Shadow colour: Use your hanukiah outline (#8E740E).
Make sure fill interior with colour is UNchecked.
Deselect.
Repeat for the other 8 small candle holders.
Step 3: Candle Outline
Add a new raster layer.
Select your brush tool with the same settings we used earlier but change the foreground colour to colour 3 on the outline colour chart (#D7C5AF) and start drawing the outline shown below.
Duplicate the candle layer 8 times (for a total of 9 candles) and use your mover tool to move them into position.
Merge all visible.
Step 4: Candle Fills
Select your magic wand and click inside one of the candles.
Flood fill this selection with colour 4 on your colour chart (#FAF5EF).
Keep selected.
Selections float, Effects 3D effects, Cutout with the following settings
Vertical: 0
Horizontal: 2
Opacity: 75
Blur: 3
Shadow colour: Use your candle outline.(#D7C5AF)
Make sure fill interior with colour is UNchecked.
Deselect.
Repeat for the other 8 candles.
Step 5: Flames
You will need the following colour chart.
Save and then open in PSP
Of course you are free to use any colours you want.
Add a new raster layer.
Using the guide below draw in a flame on the new layer.
The outline is done in colour 1 on the colour chart (#D18400).
The center of the flame is done in colour 2 on the colour chart (#EC9F11).
The colour next to the center of the flame is colour 3 on the colour chart (#EFBB68).
Finally the outer is colour 4 on the colour chart (#F5E0A9).
Duplicate your flame layer 8 times for a total of 9 flames and use your mover tool to move them into position.
I mirrored some of mine so the flames weren't all going the same way.
Merge all visible and save as a png.


No comments:
Post a Comment