This tutorial was written by Monti on November 11th 2007. It's concept is copyrighted to Monti. Any creation you make from my ideas are yours. You may print out this tutorial for your own personal use, but please do not copy it in any way to put online, pass out or rewrite without my permission or worse yet attempt to claim as your own.
For this tutorial you will need
Paint Shop Pro
The Following Colour Chart
Save and then open in PSP
Of course you are free to use any colours you want.
Ok we are ready to start.
REMEMBER TO SAVE OFTEN
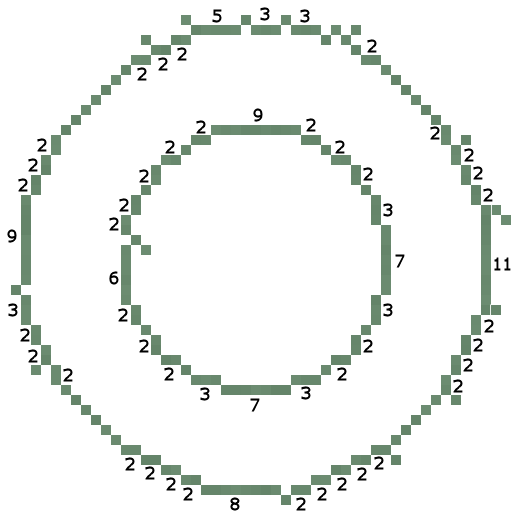
We will be be making the Wreath shown above. The outline below have been resized a lot so you can see it clearly.
To make this easier I have numbered all pixels over 1.
We are doing the outline in 4 parts starting with the base below.
Step 1:
Open a new image 150 x 150 transparent.
Select the brush tool with the following settings.
Size: 1 - Hardness, Opacity and Density: 100
Zoom in to about 800% - 1000%
Set your foreground to colour 1 on the colour chart (#69896E) and start to draw the wreath outline. I find it easier to start at the top.
Step 2:
When your outline is complete, select your magic wand with the following settings and click inside the wreath.
Stay on colour 1 (#69896E) on your colour chart and flood fill this selection.
Keep selected.
Add noise - uniform and monochrome checked - 3%
Deselect.
Step 3:
Add a new raster layer and select your brush tool again.
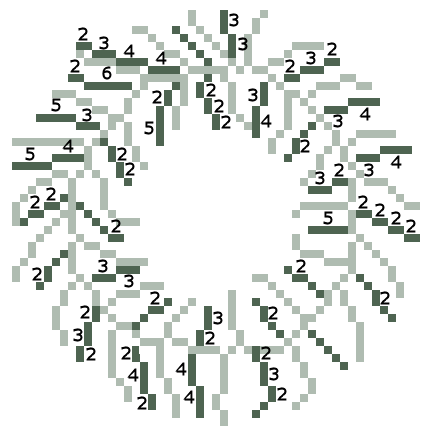
Set your foreground to colour 2 on the colour chart (#5F7963) and start to draw the outline shown below.
Position it in the center of the wreath.
Step 4:
Add a new raster layer and stay on your brush tool.
Set your foreground to colour 3 on the colour chart (#4E6451) and start to draw the outline shown below.
NOTE: The faded un-numbered areas are the outline from Step 3.
Step 5:
Add a new raster layer and stay on your brush tool.
Set your foreground to colour 4 on the colour chart (#6F3334) and start to draw the outline shown below.
Change your foreground to colour 5 on the colour chart (#A74F51) and fill in 3 of the 4 middle pixels.
Change your foreground to colour 5 on the colour chart (#BA6769) and fill in the 4th pixel.
Duplicate the berries to create as many as you want and then mirror and flip some and arrange as desired.
I added a pixel bow to mine too.
Merge all visible and save as a png.


No comments:
Post a Comment