


This tutorial was written by Monti on 26th October, 2014. It's concept is copyrighted to Monti. Any creation you make from my ideas are yours.
You may print out this tutorial for your own personal use, but please do not copy it in any way to put online, pass out or rewrite without my permission or worse yet attempt to claim as your own.
This was written for psp 9 but will work in other versions.
For this tutorial you will need:
Paint Shop Pro
Eye Candy 5 - Gradient Glow - Optional
Tube of your Choice
I am using a CDO Exclusive tube by Alicia Mujica.
You can find the tube HERE and more of Alicia's work at Alicia Mujica Design
Scrap Kit of your Choice
I am using Alicia Mujica Exclusive 4B Inspired by kit by LadyHawkDesigns.
This is available at CDO
Font of your Choice
I used Whisper Medium
Mask of your Choice
I used Mask 17 by Moonbeams and SpiderWebs - Available HERE
Place in your Mask folder.
They have loads of beautiful Masks so you may want to check them all out while you are there.
Ok we are ready to start.
REMEMBER TO SAVE OFTEN
Step 1:
Open a new transparent image 500 x 500 pixels.
Fill with a colour from your tube.
Go to Layers- Load/Save Mask - Load Mask from Disk.
Apply Mask 17 by Moonbeams and SpiderWebs or the mask you want to use. Right click on the mask layer in the layer palette and Merge Group.
Duplicate this layer and go to Image - Mirror.
Step 2:
Copy and paste Frame 3 as a new layer on your Canvas.
Go to Image - Resize and resize by 70% making sure ALL Layers is UNchecked.
Go to Adjust - Sharpen.
Click inside the frame with your magic wand and go to Selections - Modify- Expand by 6.
Copy and paste a black paper of your choice as a new layer on your canvas and go to Layers- Arrange - Move Down. I used Paper 4.
It will now be under your frame layer.
Go to Selections - Invert and press Delete on your keyboard.
Step 3:
Copy and paste your tube (the tube I am using came with a close up so I am using that) as a new layer.
It should still be under your frame layer.
Move it into position so the parts of the tube you want showing are in the selections
Press delete on your keyboard and go to Selections - Select None
Duplicate your tube layer and change the blend mode on the duplicate to Screen.
In the layer palette lower the opacity of the duplicate tube layer to 48.
Step 4:
Click on your top Frame layer to activate it.
Open Element 17 and Copy and Paste as a new layer onto your canvas.
Go to Image - Resize by 60% making sure ALL Layers is UNChecked and move to the right of the frame.
Add the following Drop Shadow.
Vertical: 2
Horizontal: 2
Opacity: 50
Blur: 5
Colour: Black
_________________________________________________
Open Element 24.
Copy and Paste this as a new layer on your canvas.
Resize by 60% making sure ALL Layers is UNChecked and move to the bottom right of the frame.
Rotate it slightly to the left.
Duplicate this layer and Mirror it.
Add the same Drop Shadow we used earlier to both Feather layers.
_________________________________________________
Open Element 22.
Copy and paste this as a new layer on your canvas.
Go to Image - Mirror.
Resize by 40% making sure ALL Layers is UNChecked and go to Adjust - Sharpen.
Add the Same Drop Shadow.
_________________________________________________
Open Element 13.
Copy and paste this as a new layer on your canvas.
Resize by 40% making sure ALL Layers is UNChecked move it to the lower right of the frame.
Go to Adjust -Sharpen and add the same Drop Shadow.
_________________________________________________
Open Element 23.
Copy and paste this as a new layer on your canvas. Go to Image - Mirror.
Resize by 40% making sure ALL Layers is UNChecked and move to the bottom left of the frame.
Go to Adjust - Sharpen and add the same Drop Shadow.
_________________________________________________
Open element 19.
Copy and paste this as a new layer on your canvas.
Resize by 30% making sure ALL Layers is UNChecked.
Go to Adjust - Sharpen and move to the bottom left. See my tag as a guide.
Duplicate this layer and go to Image - Mirror.
Add the same Drop Shadow to both layers.
_________________________________________________
Open Element 26.
Copy and paste this as a new layer on your canvas.
Resize by 35% making sure ALL Layers is UNChecked.
Move to the bottom right of the tag and duplicate this layer.
On the Duplicate layer go to Image - Mirror.
Sharpen both Layers and add the same Drop Shadow to both.
_________________________________________________
Open Element 1.
Press Shift + D to make a duplicate. Close the original.
On the duplicate go to Adjust - Hue and Saturation and set both to 0.
Then go to Adjust - Brightness/Contrast and set the Brightness to -70 and the contrast to 0.
Copy and paste as a new layer onto your canvas.
Move to the bottom and slightly to the left - see my tag as a guide.
Go to Duplicate - Image - Mirror.
sharpen both flowers and add the same Drop Shadow to both.
Step 5:
Crop to size using Merged Opaque.
If you want to resize your tag do so now. I resized mine by 80%.
Add the artists copyright as a new layer.
Add your name using a font of your choice. I used Wendy medium with my Foreground set to black and my Background set to a colour from the tube.
Type your name using Vector and go to Objects - Align - Horizontal in Canvas.
Convert to Raster layer.
Add an Inner Bevel of your choice.
I used
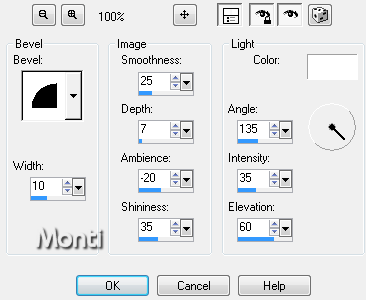
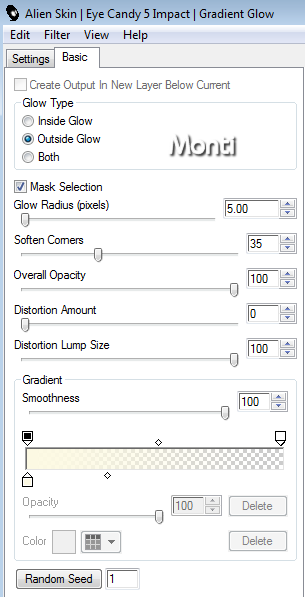
I also added a light Gradient glow using eye Candy 5. My settings are below.
Add the same drop shadow we have used throughout and save your finished tag.
No comments:
Post a Comment