

This tutorial was written by Monti on November 15th 2006 and reworked on 12th October 2014. It's concept is copyrighted to Monti. Any creation you make from my ideas are yours. You may print out this tutorial for your own personal use, but please do not copy it in any way to put online, pass out or rewrite without my permission or worse yet attempt to claim as your own.
This tut was named by my youngest son Jordan.
This was written for psp 9 but will work in other versions.
For this tutorial you will need:
Paint Shop Pro
Animation Shop
Eye Candy 5 Impact
Perspective Shadow - Can be done without and Glass
Eye Candy 5 Nature
SnowDrift - Optional.
Mura Meisters Clouds
Available at www.oocities.org/murakuma/mmplugins.html
DSB Flux
Bright Noise available at http://grafnet.com.pl/Filters/DSB-Flux
VanDerLee Snowflakes
Download at www.vanderlee.com/plugins_snowflakes.html and run the exe file and install in your psp plugins folder.
My Supplies
Includes my pattern incase you don't have Eye Candy 5 Nature. Picture Frame by Mz Kels - Thanks for letting me use it MzKels and the Tree tube by Rainbow Coffi.
Download Here
Open the trees and pattern fill if you are using it in PSP. Place the Frame into your Picture Frame folder in your "My PSP Files" folder.
Fonts of your choice
A Tube of your choice
I am using the art of Ismael Rac used with a license from Xeracx.
You can purchase a license to use his work from http://store.xeracx.net
Ok we are ready to start.
REMEMBER TO SAVE OFTEN
Step 1:
Open a new 450 x 450 transparent image.
Copy and paste your White Forest tube as a new layer on your canvas. Move it to just above the center. Go to Image Resize 90% - All Layers UNChecked.
Duplicate, this layer and go to Image - Mirror and move it down a bit on the canvas. Arrange so it looks similar to that shown below.
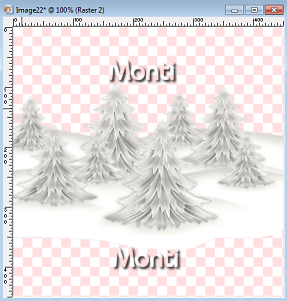
Click on the top layer in the layer palette and choose Merge Down.
Click on the background layer to activate it.
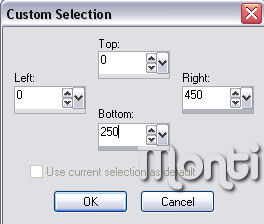
Activate your Selection Tool and choose Custom Selection. Use the settings shown below.

Flood fill with white and apply Eye Candy 5 - Nature SnowDrift with the following settings or choose settings of your own. If you don't have Eye Candy 5 you can flood fill with my Ice Pattern.


Deselect.
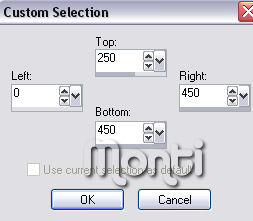
Still on the background layer choose Custom Selection again and use settings shown below.
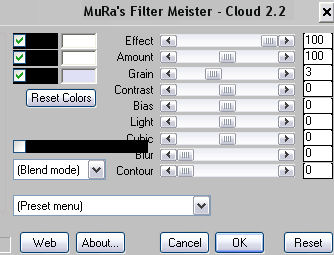
Set your foreground to white and your background to #DFE0F5. Apply Mura Meisters Cloud with the following settings.
Deselect.
Step 2:
Copy and paste your tube as a new layer on your canvas and move this layer to the top. Resize to fit. I resized mine by 70% - All Layers UNchecked.
Apply the following Drop Shadow to the tube.
Vertical: 0
Horizontal: -5
Opacity: 36
Blur: 4
Colour: Black
Go to Eye Candy 5 Impact Perspective Shadow (If you don't have this plugin you can leave this part out.)
Under Settings click on Reflect in Front - Short.
On the preview move the top of the box up so it meets the bottom of your tube. Click ok.
Activate your tree layer and duplicate twice for a total of 3 layers.
On the bottom tree layer apply DSB Flux Bright Noise- Intensity 12 and click on Mix once.
Activate your middle tree layer and apply DSB Flux Bright Noise- Intensity 12 and click on Mix twice.
Activate your top tree layer and apply DSB Flux Bright Noise- Intensity 12 and click on Mix three times.
Apply the following Drop Shadow to each of the Tree layers.
Vertical: 0
Horizontal: -3
Opacity: 36
Blur: 4
Colour: Black
I am now going to give you two ways of finishing this tag.
Option One is the tag shown at the top of the tutorial and Option Two along with another sample of Option 1 can be seen at the bottom of the tutorial.
You can choose which you would prefer to do.
Option One:
Click on the top layer of your canvas to activate it and add 3 new raster layers. Rename Snow 1, Snow 2 and Snow 3.
Click on Snow 1 and Apply VanDerLee Snowflakes with the following settings.

Repeat for the Snow 2 layer but move your Random Seed slide to the middle.
Repeat for the Snow 3 layer but move the Random Seed all the way to the right.
Add a new Raster layer and go to Image - Picture Frame and apply Kels Frame 01 with the following settings.

If you want to resize it do so now.
Add the artists copyright.
Open Animation Shop.
Back in PSP hide the top 2 Tree layers and the top 2 Snow layers.
Go to Edit - Copy Merged and paste as a new Image in Animation Shop.
Back in PSP hide the bottom Tree and Snow layers and unhide the middle Tree and Snow layers.
Go to Edit - Copy Merged and back in Animation Shop go to Edit - Paste After Current Frame.
Back in PSP hide the middle Tree and Snow layers and unhide the top Tree and Snow layers.
Go to Edit - Copy Merged and back in Animation Shop go to Edit - Paste After Current Frame.
While still in animation shop go to Edit - Select All and then click on Propagate Paste.
Back in PSP choose a font for your saying at the bottom.
Set your Foreground to #BDC0C8 and your Background to #F0F3FB.
Select your text tool and make sure Vector is Checked. Size will depend on what font you use.
Type your saying. I used "Baby it's cold outside".
Go to Objects - Align Horizontal in Canvas and convert to Raster layer.
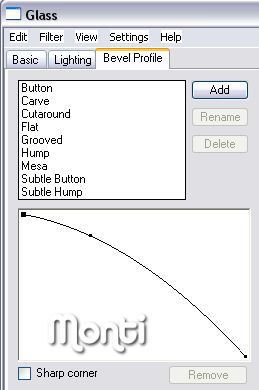
Apply Eye Candy 400 Glass with the following settings (glass colour is #F0F3FB).


Apply the following Drop Shadow.
Vertical: 0
Horizontal: -2
Opacity: 36
Blur: 2
Colour: Black
Change your font to a nice scripty one, I used International Palms, and add your name to the top.
Apply the same Drop Shadow.
Hide all layers apart from your text layers and go to Edit - Copy merged.
Paste as a new image in animation shop.
Still in animation shop go to Edit - Copy and Paste into selected frames.
Change your Frame Properties to between 15 and 20. Resize if neccessary and save a a gif.
Option Two:
In PSP - Crop Canvas - Merged Opaque then resize by 80% - All Layers Checked.
Go to Image - Canvas Size and change it to 404 x 404 pixels.
Activate your top layer and add a new ratster layer. Fill with black.
Go to Selections - Select All - Selections - Modify Contract by 22.
Press Delete on your keyboard.
Go to Selections - Select All.
Add a new Raster layer and flood fill with white.
Go to Selections - Select All - Selections - Modify Contract by 21.
Press Delete on your keyboard.
Go to Selections - Select All.
Add a new raster layers and flood fill with black.
Go to Selections - Select All - Selections - Modify Contract by 1.
Press Delete on your keyboard.
In the Layer Palette click on the white border layer to activate it and go Selections - Select All - Float - Defloat.
Set your Foreground to White and your background to #F0F3FB. Change your Foreground to Gradient - Foreground/Background - Angle 45 - Repeats 2 and flood fill the selection
Deselect.
Click on the tube layer to activate it and add 3 new layers named Snow 1, Snow 2 and Snow 3.
On Snow 1 go to Effects - VanDerLee Snowflakes with the settings shown below.
Repeat for the Snow 2 layer but move your Random Seed slide to the middle.
Repeat for the Snow 3 layer but move the Random Seed all the way to the right.
In the layer palette hide Snow 2 and Snow 3 layers.
Go to Edit - Copy Merged. Paste as a new animation in animation shop.
Back in PSP hide Snow 1 and unhide Snow 2 layer. Go to Edit - Copy Merged. Right click on the frame in Animation Shop and choose paste after current frame.
Back in PSP hide Snow 2 and unhide Snow 3 layer. Go to Edit - Copy Merged. Right click on the second frame in Animation Shop and choose paste after current frame.
Go to Edit - Select All and then click on Propagate Paste.
Back in PSP add the artists copyright and your watermark on a new layer.
Change your font to a plain one and your Foreground to null - Background to a dark colour from your tube. Vector checked - size depends on the font used.
Type your saying in the top frame area. I typed "It will be Lonely this Christmas without you to hold".
Use your nodes to stretch it to fit across the top without going past the original image size.
Go to Objects - Align Horizontal in Canvas, convert to raster layer.
Duplicate and move it to the bottom of the frame.
Duplicate again and go to Image Rotate to the left 90% - Rotate single layer. Position to the left in the frame.
Duplicate again and go to Image Flip - Image Mirror.
Change your font to a nice scripty one, I used International Palms, and add your name to the top of the canvas. Add an Inner Bevel of your choice.
Apply the following Drop Shadow.
Vertical: 0
Horizontal: -2
Opacity: 36
Blur: 2
Colour: Black
Hide all layers apart from the artists copyright, the frame text and your name text. Go to Edit - Copy Merged.
Paste as a new image in animation shop.
Still in animation shop go to Edit - Copy and paste into selected frames.
Change your Frame Properties to between 15 and 20. Resize if neccessary and save a a gif.


No comments:
Post a Comment