This tutorial was written by Monti on February 4th 2007. It's concept is copyrighted to Monti. Any creation you make from my ideas are yours. You may print out this tutorial for your own personal use, but please do not copy it in any way to put online, pass out or rewrite without my permission or worse yet attempt to claim as your own.
For this tutorial you will need
Paint Shop Pro
The Following Colour Chart
Save and then open in PSP
Of course you are free to use any colours you want.
Ok we are ready to start.
REMEMBER TO SAVE OFTEN
Step 1:
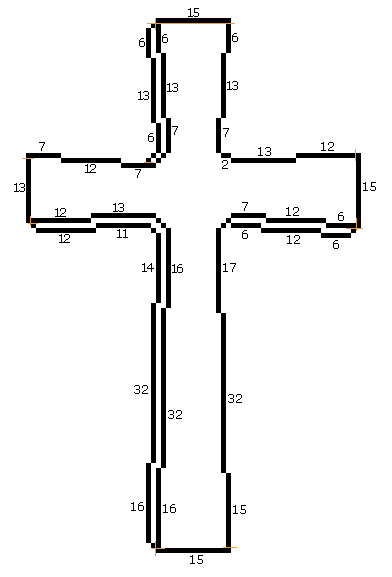
This is the outline we will be making. Mine has been resized a lot so you can see it clearly.
To make this easier I have numbered all pixels over 1.
Open a new image 150 x 150 transparent.
Select the brush tool with the following settings.
Size: 1 - Hardness, Opacity and Density: 100
Zoom in to about 800% - 1000%
Set your foreground to colour 1 on the colour chart (Black) and start at whichever point you prefer. I find it easier to start at the top. (You can move the image later using your move tool if you need to).
Step 2:
When your outline is complete, select your magic wand and click inside the main part of the cross.
Select colour 2 (#7D766E) on your colour chart and flood fill that selection.
Keep selected.
Selections float, Effects 3D effects, Cutout with the following settings
Vertical: 2
Horizontal: 2
Opacity: 45
Blur: 11
Shadow colour: Use your cross outline.(Black)
Make sure fill interior with colour is UNchecked.
Deselect.
Change your foreground to Colour 3 (#524D48) on the colour chart and select your paintbrush at size 1. Fill in the cross edging.
You could choose to select and flood fill this area but I found it easier to use the paintbrush, however the choice is yours.
Your cross will now look like the one shown below.
Save this as a psp file for now while we work on the Lilies.
Step 3:
NOTE: We will be adding the yellow stamen at the end.
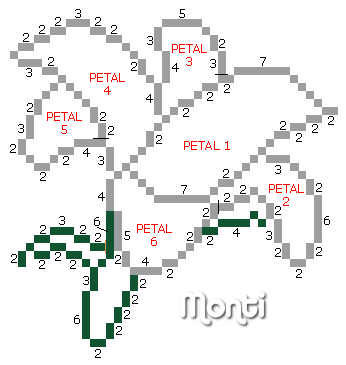
This is the outline we will be making. Mine has been resized a lot so you can see it clearly.
To make this easier I have numbered all pixels over 1.
Open a new image 100 x 100 transparent.
Select the brush tool with the following settings.
Size: 1 - Hardness, Opacity and Density: 100
Zoom in to about 800% - 1000%
Set your foreground to colour 4 (#9D9EA0) on the colour chart and start at whichever point you prefer. I find it easier to start at the top. (You can move the image later using your move tool if you need to).
When you get to the stem and leaf coloured green on the chart change your foreground to colour 6 (#0F5331) on the colour chart.
NOTE: I have numbered the petals in red so when we do the fills you will know which petal we are working on.
Step 4: Petal 1
When your outline is complete, select your magic wand and click inside petal 1.
Select colour 5 (White) on your colour chart and flood fill that selection.
Keep selected.
Selections float, Effects 3D effects, Cutout with the following settings
Vertical: 2
Horizontal: 2
Opacity: 45
Blur: 3
Shadow colour: Use your petal outline.(#9D9EA0)
Make sure fill interior with colour is UNchecked.
Deselect.
Step 5: Petal 2
Select your magic wand and click inside petal 2.
Select colour 5 (White) on your colour chart and flood fill that selection.
Keep selected.
Selections float, Effects 3D effects, Cutout with the following settings
Vertical: 2
Horizontal: 2
Opacity: 45
Blur: 3
Shadow colour: Use your petal outline.(#9D9EA0)
Make sure fill interior with colour is UNchecked.
Deselect.
Step 6: Petal 3
Select your magic wand and click inside petal 3.
Select colour 5 (White) on your colour chart and flood fill that selection.
Keep selected.
Selections float, Effects 3D effects, Cutout with the following settings
Vertical: -2
Horizontal: 1
Opacity: 45
Blur: 3
Shadow colour: Use your petal outline.(#9D9EA0)
Make sure fill interior with colour is UNchecked.
Deselect.
Step 7: Petal 4
Select your magic wand and click inside petal 4.
Select colour 5 (White) on your colour chart and flood fill that selection.
Keep selected.
Selections float, Effects 3D effects, Cutout with the following settings
Vertical: 3
Horizontal: 0
Opacity: 45
Blur: 3
Shadow colour: Use your petal outline.(#9D9EA0)
Make sure fill interior with colour is UNchecked.
Deselect.
Step 8: Petal 5
Select your magic wand and click inside petal 5.
Select colour 5 (White) on your colour chart and flood fill that selection.
Keep selected.
Selections float, Effects 3D effects, Cutout with the following settings
Vertical: 3
Horizontal: -1
Opacity: 45
Blur: 4
Shadow colour: Use your petal outline.(#9D9EA0)
Make sure fill interior with colour is UNchecked.
Deselect.
Step 9: Petal 6
Select your magic wand and click inside petal 6.
Select colour 5 (White) on your colour chart and flood fill that selection.
Keep selected.
Selections float, Effects 3D effects, Cutout with the following settings
Vertical: 3
Horizontal: -1
Opacity: 45
Blur: 4
Shadow colour: Use your petal outline.(#9D9EA0)
Make sure fill interior with colour is UNchecked.
Deselect.
Step 10: Stem
Select your magic wand and click inside the stem to the left of petal 2 making sure to select the stray pixel as shown in the screen shot below.
Select colour 7 (#547023) on your colour chart and flood fill that selection.
Keep selected.
Selections float, Effects 3D effects, Cutout with the following settings
Vertical: -1
Horizontal: 0
Opacity: 45
Blur: 2
Shadow colour: Use your stem outline.(#0F5331)
Make sure fill interior with colour is UNchecked.
Deselect.
Select your magic wand and click inside the bottom stem under petal 6.
Select colour 7 (#547023) on your colour chart and flood fill that selection.
Keep selected.
Selections float, Effects 3D effects, Cutout with the following settings
Vertical: 2
Horizontal: 1
Opacity: 45
Blur: 4
Shadow colour: Use your stem outline.(#0F5331)
Make sure fill interior with colour is UNchecked.
Deselect.
Select your magic wand and click inside the left leaf making sure to select the stray pixel as shown in the screen shot below.
Select colour 7 (#547023) on your colour chart and flood fill that selection.
Keep selected.
Selections float, Effects 3D effects, Cutout with the following settings
Vertical: 1
Horizontal: 0
Opacity: 45
Blur: 1
Shadow colour: Use your stem outline.(#0F5331)
Make sure fill interior with colour is UNchecked.
Deselect.
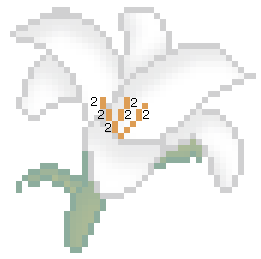
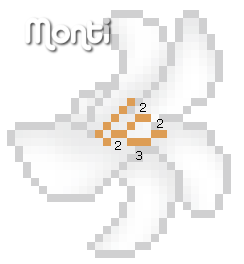
Add a new raster layer, change your foreground to colour 8 (#DD9D55) on your colour chart and using your paint brush on size one, draw in your stamen using the chart below.
NOTE: The lily in the screen shot has been reduced in opacity so you can see the stamen better. Please also note that the stamen do cross the petal outlines in places.
Your lily will now look like the one shown below.
Save this as a psp file for now while we work on the other Lily.
Step 11: Lily 2
NOTE: We will be adding the yellow stamen at the end.
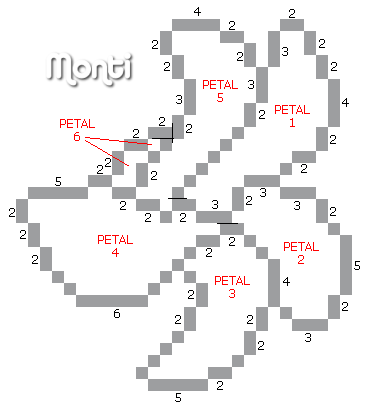
This is the outline we will be making. Mine has been resized a lot so you can see it clearly.
To make this easier I have numbered all pixels over 1.
Open a new image 100 x 100 transparent.
Select the brush tool with the following settings.
Size: 1 - Hardness, Opacity and Density: 100
Zoom in to about 800% - 1000%
Set your foreground to colour 4 (#9D9EA0) on the colour chart and start at whichever point you prefer. I find it easier to start at the top. (You can move the image later using your move tool if you need to).
NOTE: I have numbered the petals in red so when we do the fills you will know which petal we are working on.
Step 12: Petal 1
When your outline is complete, select your magic wand and click inside petal 1.
Select colour 5 (White) on your colour chart and flood fill that selection.
Keep selected.
Selections float, Effects 3D effects, Cutout with the following settings
Vertical: 2
Horizontal: 0
Opacity: 45
Blur: 3
Shadow colour: Use your petal outline.(#9D9EA0)
Make sure fill interior with colour is UNchecked.
Deselect.
Step 13: Petal 2
Select your magic wand and click inside petal 2.
Select colour 5 (White) on your colour chart and flood fill that selection.
Keep selected.
Selections float, Effects 3D effects, Cutout with the following settings
Vertical: 2
Horizontal: 1
Opacity: 45
Blur: 3
Shadow colour: Use your petal outline.(#9D9EA0)
Make sure fill interior with colour is UNchecked.
Deselect.
Step 14: Petal 3
Select your magic wand and click inside petal 3.
Select colour 5 (White) on your colour chart and flood fill that selection.
Keep selected.
Selections float, Effects 3D effects, Cutout with the following settings
Vertical: 2
Horizontal: -1
Opacity: 45
Blur: 3
Shadow colour: Use your petal outline.(#9D9EA0)
Make sure fill interior with colour is UNchecked.
Deselect.
Step 15: Petal 4
Select your magic wand and click inside petal 4.
Select colour 5 (White) on your colour chart and flood fill that selection.
Keep selected.
Selections float, Effects 3D effects, Cutout with the following settings
Vertical: 2
Horizontal: -3
Opacity: 45
Blur: 4
Shadow colour: Use your petal outline.(#9D9EA0)
Make sure fill interior with colour is UNchecked.
Deselect.
Step 16: Petal 5
Select your magic wand and click inside petal 5.
Select colour 5 (White) on your colour chart and flood fill that selection.
Keep selected.
Selections float, Effects 3D effects, Cutout with the following settings
Vertical: 2
Horizontal: 0
Opacity: 45
Blur: 3
Shadow colour: Use your petal outline.(#9D9EA0)
Make sure fill interior with colour is UNchecked.
Deselect.
Step 17: Petal 6
Select your magic wand and click inside petal 6, making sure to select the stray pixel as shown in the outline chart above.
Select colour 5 (White) on your colour chart and flood fill that selection.
Keep selected.
Selections float, Effects 3D effects, Cutout with the following settings
Vertical: -1
Horizontal: 0
Opacity: 45
Blur: 2
Shadow colour: Use your petal outline.(#9D9EA0)
Make sure fill interior with colour is UNchecked.
Deselect.
Add a new raster layer, change your foreground to colour 8 (#DD9D55) on your colour chart and using your paint brush on size one, draw in your stamen using the chart below.
NOTE:
The lily in the screen shot has been reduced in opacity so you can see the stamen better. Please also note that the stamen do cross the petal outlines in places.
Your lilly will now look like the one shown below.
Step 18: Putting Them Together
Open up the Cross and the Lily 1 that you made and saved earlier.
Copy and paste Lily 1 onto the cross and use your mover tool to position it, using my pixel at the top of this tut as a reference.
Copy and paste Lily 2 and position again using your mover tool and my pixel as a reference.
Merge all visible and save as a png.





No comments:
Post a Comment