This tutorial was written by Monti on October November 12th 2010. It's concept is copyrighted to Monti. Any creation you make from my ideas are yours. You may print out this tutorial for your own personal use, but please do not copy it in any way to put online, pass out or rewrite without my permission or worse yet attempt to claim as your own.
For this tutorial you will need
Paint Shop Pro
The Following Colour Charts
Save and then open in PSP.
Of course you are free to use whatever colours you want.
Girl Colour Chart
Face Colour Chart
Hair Colour Charts
Brunette
Blonde
Redhead
Black
Ok we are ready to start.
Get yourself a drink before we start.
REMEMBER TO SAVE OFTEN
Step 1:
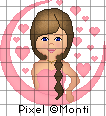
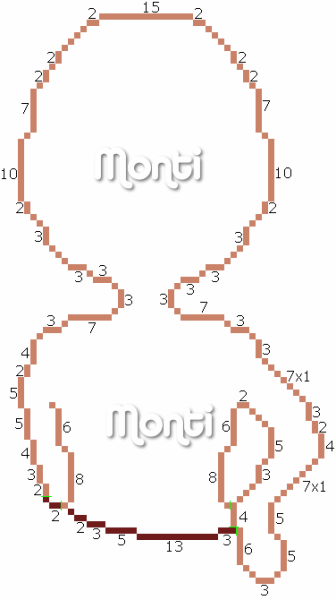
We will be be making the girl shown above. The outlines below have been resized a lot so you can see them clearly.
We are going to work in layers so that the shading works properly. It also makes it easier for you to change the colour of the dress, hearts or hair later if you wish.
We will be starting with the girl outline.
To make this easier I have numbered all pixels over 1.
Open a new image 200 x 200 transparent.
Select the brush tool with the following settings.
Size: 1 - Hardness, Opacity and Density: 100
Zoom in to about 800% - 1000%
Set your foreground to colour 1 on the Girl colour chart (#CA8269) - and start drawing the girls head onto your canvas.
You can use your mover tool to move it later if you need to.
When you reach the very bottom of the outline change to colour 3 (#6E1A1A) for the red bottom bits.
Step 2: Body Fills
Once your outline is complete select your magic wand with the following settings and click anywhere inside your outline.
Select colour 2 (#FBC99B) on your girl colour chart and flood fill this selection.
Keep selected.
Selections float, Effects 3D effects, Cutout with the following settings
Vertical: 0
Horizontal: 0
Opacity: 100
Blur: 14
Shadow colour: Use your skin outline (#CA8269).
Make sure fill interior with colour is UNchecked.
Deselect.
Step 3: Face
When the body is done add a new raster layer so we can add the face.
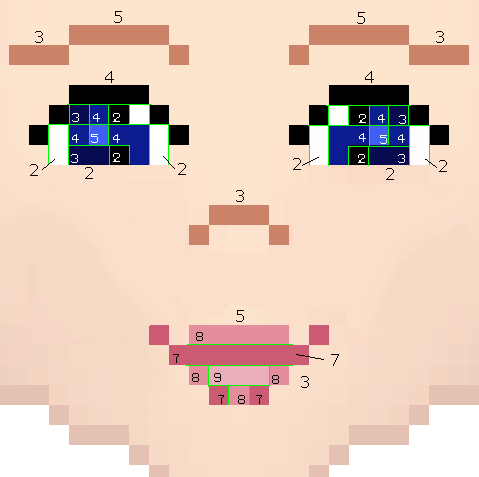
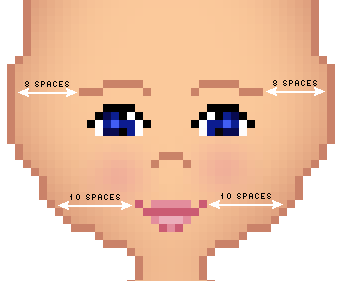
Use the guide below.
The large numbers are the pixel counts and as the lip and eye colours were hard to define, the small numbers on the guide are the colour chart numbers to make it easier for you.
For her eyebrows and nose use colour 1 (#CA8368) on your colour chart.
For the eyelashes use colour 2 (#000000) on your colour chart.
For the eye colour use 3 colours of your choice. I used colour 3 (#080A50), colour 4 (#0C1F90) and colour 5 (#415EF3) on your colour chart.
Add the white (#FFFFFF) pixels where shown on each eye.
For the lips use colour 7 (#CB5B73), colour 8 (#E38D9D) and colour 9 (#415EF3) on your colour chart.
Add a new raster layer.
Select your paint brush and colour 8 (#E38D9D) on your colour chart.
Change the paintbrush size to 4 - shape round.
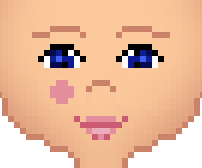
Click once on the face so you end up with the image shown below.
Go to Adjust - Blur - Gaussian Blur - 2.
Move this layer below the face layer. Duplicate and mirror.
Hide all layers except for the face and cheeks and merge those visible then use the guide below to move the face into position.
Hide the face layer while we work on the fills.
Step 4: Hair
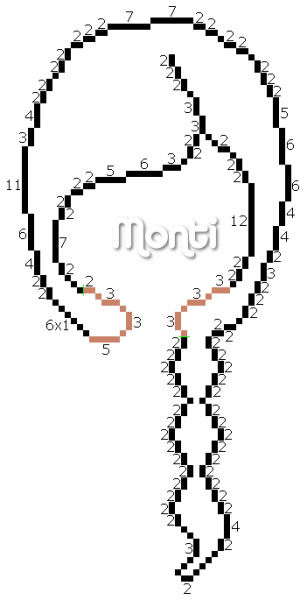
Add a new layer and using your chosen hair colour chart draw in the hair using the outline shown below. Make sure your paintbrush size is back on 1 pixel.
You will notice that parts of the outline are done in colour 1 (#CA8269) on the girl colour chart. This is where we will line it up with the body outline when finished.
Draw the outline using colour 1 - the darker of your hair colours.
Once your outline is complete select your magic wand with the same settings we used earlier and click inside the hair.
Select colour 2 on your hair colour chart and flood fill this selection.
Keep selected.
Selections float, Effects 3D effects, Cutout with the following settings
Vertical: 0
Horizontal: 0
Opacity: 100
Blur: 24
Shadow colour: Use your hair outline.
Make sure fill interior with colour is UNchecked.
DO NOT Deselect.
Adjust - Add/Remove Noise - Add noise - uniform and monochrome checked - 6%
Deselect.
Use your move tool to move it into position lining the skin colour up with the neck on the body.
Hide the hair layer for now.
Step 5: Dress
Add a new layer and move it beneath your hair layer. Rename Dress.
Change your foreground to colour 3 on your girl colour chart (#6E1A1A).
You will notice that there are 3 pixels by the right hand done in colour 1 (#CA8269) on the girl colour chart. This is where we will line it up with the body outline when finished.
Once your outline is complete select your magic wand with the same settings we used earlier and click inside the dress.
Select colour 4 on your colour chart (#AA2622) and flood fill this selection.
Keep selected.
Selections float, Effects 3D effects, Cutout with the following settings
Vertical: 0
Horizontal: 0
Opacity: 100
Blur: 16
Shadow colour: Use your dress outline (#6E1A1A).
Make sure fill interior with colour is UNchecked.
Deselect.
Step 6: Necklace
Keep your hair layer hidden for now.
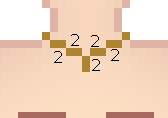
Change your foreground to colour 5 (#AE8432) on the girl colour chart and add a new raster layer making sure it is beneath the hair layer.
Draw in the necklace using the count below.
You can now unhide the hair layer and make sure it is at the top of the layer palette.
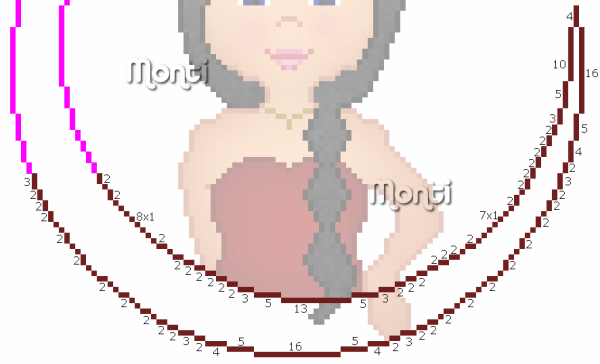
Step 7: Circle Arc
Add a new raster layer.
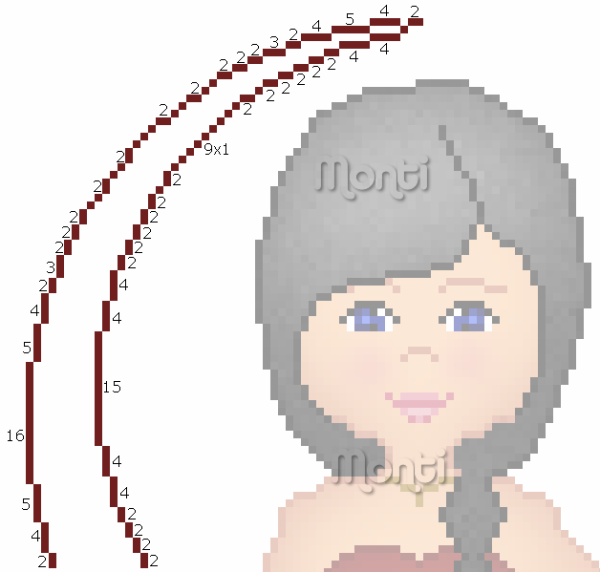
Change your foreground to colour 3 on your girl colour chart (#6E1A1A) and draw in the circle outline shown below.
This outline is in 2 parts.
The parts in pink on the 2nd outline are the parts you have already drawn from the 1st one.
Part 1
Part 2
Once the circle arc is complete use your move tool to move it into position so it lines up where shown in the bottom count.
Go to Layers - Arrange and move the circle arc layer to the bottom.
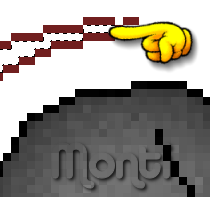
Once you have moved into position and moved the layer to the bottom select your magic wand with the same settings we used earlier and click inside the circle arc.
Make sure you also select the 2 stray pixels shown below.
Select colour 4 on your colour chart (#AA2622) and flood fill this selection.
Keep selected.
Selections float, Effects 3D effects, Cutout with the following settings
Vertical: 0
Horizontal: 0
Opacity: 100
Blur: 8
Shadow colour: Use your dress outline (#6E1A1A).
Make sure fill interior with colour is UNchecked.
Deselect.
Step 8: Heart 1
Add a new raster layer and rename Heart 1.
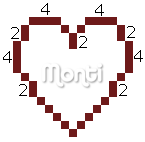
Change your foreground to colour 3 on your girl colour chart (#6E1A1A) and draw in the heart outline shown below.
Once your outline is complete select your magic wand with the same settings we used earlier and click inside the heart.
Select colour 4 on your colour chart (#AA2622) and flood fill this selection.
Keep selected.
Selections float, Effects 3D effects, Cutout with the following settings
Vertical: 0
Horizontal: 0
Opacity: 100
Blur: 8
Shadow colour: Use your heart outline (#6E1A1A).
Make sure fill interior with colour is UNchecked.
Deselect.
Step 9: Heart 2
Add a new raster layer and rename Heart 2.
Change your foreground to colour 3 on your girl colour chart (#6E1A1A) and draw in the heart outline shown below.
Once your outline is complete select your magic wand with the same settings we used earlier and click inside the heart.
Select colour 4 on your colour chart (#AA2622) and flood fill this selection.
Keep selected.
Selections float, Effects 3D effects, Cutout with the following settings
Vertical: 0
Horizontal: 0
Opacity: 100
Blur: 4
Shadow colour: Use your heart outline (#6E1A1A).
Make sure fill interior with colour is UNchecked.
Deselect.
Step 10: Heart 3
Add a new raster layer and rename Heart 3.
Change your foreground to colour 3 on your girl colour chart (#6E1A1A) and draw in the heart outline shown below.
Once your outline is complete select your magic wand with the same settings we used earlier and click inside the heart.
Select colour 4 on your colour chart (#AA2622) and flood fill this selection.
Keep selected.
Selections float, Effects 3D effects, Cutout with the following settings
Vertical: 0
Horizontal: 0
Opacity: 100
Blur: 2
Shadow colour: Use your heart outline (#6E1A1A).
Make sure fill interior with colour is UNchecked.
Deselect.
Step 11: Hearts
Duplicate each heart layer as many times as you want and position them within the circle arc around the girl.
See my tag as a guide.
Merge visible and save as a png.







No comments:
Post a Comment