


This tutorial was written by Monti on September 20th 2009. It's concept is copyrighted to Monti. Any creation you make from my ideas are yours. You may print out this tutorial for your own personal use, but please do not copy it in any way to put online, pass out or rewrite without my permission or worse yet attempt to claim as your own.
This tutorial is going to be quite long but I have broken it into parts and will provide pixel counts and if needed colour charts for each part as we get to it.
Get yourself a nice drink before you start.
For this tutorial you will need
Paint Shop Pro
The Following Colour Chart
Save and then open in PSP.
Of course you are free to use any colours you want.
Ok we are ready to start.
REMEMBER TO SAVE OFTEN
We will be be making the Drummer Rock Chick shown above. We will be doing each part of the drum kit seperately and then the girl at the back.
Step 1: - Main Drum
Open a new image 200 x 200 transparent.
Flood fill with white so you can see what you are working on. Delete this layer at the end.
Turn the grid on so you can see the single pixels by going to View - Grid - then View - Change Grid, Guide and Snap Properties. Under Current Image Settings change the Horizontal and Vertical grids to 1.
Add a new Raster Layer and name Outline.
Select the brush tool with the following settings.
Size: 1 - Hardness, Opacity and Density: 100
Zoom in to about 800% - 1000%
I will tell you when to change colours as we go.
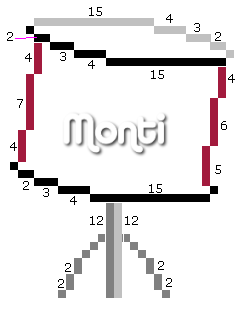
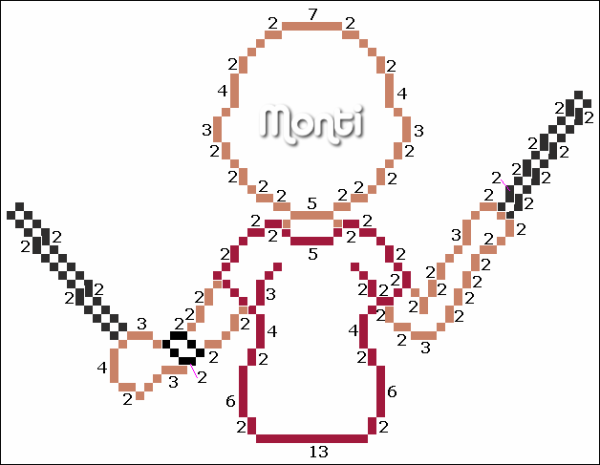
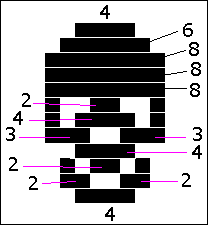
We will start with the main drum shown below. The outlines below have been resized a lot so you can see them clearly.
To make this easier I have numbered all pixels over 1.
The outer circle is colour 3 (#A21A3D) on your colour chart, the inner circle is colour 1 (#000000) on your colour chart and the drum feet are colour 5 (#808080) on your colour chart.

When all of your outline is complete, select your magic wand with the following settings and click inside the inner drum area.
Add a new raster layer called Fill and move this beneath your outline layer in the layer palette.
Select colour 2 (#313030) on your colour chart, click on the Fill layer to activate it and flood fill that selection.
Keep selected.
Selections float, Effects 3D effects, Cutout with the following settings
Vertical: 0
Horizontal: 0
Opacity: 100
Blur: 13
Shadow colour: Use your inner drum outline. Colour 1 (#000000).
Make sure fill interior with colour is UNchecked.
Deselect.
Select your magic wand and making sure you are on the outline layer click inside the outer drum area.
Select colour 4 (#EB3564) on your colour chart, click on the Fill layer to activate it and flood fill that selection.
Keep selected.
Selections float, Effects 3D effects, Cutout with the following settings
Vertical: 0
Horizontal: 0
Opacity: 100
Blur: 2
Shadow colour: Use your outer drum outline. Colour 3 (#A21A3D).
Make sure fill interior with colour is UNchecked.
Deselect.
Select your magic wand and making sure you are on the outline layer click inside the left drum foot.
Select colour 6 (#C0C0C0) on your colour chart, click on the Fill layer to activate it and flood fill that selection.
Keep selected.
Selections float, Effects 3D effects, Cutout with the following settings
Vertical: 0
Horizontal: 0
Opacity: 100
Blur: 2
Shadow colour: Use your outer drum foot outline. Colour 3 (#808080).
Make sure fill interior with colour is UNchecked.
Deselect.
Repeat this for the right drum foot.
Your drum should now look like this - mine is shown bigger than actual size.

Hide the white background layer and merge the drum layers visible. Rename Main Drum.
Hide the Main Drum layer and add a new raster layer called Outline.
Unhide the white background layer.
Step 2: - Right Drum Standing
We will now do the right standing drum shown below.
To make this easier I have numbered all pixels over 1.
The top and bottom of the drum are colour 1 (#000000) on your colour chart, the sides of the drum are colour 3 (#A21A3D), the main part of the stand is colour 5 (#808080) and the top of the drum and the lighter line on the right of the stand are colour 6 (#C0C0C0).

When all of your outline is complete, select your magic wand and click inside the large drum area -the side of the drum.
Add a new raster layer called Fill and move this beneath your outline layer in the layer palette.
Select colour 4 (#EB3564) on your colour chart, click on the Fill layer to activate it and flood fill that selection.
Keep selected.
Selections float, Effects 3D effects, Cutout with the following settings
Vertical: 0
H0rizontal: 3
Opacity: 100
Blur: 6
Shadow colour: Use colour 3 (#A21A3D) on your colour chart.
Make sure fill interior with colour is UNchecked.
Repeat this cutout but change the Horizontal to -3.
Deselect.
Select your magic wand and making sure you are on the outline layer click inside the small area at the top of the drum.
Select colour 9 (#E5E5E5) on your colour chart, click on the Fill layer to activate it and flood fill that selection.
Deselect.
Your drum should now look like this - mine is shown bigger than actual size.

Hide the white background layer and merge the drum layers visible. Rename Right Drum Standing.
Hide the Right Drum Standing layer and add a new raster layer called Outline.
Unhide the white background layer.
Step 3: - Left Drum Standing
We will now do the left standing drum shown below.
To make this easier I have numbered all pixels over 1.
The top and bottom of the drum are colour 1 (#000000) on your colour chart, the sides of the drum are colour 3 (#A21A3D), the main part of the stand is colour 5 (#808080) and the top of the drum and the lighter line on the right of the stand are colour 6 (#C0C0C0).
When all of your outline is complete, select your magic wand and click inside the large drum area -the side of the drum.
Add a new raster layer called Fill and move this beneath your outline layer in the layer palette.
Select colour 4 (#EB3564) on your colour chart, click on the Fill layer to activate it and flood fill that selection.
Keep selected.
Selections float, Effects 3D effects, Cutout with the following settings
Vertical: 0
H0rizontal: 3
Opacity: 100
Blur: 8
Shadow colour: Use colour 3 (#A21A3D) on your colour chart.
Make sure fill interior with colour is UNchecked.
Repeat this cutout but change the Horizontal to -3.
Deselect.
Select your magic wand and making sure you are on the outline layer click inside the small area at the top of the drum.
Select colour 7 (#FFFFFF) on your colour chart, click on the Fill layer to activate it and flood fill that selection.
Keep selected.
Selections float, Effects 3D effects, Cutout with the following settings
Vertical: 0
H0rizontal: 3
Opacity: 100
Blur: 3
Shadow colour: Use colour 6 (#C0C0C0) on your colour chart.
Make sure fill interior with colour is UNchecked.
Deselect.
Your drum should now look like this - mine is shown bigger than actual size.

Hide the white background layer and merge the drum layers visible. Rename Left Drum Standing.
Hide the Left Drum Standing layer and add a new raster layer called Outline.
Unhide the white background layer.
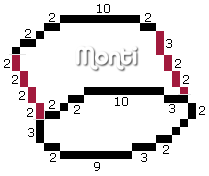
Step 4: - Right Upper Drum
We will now do the right upper drum shown below.
To make this easier I have numbered all pixels over 1.
The top and bottom of the drum are colour 1 (#000000) on your colour chart, the sides of the drum are colour 3 (#A21A3D) on your colour chart.
When all of your outline is complete, select your magic wand and click inside the bottom of the drum.
Add a new raster layer called Fill and move this beneath your outline layer in the layer palette.
Select colour 7 (#FFFFFF) on your colour chart, click on the Fill layer to activate it and flood fill that selection.
Keep selected.
Selections float, Effects 3D effects, Cutout with the following settings
Vertical: 0
H0rizontal: -3
Opacity: 30
Blur: 4
Shadow colour: Use colour 1 (#000000) on your colour chart.
Make sure fill interior with colour is UNchecked.
Deselect.
Select your magic wand and making sure you are on the outline layer click in the upper part of the drum - actually the side.
Select colour 4 (#EB3564) on your colour chart, click on the Fill layer to activate it and flood fill that selection.
Keep selected.
Selections float, Effects 3D effects, Cutout with the following settings
Vertical: 0
H0rizontal: 3
Opacity: 100
Blur: 4
Shadow colour: Use colour 3 (#A21A3D) on your colour chart.
Make sure fill interior with colour is UNchecked.
Repeat this cutout but change the Horizontal to -3.
Deselect.
Your drum should now look like this - mine is shown bigger than actual size.

Hide the white background layer and merge the drum layers visible. Rename Right Upper Drum.
Hide the Right Upper Drum layer and add a new raster layer called Outline.
Unhide the white background layer.
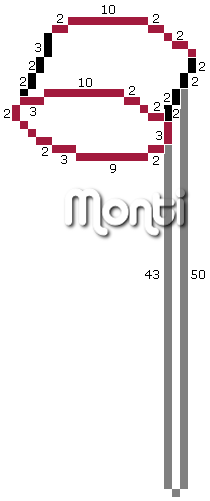
Step 5: - Left Upper Drum
We will now do the left upper drum shown below.
To make this easier I have numbered all pixels over 1.
The top and bottom of the drum are colour 3 (#A21A3D) on your colour chart, the sides of the drum are colour 1 (#000000) and the stand is colour 5 (#808080) on your colour chart.
When all of your outline is complete, select your magic wand and click inside the bottom of the drum.
Add a new raster layer called Fill and move this beneath your outline layer in the layer palette.
Select colour 7 (#FFFFFF) on your colour chart, click on the Fill layer to activate it and flood fill that selection.
Keep selected.
Selections float, Effects 3D effects, Cutout with the following settings
Vertical: 0
H0rizontal: 3
Opacity: 30
Blur: 4
Shadow colour: Use colour 1 (#000000) on your colour chart.
Make sure fill interior with colour is UNchecked.
Deselect.
Select your magic wand and making sure you are on the outline layer click in the upper part of the drum - actually the side.
Select colour 2 (#313030) on your colour chart, click on the Fill layer to activate it and flood fill that selection.
Keep selected.
Selections float, Effects 3D effects, Cutout with the following settings
Vertica: 0
H0rizontal: 3
Opacity: 100
Blur: 4
Shadow colour: Use colour 3 (#000000) on your colour chart.
Make sure fill interior with colour is UNchecked.
Repeat this cutout but change the Horizontal to -3.
Deselect.
Select your magic wand and making sure you are on the outline layer click in the stand.
Select colour 6 (#C0C0C0) on your colour chart, click on the Fill layer to activate it and flood fill that selection.
Deselect.
Your drum should now look like this - mine is shown bigger than actual size.
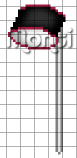
Hide the white background layer and merge the drum layers visible. Rename Left Upper Drum.
Unhide the Right Upper Drum layer and move that layer above the Left Upper Drum layer in the layer palette. Move it into position as shown below.
Merge visible and rename Double Drum.
Hide the Double Drum layer and add a new raster layer called Outline.
Unhide the white background layer.
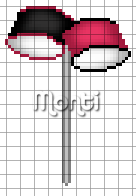
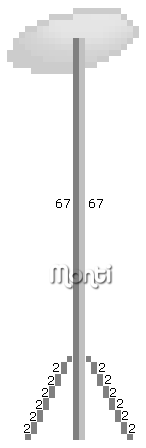
Step 6: - Right Cymbal
We will now do the right cymbal shown below.
To make this easier I have numbered all pixels over 1.
The main outline is colour 5 (#808080) on your colour chart and the lighter line on the right of the stand is colour 6 (#C0C0C0).
When all of your outline is complete, select your magic wand and click inside the top of the cymbal.
Add a new raster layer called Fill and move this beneath your outline layer in the layer palette.
Select colour 6 (#C0C0C0) on your colour chart, click on the Fill layer to activate it and flood fill that selection.
Keep selected.
Selections float, Effects 3D effects, Cutout with the following settings
Vertical: 0
H0rizontal: 4
Opacity: 80
Blur: 4
Shadow colour: Use colour 5 (#808080) on your colour chart.
Make sure fill interior with colour is UNchecked.
Deselect.
Change your foreground to colour 8 (#686868) on your colour chart and change your paintbrush to size 2.
Place your paintbrush once on the canvas as shown below to form the top of the cymbal.

Your cymbal should now look like this - mine is shown bigger than actual size.
Hide the white background layer and merge the cymbal layers visible. Rename Right Cymbal.
Hide the Right Cymbal layer and add a new raster layer called Outline.
Unhide the white background layer.
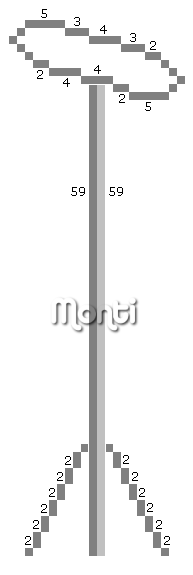
Step 7: - Left Cymbal
We will now do the left upper drum shown below.
To make this easier I have numbered all pixels over 1.
The outline is colour 5 (#808080) on your colour chart.
When your outline is complete, select your magic wand and click inside the top of the cymbal.
Add a new raster layer called Fill and move this beneath your outline layer in the layer palette.
Select colour 6 (#C0C0C0) on your colour chart, click on the Fill layer to activate it and flood fill that selection.
Keep selected.
Selections float, Effects 3D effects, Cutout with the following settings
Vertical: -4
H0rizontal: 4
Opacity: 80
Blur: 4
Shadow colour: Use colour 5 (#808080) on your colour chart.
Make sure fill interior with colour is UNchecked.
Deselect.
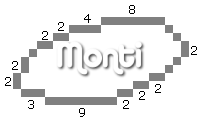
Add a new raster layer above your outline layer and set your paintbrush back to size 1.
Draw in the cymbal stand using the guide below.
I have lowered the opacity of the cymbal fill and outline layers so you can see the stand more clearly.
The main outline is colour 5 (#808080) on your colour chart and the lighter line on the right of the stand is colour 6 (#C0C0C0).
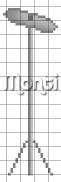
Your cymbal should now look like this - mine is shown bigger than actual size.

Hide the white background layer and merge the cymbal layers visible. Rename Left Cymbal.
Unhide the white background layer.
Step 8: - Layers
If you followed that correctly your layer palette should now be in this order.
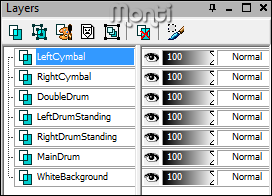
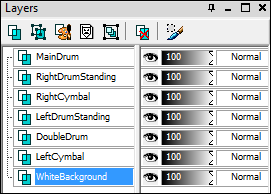
Before we unhide all the layers and merge it we need to arrange the layer palette.
Move the layers up or down in the layer palette until they are in the order shown below.
Keeping the white background layer hidden unhide your Main Drum layer.
Use your Move/Pick tool to move it into the center of the canvas.
Unhide all the other layers one at a time, moving each drum into position - use my tag as a guide - before unhiding the next layer.
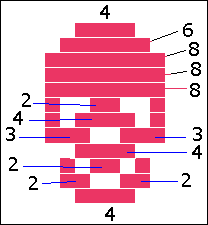
Step 9: - Skull
I thought my main drum looked a bit bare so I choose to add a skull to the front of it.
Add a new raster layer to your image and set your foreground to colour 4 (#EB3564) on your colour chart.
Using the guide below draw in the skull on the new layer.
Use your move/pick tool to move it into position on the main drum and add the following drop shadow.
Vertical: 0
Horizontal: 1
Opacity: 70
Blur: 1
Colour: Black
Your drum kit should now look like this. Mine is shown larger than actual size.

Before we start work on our girl drummer hide the white background layer and save as a psp file.
Go get a drink, something to eat and have a good stretch and a bathroom break.
Step 10: - Girl
We now need to do the girl behind the drums.
As the bottom will be hidden behind the drums we are only going to be doing the top half.
You will need the Following Colour Chart.
Save and then open in PSP.
Of course you are free to use any colours you want.

We will be be making the Rock Chick shown below and will be starting with the main outline.
The outline below have been resized a lot so you can see it clearly.
To make this easier I have numbered all pixels over 1.
Open a new image 200 x 200 transparent.
Flood fill with white so you can see what you are working on. Delete this layer at the end.
Turn the grid on so you can see the single pixels by going to View - Grid - then View - Change Grid, Guide and Snap Properties. Under Current Image Settings change the Horizontal and Vertical grids to 1.
Add a new Raster Layer and name Outline.
Select the brush tool with the following settings.
Size: 1- Hardness, Opacity and Density: 100
Zoom in to about 800% - 1000%
Change colours as you go as indicated on the outline chart.
The skin outline is colour 1 (#CA8368), the t-shirt outline is colour 5 (#A21A3D), the wrist band and drumsticks outline is colour 3 (#000000) on your colour chart.
I find it easier to start at the highest point, in this case with her head. (You can move the image later using your move tool if you need to).
Set your foreground to colour 1 (#CA8368) on the colour chart and start drawing the girl outline.
Step 10.1: - Fills
Head
When all of your outline is complete, select your magic wand with the following settings and click inside her head.
Add a new raster layer called Fill and move this beneath your outline layer in the layer palette.
Select colour 2 (#FAD3C5) on your colour chart, click on the Fill layer to activate it and flood fill that selection.
Keep selected.
Selections float, Effects 3D effects, Cutout with the following settings
Vertical: 0
Horizontal: 0
Opacity: 85
Blur: 7
Shadow colour: Use your skin outline. Colour 1 (#CA8368).
Make sure fill interior with colour is UNchecked.
Deselect.
Neck
Select your magic wand and making sure you are on the outline layer click inside the neck area.
Select colour 2 (#FAD3C5) on your colour chart, click on the Fill layer to activate it and flood fill that selection.
Keep selected.
Selections float, Effects 3D effects, Cutout with the following settings
Vertical: 0
Horizontal: 0
Opacity: 85
Blur: 2
Shadow colour: Use your skin outline. Colour 1 (#CA8368).
Make sure fill interior with colour is UNchecked.
Deselect.
Right Arm
Select your magic wand and making sure you are on the outline layer click inside the right arm.
Select colour 2 (#FAD3C5) on your colour chart, click on the Fill layer to activate it and flood fill that selection.
Keep selected.
Selections float, Effects 3D effects, Cutout with the following settings
Vertical: 0
Horizontal: 0
Opacity: 85
Blur: 2
Shadow colour: Use your skin outline. Colour 1 (#CA8368).
Make sure fill interior with colour is UNchecked.
Deselect.
Left Arm
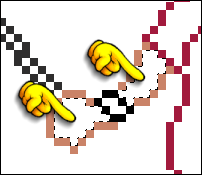
Select your magic wand and making sure you are on the outline layer click inside both sections of the left arm as shown below.
Select colour 2 (#FAD3C5) on your colour chart, click on the Fill layer to activate it and flood fill that selection.
Keep selected.
Selections float, Effects 3D effects, Cutout with the following settings
Vertical: 0
Horizontal: 0
Opacity: 85
Blur: 2
Shadow colour: Use your skin outline. Colour 1 (#CA8368).
Make sure fill interior with colour is UNchecked.
Deselect.
Wrist Band
Select your magic wand and making sure you are on the outline layer click inside the wristband.
Select colour 4 (#313030) on your colour chart, click on the Fill layer to activate it and flood fill that selection.
Keep selected.
Selections float, Effects 3D effects, Cutout with the following settings
Vertical: 0
Horizontal: 0
Opacity: 100
Blur: 1
Shadow colour: Use your Wristband outline. Colour 3 (#000000).
Make sure fill interior with colour is UNchecked.
Deselect.
Drum Sticks
Set your foreground to colour 4 (#313030) on your colour chart.
Activate your Fill layer and paint in the blank areas showing in the drum sticks.
T-Shirt
Select your magic wand and making sure you are on the outline layer click inside the T-Shirt.
Select colour 6 (#EB3564) on your colour chart, click on the Fill layer to activate it and flood fill that selection.
Keep selected.
Selections float, Effects 3D effects, Cutout with the following settings
Vertical: 0
Horizontal: 0
Opacity: 100
Blur: 6
Shadow colour: Use your T-Shirt outline. Colour 5 (#A21A3D).
Make sure fill interior with colour is UNchecked.
Go to Adjust - Add/Remove Noise - Add Noise - Gaussian: Checked - Noise Amount: 4 - Monochrome: Checked.
Deselect.
Face
You will need the following colour chart. Save and then open in PSP.

Add a new raster layer and make sure it is the top layer.
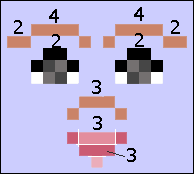
Using the colour chart above draw in the face on this new layer. Feel free to change the colour of the eyes, I just used black as they went with the look of the girl.
The eyebrows and nose are colour 1 (#CA8368), the 2 pixels above the eye and the pixels above the white pixels are colour 2 (#000000), the main lip colour is colour 5 (#CB5B73), the upper lip is colour 6 (#E38D9D) and the single pixel at the bottom of the mouth is colour 7 (#EBADBA).
Activate the Outline layer.
Select your magic wand and click inside the head.
Add a new raster layer.
Set your foreground to #E4909E and select your Paint Brush - Shape: Round - Size: 4.
Click once on each side of the face, using my guide below for positioning.

Go to Adjust - Blur - Gaussian Blur - 2.
Deselect.
Save your pixel and go and get a drink before we work on the hair.
Hair
This part is probably the most complicated part of the tutorial but if you take it slowly you will be ok.
In fact because I know some of you may have problems keeping the count on this section I am going to make the count images so you can click on them, then right click and save just as you do with the colour charts. That way you can zoom in on them and even open them in psp and use your paint brush to mark the ones you have drawn.
You will need the following colour chart. Save and then open in PSP.
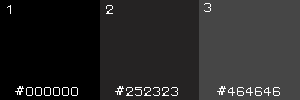
We will be doing the hair in 3 parts starting with the count shown below.
Open a new 150 x 150 transparent image.
Add a new raster layer and select colour 1 (#000000) on the colour chart and start to draw the outline shown below.

When you have completed that outline we will carry on with the outline below.
NOTE: The faded areas are the parts you have already drawn from the first outline.
Add a new raster layer and select colour 2 (#252323) on the colour chart and start to draw the outline shown below.
This is the part where it might be easier to open it in PSP.

When you have completed that outline we will carry on with the outline below.
NOTE: The faded areas are the parts you have already drawn from the first 2 outlines.
Add a new raster layer and select colour 3 (#464646) on the colour chart and start to draw the outline shown below.

That's the hard part finished.
Go to Edit - Copy Merged - and then on your pixel girl canvas, paste the hair as a new layer and move into position using the image below to make sure it is in the right place.

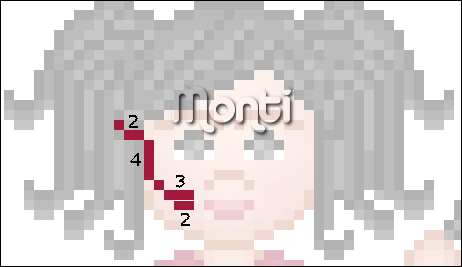
Hair Ribbons
Add a new raster layer and name it Ribbons.
Set your foreground to colour 5 (#A21A3D) on the main colour chart and draw out the areas shown in the darker pink below.

When you have done that change your foreground to colour 6 (#EB3564) on the main colour chart and draw in the areas inside the ribbon outline.
Move into position.
T-Shirt Decoration - Optional
Set your Foreground to Black and add a new raster layer called Skull to your girl canvas.
Select the brush tool with the following settings.
Size: 1 - Hardness, Opacity and Density: 100
Zoom in to about 800% - 1000%
Making sure you are on the new layer draw the skull using the outline below.
Move it into position on the girls chest.
Head Microphone - Optional
This idea came from Rob who has been kind enough to test all these tut's for me and I liked it so much I put it in.
Add a new layer on your girl canvas.
Set your foreground to a colour of choice. I used colour 1 (#A21A3D) on the colour chart so it showed up against her hair but if you used other colours for the hair then a dark grey would be good for this.
Using the same brush settings as above draw in the following lines.
I have lowered the opacity on the girl so you can see it better.
Hide your white background layer and go to Edit - Copy - Merged. Maximise your Drum image - with the white background layer closed off - and paste the drummer girl as a new layer onto the canvas.
Use your move/pick tool to move her into position - you can lower the opacity on the girl layer while you do this - and then when you are happy with the position go to Layers - Arrange - Send to Bottom.
Use my pixel at the top of the page as a guide.
Delete the White layer.
Merge all visible and save as a psp file or a png.
No comments:
Post a Comment