


This tutorial was written by Monti on December 8th 2004 and reworked on 7th October 2014. It's concept is copyrighted to me. Any creation you make from my ideas are yours. You may print out this tutorial for your own personal use, but please do not copy it in any way to put online, pass out or rewrite without my permission or worse yet attempt to claim as your own.
This was written for psp 7 but will work in other versions.
For this tutorial you will need
Paint Shop Pro
DSB Flux
You can get it at the following link
http://grafnet.com.pl/Filters/DSB-Flux
If you don't have DSB Flux I have given instructions for a similar effect using PSP noise.
You can get it at the following link
http://grafnet.com.pl/Filters/DSB-Flux
If you don't have DSB Flux I have given instructions for a similar effect using PSP noise.
A tube of your choice
I am using the art of Anna Marine used with a license from CDO.
If you wish to use her work please visit www.cdoestore.com to purchase a license.
I am using the art of Anna Marine used with a license from CDO.
If you wish to use her work please visit www.cdoestore.com to purchase a license.
A font of your choice.
I used Saginaw
I used Saginaw
Accent Tubes.
Rainbow Coffi has a whole range of accent tubes for you to choose from. You can find her tubes at www.psp-playground.com
Rainbow Coffi has a whole range of accent tubes for you to choose from. You can find her tubes at www.psp-playground.com
Ok we are ready to start.
REMEMBER TO SAVE OFTEN
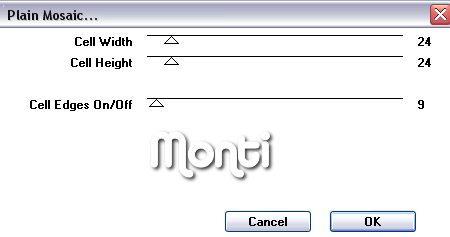
Step 1:Open a new image 500 x 500 white background.Copy and paste your tube as a new layer on the background, go to Toadies/ Plain Mosiac Blur and use the settings below
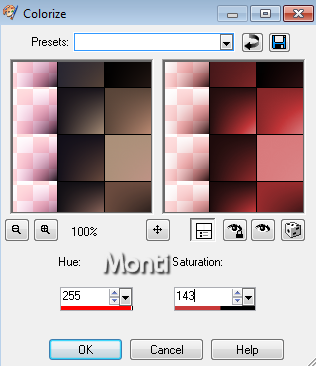
Then go to Adjust- Hue and Saturation - Colourize and use the settings shown below.
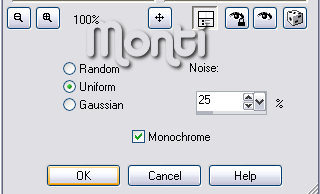
Apply DSB Flux Bright Noise at 25 as shown below OR use psp noise at 25 uniform.

Or
Step 2:
Go back to the tube and copy and paste as a new layer. Go to Image - Resize 75%. Position her where you want.
Go back to the tube and copy and paste as a new layer. Go to Image - Resize 75%. Position her where you want.
Add a drop shadow using the settings shown below.
Vertical: -4
Horizontal: -4
Opacity: 50
Blur: 5
Colour: Black
Vertical: -4
Horizontal: -4
Opacity: 50
Blur: 5
Colour: Black
Activate your black rose tube and copy and paste it as a new layer on your image, position it near her head where you think it looks best and apply the same drop shadow , then go to layers arrange, move down so it is beneath the girl layer.
Click on the girl layer so the top layer is active and then go back to your black rose tube and resize it by 60 %. Copy and paste as a new layer, position it where you think it looks best. Duplicate this layer and go to image mirror.
Position to your liking. Add the same drop shadow we used earlier to both these layers.
Step 3:
The next part lets you get creative. Choose your accent tubes and arrange them on your tag to your liking.
The next part lets you get creative. Choose your accent tubes and arrange them on your tag to your liking.
Step 4:
Activate your text tool and set your foreground to black and your background to a red from the Toadies background layer.
Activate your text tool and set your foreground to black and your background to a red from the Toadies background layer.
I used #9F0504. Use font Saginaw bold, Size 72, Vector and Antialias checked.
Apply your text and then convert to a raster layer.
DO NOT ADD YOUR DROP SHADOW YET.
Position your text where you want it.
On a new raster layer add your watermark and the artists credits.
Apply your text and then convert to a raster layer.
DO NOT ADD YOUR DROP SHADOW YET.
Position your text where you want it.
On a new raster layer add your watermark and the artists credits.
Step 5:
Click on your name (text layer) to activate it and in the layer palette duplicate this layer twice for a total of 3 name layers.
Click on your name (text layer) to activate it and in the layer palette duplicate this layer twice for a total of 3 name layers.
On your 3rd image go to effects DSB Flux Bright Noise size 25, click your mix button 3 times. (OR apply noise uniform at 30%). Apply the same drop shadow we used on the other layers.
On your 2nd image go to effects DSB Flux Bright Noise size 25, click your mix button 2 times. (OR apply noise uniform at 30%). Apply the same drop shadow we used on the other layers.
On your 1st image go to effects DSB Flux Bright Noise size 25, click your mix button 1 time. (OR apply noise uniform at 30%). Apply the same drop shadow we used on the other layers.
Step 6:
Hide your white background layer and crop to size.Unhide the white background and hide the top 2 text layers.Open Animation Shop.In PSP copy merged and paste as a new animation in Animation Shop.Back in PSP Hide the bottom text layer and unhide the middle text layer.Copy merged and go back to Animation Shop.Right click the image in there and choose paste after current frame.Back in PSP Hide the middle text layer and unhide the top text layer.Copy merged and go back to Animation Shop.Right click the image in there and choose paste after current frame.Save your image as a .gif file.
Hide your white background layer and crop to size.Unhide the white background and hide the top 2 text layers.Open Animation Shop.In PSP copy merged and paste as a new animation in Animation Shop.Back in PSP Hide the bottom text layer and unhide the middle text layer.Copy merged and go back to Animation Shop.Right click the image in there and choose paste after current frame.Back in PSP Hide the middle text layer and unhide the top text layer.Copy merged and go back to Animation Shop.Right click the image in there and choose paste after current frame.Save your image as a .gif file.
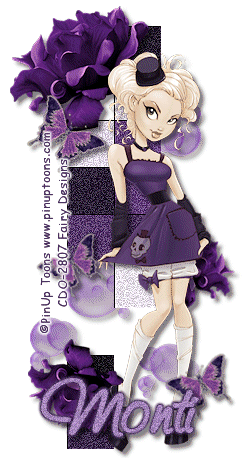
Congratulations, you now have your finished Tag.
Tag Made With This Tut
No comments:
Post a Comment