


This tutorial was written by Monti on January 2nd, 2004 and reworked on October 6th 2014. It's concept is copyrighted to Monti. Any creation you make from my ideas are yours.
You may print out this tutorial for your own personal use, but please do not copy it in any way to put online, pass out or rewrite without my permission or worse yet attempt to claim as your own.
This was written for psp 7 but will work in other versions.
For this tutorial you will need:
Paint Shop Pro
SuperBlade Pro
You will need the m-coconut ice preset which you can find at the link below.
Xenofex 1.0
If you don't have Xenofex you can still do this tutorial, just use your eraser brush to create a distressed look on your rectangle.
Tube of your choice
I am using the artwork of Ismael Rac and you can find his tubes at the link below.
I am using the artwork of Ismael Rac and you can find his tubes at the link below.
Font of your choice
I used Horny Devils.
Ok we are ready to start.
REMEMBER TO SAVE OFTEN
Step 1:
Open a new image 500 x 500.
Set your foreground to a darker colour from your tube and your background colour to a lighter shade of the same colour.
Click on your Preset Shapes icon and set it to Rectangle - Line Width 3 making sure Antialias and Vector are checked.Draw a rectangle starting at 80,80 drawing out to 415,175 then convert to raster layer.

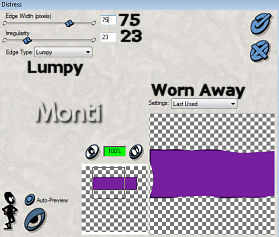
Now apply Xenofex - Distress using the settings shown below. If you don't have Xenofex use your eraser tool to erase some of the edges to create a distressed look.
Step 2:
On your layer palette right click Layer 2 (your rectangle layer) and duplicate.
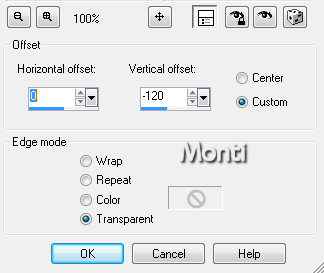
Making sure you are on the duplicate layer go to Effects - Image Effects - Offset using the settings below.
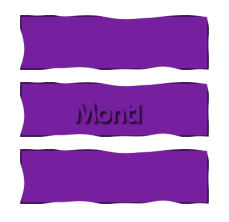
Duplicate the duplicate layer and repeat the offset. It should look similar to this.
When you have them where you want them X out layer 1 and Merge all Visible. Unhide layer 1 again.
Rename your merged layer Boxes.
Add a Drop Shadow of your choice. I used
Vertical: 0
Horizontal: 0
Opacity: 30
Blur: 10
Colour: Black
Step 3:
Choose your Preset Shapes again and select your star shape Vector and Antialias checked - Line width 3 and draw a star to the size shown.

Convert to raster layer and rename Star.
Duplicate this layer and resize it by 80% making sure All Layers is Unchecked and the resize type is set to Bicubic.
Move this layer up and to the left of the first star.
Repeat duplicate and resize and keep moving them until you have 8 stars arranged like mine. (Yours will only be on one side at this point).
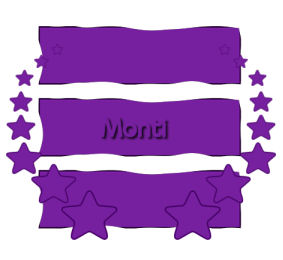
Hide Layer 1 and your Boxes layer and Merge all Visible, rename Stars and unhide the other layers.
Duplicate your Star layer and go to Image/Mirror. It should now look like the image above.
In the layer palette right click on the copy of stars layer and choose Merge down.
Add a Drop Shadow of your choice. I used
Vertical: 2
Horizontal: 2
Opacity: 60
Blur: 3
Colour: Black
Step 4:
Copy and paste your main tube as a new layer on your background.
Open your accent tubes in psp and colourize them to contrast with your background. If you don't have any accent tubes you can make some shapes using preset shapes or ding fonts.
Copy and paste them as a new layer onto the image. Position them similar to mine depending on what you used (you may need to hide your tube layer to see it before moving it).
Duplicate and mirror. Your image should now look similar to this depending on what accent tubes you used.

Add Drop Shadows of your choice. For the accents I used
Vertical: 2
Horizontal: 2
Opacity: 60
Blur: 3
Colour: Black
For the main tube I used
Vertical: 2
Horizontal: 4
Opacity: 50
Blur: 5
Colour: Black
Step 5:
Choose your font ( I used Horny Devil BV).
Set your foreground to the darker colour of your stars and the background to a gradient of your choice with the following settings:
Style: Linear - Angle: 0 - Repeats: 3
Activate your text tool, Size 72, Bold, Vector and Antialias checked. Click ok.
Move your text down and stretch it out to fit, then convert to raster layer.
Go to Selections, select all float and apply the Super Blade Pro m-coconut ice preset. Deselect.
Apply the following drop shadow using the same colour you used before.
Vertical: 2
Horizontal: 2
Opacity: 60
Blur: 3
Colour: Black
Activate the Crop tool and click on Merged Opaque. This will remove the excess area from your tag.
Save your tag.
No comments:
Post a Comment