


This tutorial was written by Monti in 2004 and reworked in October 2014. It's concept is copyrighted to me. Any creation you make from my ideas are yours. You may print out this tutorial for your own personal use, but please do not copy it in any way to put online, pass out or rewrite without my permission or worse yet attempt to claim as your own.
This was written for psp 9 but will work in other versions.
For this tutorial you will need:
Paint Shop Pro
Flaming Pear SuperBlade Pro.
A Super Blade Pro Preset of your choice. I used mm-coconut ice available from Meadows Studios.
http://www.meadowsstudio.com/justglass.htm
A Super Blade Pro Preset of your choice. I used mm-coconut ice available from Meadows Studios.
http://www.meadowsstudio.com/justglass.htm
MuRa’s Meister Cloud
http://www.oocities.org/murakuma/mmplugins.html
http://www.oocities.org/murakuma/mmplugins.html
Font of your choice.
I used Starstruck
I used Starstruck
Tube of your Choice.
I am using the wonderful art of Celineart used with a license .
If you wish to use her work please visit http://celinartpinup.com to purchase a license.
I am using the wonderful art of Celineart used with a license .
If you wish to use her work please visit http://celinartpinup.com to purchase a license.
Mask of your choice
I used MB and SW Mask 21 which you can get at Moonbeams and Spider webs
http://moonbeamsandspiderwebs.blogspot.co.uk
They have some beautiful masks so look through them all.
I used MB and SW Mask 21 which you can get at Moonbeams and Spider webs
http://moonbeamsandspiderwebs.blogspot.co.uk
They have some beautiful masks so look through them all.
Ok we are ready to start.
REMEMBER TO SAVE OFTEN
Step 1:
Open my 5 frame psp tube and the tube that you wish to use for your Tag in psp.Press Shift D to make duplicates and close the originals.Minimize your picture tube for now, as we will be working on the frame tube first.Look on your layer palette and you will see that you have 5 frame layers. Start on Frame 1 and go to selections/select all/ float. Fill with a colour or pattern of choice and apply your SBP preset. Selections/ select none. Repeat this with the other 4 layers until your frame looks like this (obviously in colours of your choice).
Open my 5 frame psp tube and the tube that you wish to use for your Tag in psp.Press Shift D to make duplicates and close the originals.Minimize your picture tube for now, as we will be working on the frame tube first.Look on your layer palette and you will see that you have 5 frame layers. Start on Frame 1 and go to selections/select all/ float. Fill with a colour or pattern of choice and apply your SBP preset. Selections/ select none. Repeat this with the other 4 layers until your frame looks like this (obviously in colours of your choice).

Now go to Layers/Merge all visible.
Step 2:
Select your Magic Wand and click inside one of the 4 outer frames. Go to Selections - Modify - Expand by 2.Copy and paste your tube as a new layer and position it so the part you want showing in the frame is inside the selection.Once happy with the placement go to Selections - Invert and press Delete on your keyboard. Move this layer beneath your Frame layer.Repeat the steps above until all the four outside frames have been filled.

Select your Magic Wand and click inside one of the 4 outer frames. Go to Selections - Modify - Expand by 2.Copy and paste your tube as a new layer and position it so the part you want showing in the frame is inside the selection.Once happy with the placement go to Selections - Invert and press Delete on your keyboard. Move this layer beneath your Frame layer.Repeat the steps above until all the four outside frames have been filled.

Step 3:
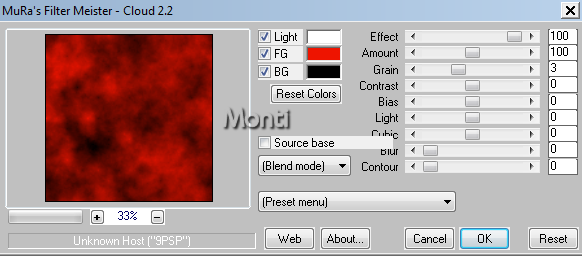
Add a new raster layer and go to Layers - Arrange - Send to bottom.On the layer palette click on your merged frame layer to activate it and then select your magic wand. Hold down your shift key and click once inside all 4 outer frames. Go to Selections/modify expand by 2.Then click on your blank layer that you just added to activate it.Go to Effects/Mura's Meister Cloud and use the settings shown below, using colours from your tube. (If you do not have this plugin use a gradient that blends with your tube).
Deselect.
Go back to your merged frame layer and use your magic wand to click inside the four small frame areas where the frames overlap, holding down your shift key as you do.
Add a new Raster layer then go to Selections/modify expand by 2.
Apply Mura's Meister Cloud Plugin again, this time changing the amount to 167.
(If using the gradient apply the same one but then go to colours/adjust brightness and set it to -15).
Go to Selections/select none and then move this layer down to the bottom of your layer palette.
Step 4:
Add a new raster layer and move it to the bottom of your layer palette.
Apply Mura Meisters cloud with the same colours we used earlier but change the amount to 70.
Apply a mask of your choice by going to Layers - Load/Save Mask - Load Mask from Disk. Apply the mask and choose merge group.
Add a new raster layer and move it to the bottom of your layer palette.
Apply Mura Meisters cloud with the same colours we used earlier but change the amount to 70.
Apply a mask of your choice by going to Layers - Load/Save Mask - Load Mask from Disk. Apply the mask and choose merge group.
Step 5:
Click on the merged frame layer to activate it.Copy and paste your tube as a new layer. Resize if necessaryMy tube has a very straight bottom edge which looks too hard for the tag. To solve this I use the selection tool set to rectangle, feather 25 and just draw a rectangle across the very bottom of the tube.Click delete on the keyboard twice.Click on your merged frame layer and add a drop shadowVertical = 2Horizontal = 2Opacity = 50Blur = 5Colour = Black
Click on the merged frame layer to activate it.Copy and paste your tube as a new layer. Resize if necessaryMy tube has a very straight bottom edge which looks too hard for the tag. To solve this I use the selection tool set to rectangle, feather 25 and just draw a rectangle across the very bottom of the tube.Click delete on the keyboard twice.Click on your merged frame layer and add a drop shadowVertical = 2Horizontal = 2Opacity = 50Blur = 5Colour = Black
Activate your main tube and add the following drop shadow
Vertical = 2
Horizontal = 2
Opacity = 83
Blur = 10
Colour = Black
Vertical = 2
Horizontal = 2
Opacity = 83
Blur = 10
Colour = Black
Crop your canvas using the crop tool and merged opaque.
Now you have a choice depending on what tube you use and what you think looks best.
Choice 1: You can either leave it as the top layer.(See the tag at the top of the tut).
Choice 2: Move this layer down to just below your Merged frame layer.
Choice 3: Move it down further so that it is also underneath the four outer frame tube layers too.
Choice 4: Move it all the way down so it is also underneath the four inner frame layers too.
Do what looks best for the tube you are using. See the bottom of the tut for examples.
Add your watermark and the artists credits.
Step 6:
Activate the top layer and select your text tool. Set your stroke and fill to white, font StarStruck, Size 60, Vector and Antialias Checked.Use your mover tool to move it where you want it then convert to Raster Layer.Go to Selections - Select All - Float and apply the same SBP preset that you applied for the frames.If you are using the coconut ice preset then select your Foreground and Background colours for the text to match the tube.Deselect and then apply drop shadowVertical = 2Horizontal = 2Opacity = 83Blur = 10Colour = Black
Activate the top layer and select your text tool. Set your stroke and fill to white, font StarStruck, Size 60, Vector and Antialias Checked.Use your mover tool to move it where you want it then convert to Raster Layer.Go to Selections - Select All - Float and apply the same SBP preset that you applied for the frames.If you are using the coconut ice preset then select your Foreground and Background colours for the text to match the tube.Deselect and then apply drop shadowVertical = 2Horizontal = 2Opacity = 83Blur = 10Colour = Black
Choice 2:

Choice 3:

Choice 4:

No comments:
Post a Comment