

This tutorial was written by Monti on February 6th 2008. It's concept is copyrighted to me. Any creation you make from my ideas are yours. You may print out this tutorial for your own personal use, but please do not copy it in any way to put online, pass out or rewrite without my permission or worse yet attempt to claim as your own.
This was written for psp 9 but will work in other versions.
For this tutorial you will need
Paint Shop Pro
My Valentines Hearts Scrap Kit
You can download this on my Scrap kits page.
Masks
I am using Becky's Mask 22 (formerly Secrets of the Imagination) Download HERE.
and Chelle's Mask 29 by Wee Scots Lass. Unzip and put in your Masks folder.
Download *HERE*.
A Font of your Choice
I used Feena Casual
Ok we are ready to start.
REMEMBER TO SAVE OFTEN
Step 1:
Open a new transparent image 500x500 pixels.
Copy and paste Monti-ValentineHeartsPaper2.jpg as a new layer on the canvas.
Go to Image - Resize by 80% - Bicubic selected - All layers UNchecked.
Repeat Resize.
Go to Layers - Load Mask from Disk and apply Beckys 022 with the following settings.
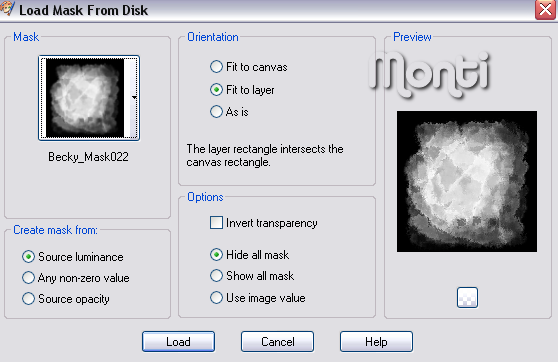
In the layer palette right click on the mask layer and Merge Group.
Lower the opacity of this layer to about 56%.
Copy and paste Monti-ValentineHeartsPaper3.jpg as a new layer.
Go to Image - Resize by 80% - Bicubic selected - All layers UNchecked.
Repeat Resize.
Go to Layers - Load Mask from Disk and apply WSL - Mask29 with the same settings we used earlier.
In the layer palette right click on the mask layer and Merge Group.
Resize by 115% - Bicubic selected - All layers UNchecked.
Duplicate this layer.
Step 2:
Copy and paste Monti-ValentineHearts-FeltHeart-Multi.png as a new layer and resize by 70% - Bicubic selected - All layers UNchecked.
Go to Image - Rotate - Left - 12 degrees making sure All layers is UNchecked.
Move it up and to the left slightly.
Duplicate this layer and mirror. Move the duplicate down slightly. See my tag as a guide.
Add the following Drop Shadow to each of these heart layers.
Vertical: 4
Horizontal: 4
Opacity: 60
Blur: 5
Colour: Black
Step 3:
Copy and paste Monti-ValentineHearts-HugsKisses-WordArt.png as a new layer and resize by 80%- Bicubic selected - All layers UNchecked.
Move it up slightly and add the following Drop Shadow.
Vertical: 1
Horizontal: 1
Opacity: 60
Blur: 1
Colour: Black
Copy and paste Monti-ValentineHearts-DiamondHeart-2.png as a new layer and resize by 80%- Bicubic selected - All layers UNchecked.
Repeat Resize.
Go to Adjust - Sharpen then add the same Drop Shadow we used on our word art.
Copy and paste one of the felt hearts as a new layer. I used Monti-ValentineHearts-FeltHeart-HugsKisses.png.
Resize by 80%- Bicubic selected - All layers UNchecked.
Move into postition and add the following Drop Shadow.
Vertical: 3
Horizontal: 3
Opacity: 60
Blur: 6
Colour: Black
Step 4:
Select your text tool.
Set your font to Feena Casual - Size 72 - Foreground and Background set to white.
Add your name and position it under your felt heart.
Go to Objects - Align - Horizontal in Canvas then convert to raster layer.
Add the following Drop Shadow.
Vertical: 2
Horizontal: 2
Opacity: 80
Blur: 3
Colour: Black
Add my copyright Scrap Kit ©Monti www.montispixelplayground.com
Remember: If you are adding an artist's tube to the finished design then add their copyright and not mine.
Crop to size and save your tag.
No comments:
Post a Comment