This tutorial was written by Monti on February 20th, 2008. It's concept is copyrighted to Monti. Any creation you make from my ideas are yours. You may print out this tutorial for your own personal use, but please do not copy it in any way to put online, pass out or rewrite without my permission or worse yet attempt to claim as your own.
For this tutorial you will need
Paint Shop Pro
The Following Colour Charts
Save and then open in PSP
Of course you are free to use any colours you want.
Baseball Bear Colour Chart
Baseball Kit Colour Chart
Ok we are ready to start.
REMEMBER TO SAVE OFTEN
Step 1:
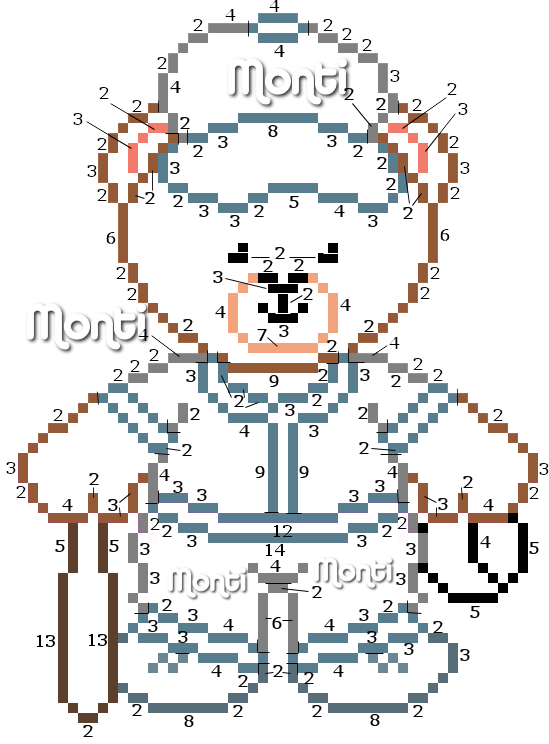
This is the outline we will be making. Mine has been resized a lot so you can see it clearly.
To make this easier I have numbered all pixels over 1.
Open a new image 150 x 150 transparent.
Select the brush tool with the following settings.
Size: 1 - Hardness, Opacity and Density: 100
Zoom in to about 800%
Set your foreground to colour C on Colour Chart 2 (#587D8E) or a colour of your choice and start with the highest point, the button on the top of the cap.
(You can move the image later using your move tool if you need to.)
Continue doing the rest of the outline using the colours shown.
Note: The blues on the uniform are done in colour C on Colour Chart 2 (#587D8E) and the shoes are done in colour E on Colour Chart 2 (#576E79). However you can change the colours to suit you.
Step 2:
When your outline is complete, select your magic wand with the following settings and click inside the bears head.
Select colour 2 (#D48B5E) on your Bear Colour Chart and flood fill that selection.
Keep selected.
Selections float, Effects 3D effects, Cutout with the following settings
Vertical: 0
Horizontal: 0
Opacity: 100
Blur: 10
Shadow colour: use your bear outline colour. (#945937)
Make sure fill interior with colour is UNchecked.
Deselect.
Step 3:
Select your magic wand and click inside the bears outer ears holding down the shift key to select all parts.
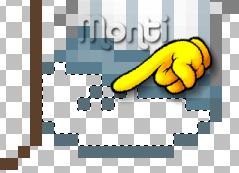
Make sure you select ALL the stray pixels shown below.
Fill with colour 2 (#D48B5E) on your Bear Colour Chart
Keep selected.
Selections float, Effects 3D effects, Cutout with the following settings
Vertical: 0
Horizontal: 0
Opacity: 100
Blur: 4
Shadow colour: use your bear outline colour. (#945937)
Make sure fill interior with colour is UNchecked.
Deselect.
Step 4:
Select your magic wand and click inside the bears left hand.
Fill with colour 2 (#D48B5E) on your Bear Colour Chart
Keep selected.
Selections float, Effects 3D effects, Cutout with the following settings
Vertical: 0
Horizontal: 0
Opacity: 100
Blur: 10
Shadow colour: use your bear outline colour. (#945937)
Make sure fill interior with colour is UNchecked.
Deselect.
REPEAT for the right hand.
Step 5:
Select your magic wand and click inside the bears neck area.
Fill with colour 2 (#D48B5E) on your Bear Colour Chart
Keep selected.
Selections float, Effects 3D effects, Cutout with the following settings
Vertical: 0
Horizontal: 0
Opacity: 100
Blur: 4
Shadow colour: use your bear outline colour. (#945937)
Make sure fill interior with colour is UNchecked.
Deselect.
Step 6:
Select your magic wand and click inside the bears left inner ear.
Fill with colour 4 (#F9C3BD) on your Bear Colour Chart
Keep selected.
Selections float, Effects 3D effects, Cutout with the following settings
Vertical: 0
Horizontal: 0
Opacity: 100
Blur: 3
Shadow colour: use your inner ear outline colour. (#F27B6B)
Make sure fill interior with colour is UNchecked.
Deselect.
REPEAT for the right inner ear.
Step 7:
Select your magic wand and click inside the bears muzzle.
Fill with colour 6 (#FAD0C0) on your Bear Colour Chart
Keep selected.
Selections float, Effects 3D effects, Cutout with the following settings
Vertical: 0
Horizontal: 0
Opacity: 100
Blur: 4
Shadow colour: use your muzzle outline colour. (#F3A47D)
Make sure fill interior with colour is UNchecked.
Deselect.
Change your foreground to White and select your paint brush.
Add a 1 pixel stroke between the black areas at the top of the nose.
Step 8:
Select your magic wand and click inside the top part of the hat.
Fill with colour B (#FFFFFF) on your Kit Colour Chart
Keep selected.
Selections float, Effects 3D effects, Cutout with the following settings
Vertical: 0
Horizontal: 0
Opacity: 60
Blur: 5
Shadow colour: use your hat outline colour. (#808080)
Make sure fill interior with colour is UNchecked.
Deselect.
REPEAT the above step for both sides of the shirt and for the trousers.
Step 9:
Select your magic wand and click inside the hat brim.
Fill with colour D (#A7BCC6) on your Kit Colour Chart
Keep selected.
Selections float, Effects 3D effects, Cutout with the following settings
Vertical: 0
Horizontal: 0
Opacity: 100
Blur: 6
Shadow colour: use your hat brim outline colour. (#587D8E)
Make sure fill interior with colour is UNchecked.
Deselect.
Step 10:
Select your magic wand and click inside the button at the very top of the cap.
Fill with colour D (#A7BCC6) on your Kit Colour Chart
Keep selected.
Selections float, Effects 3D effects, Cutout with the following settings
Vertical: 0
Horizontal: 0
Opacity: 100
Blur: 2
Shadow colour: use your hat brim outline colour. (#587D8E)
Make sure fill interior with colour is UNchecked.
Deselect.
Step 11:
Select your magic wand and click inside the left shirt collar.
Fill with colour D (#A7BCC6) on your Kit Colour Chart
Keep selected.
Selections float, Effects 3D effects, Cutout with the following settings
Vertical: 0
Horizontal: 0
Opacity: 100
Blur: 3
Shadow colour: use your shirt collar outline colour. (#587D8E)
Make sure fill interior with colour is UNchecked.
Deselect.
REPEAT the above step for the right shirt collar and all the other shirt and trouser trims.
Step 12:
Select your magic wand and click inside the left part of the ball.
Fill with colour B (#FFFFFF) on your Kit Colour Chart
Keep selected.
Selections float, Effects 3D effects, Cutout with the following settings
Vertical: 0
Horizontal: 0
Opacity: 60
Blur: 3
Shadow colour: use your ball outline colour. (#000000)
Make sure fill interior with colour is UNchecked.
Deselect.
REPEAT the above step for the right part of the ball.
Step 13:
Select your magic wand and click inside the left shoe making sure you select the stray pixel shown below.
Fill with colour F (#8BA2AD) on your Kit Colour Chart
Keep selected.
Selections float, Effects 3D effects, Cutout with the following settings
Vertical: 0
Horizontal: 0
Opacity: 100
Blur: 5
Shadow colour: use your shoe outline colour. (#576E79)
Make sure fill interior with colour is UNchecked.
Deselect.
REPEAT the above step for the right shoe making sure you select the stray pixel.
Step 14:
Select your magic wand and click inside the bat.
Fill with colour H (#8C6345) on your Kit Colour Chart
Keep selected.
Selections float, Effects 3D effects, Cutout with the following settings
Vertical: 0
Horizontal: 0
Opacity: 100
Blur: 6
Shadow colour: use your bat outline colour. (#5D402B)
Make sure fill interior with colour is UNchecked.
Deselect.
Step 15:
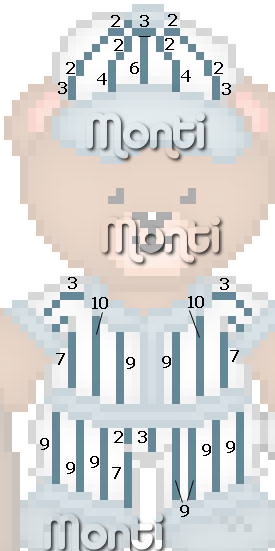
If you want you can add a new layer and add the stripes onto the uniform like I did using the guide below.
Once you have drawn them, lower the opacity of the stripes layer to about 56.
Merge all visible and save as a png.


No comments:
Post a Comment