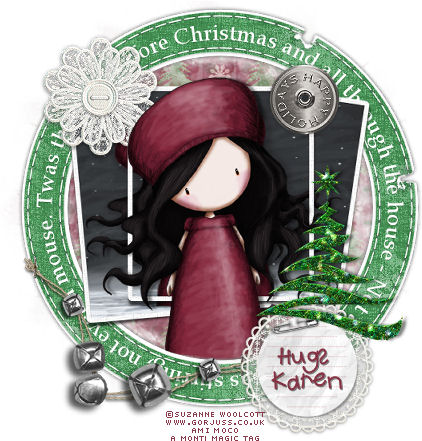
This tutorial was written by Monti on November 15th 2007. It's concept is copyrighted to Monti. Any creation you make from my ideas are yours. You may print out this tutorial for your own personal use, but please do not copy it in any way to put online, pass out or rewrite without my permission or worse yet attempt to claim as your own.
This was written for psp 9 but will work in other versions.
For this tutorial you will need
Paint Shop Pro
Scrapkit - Night Before Christmas
This is by Melissa at Scrappy Expressions.
You can download it HERE.
Masks
I used Mask 2 and Mask 26 by Chelle.
Please visit Wee Scots Lass and her masks are listed on the right hand side
Her masks are great so you might want to get them all while you're there.
A Font of your Choice
I used Scrap Kids which is a pay font so I can unable to supply it.
A Tube and Image of your Choice
I am using the wonderful art of Suzanne Woolcott.
Unfortunately Suzanne is no longer selling her work so please use an artist you have permission for.
Ok we are ready to start.
REMEMBER TO SAVE OFTEN
Step 1:
Open the Scrap kit pieces in PSP.
Open a new image 600 x 600 pixels.
Copy and paste the SE_NightBeforeChristmas_TripleFrame as a new layer on your canvas.
Go to Image - Resize 70% - Bicubic selected.
Select your Lasoo Tool - Point to Point - Add/Shift mode - Feather 0 and draw around the frames.
Add a new raster layer.
Copy your image and Paste Into Selection.
Move this layer below the frames.
Merge all visible.
Step 2:
Copy and paste SE_NightBeforeChristmas_Paper1 as a new layer onto the canvas. Go to Layers - Arrange - Send To Bottom.
Go to Layers - Load/Save Mask - Load Mask from Disk.
Apply WSL_Mask2 - Source Luminance checked - Fit to Layer checked and Hide All Mask checked.
Delete the mask, click yes in the pop up box and then Merge Group.
Go to Image - Resize 110% - Bicubic.
Copy and paste SE_NightBeforeChristmas_Paper5 as a new layer onto the canvas.
Go to Layers - Load Mask from Disk.
Apply WSL_Mask26 - Source Luminance checked - Fit to Layer checked and Hide All Mask checked.
Delete the mask, click yes in the pop up box and then Merge Group.
Go to Image - Resize 110% - Bicubic.
Add the following Drop Shadow
Vertical: 0
Horizontal: 0
Opacity: 40
Blur: 7
Colour: Black
Step 3:
Copy and paste the SE_NightBeforeChristmas_CircleFrame as a new layer and add the same Drop Shadow.
Copy and paste the SE_NightBeforeChristmas_LaceFlower1 as a new layer.
Resize by 80% - Bicubic. Repeat Resize.
Move to the top left of the image and add the same Drop Shadow.
Copy and paste your tube as a new layer. Resize if needed. I resized mine by 85%.
Move into position.
To make it look like it is behind the circle frame, activate the circle frame, go to sSelections - Select All - Float - Defloat and activate your tube layer. Erase the parts in the selections.
Deselect.
Add the following Drop Shadow to the tube.
Vertical: 0
Horizontal: 5
Opacity: 50
Blur: 5
Colour: Black
Add any other elements from the kit that you want and position as required.
Step 4:
Copy and paste the SE_NightBeforeChristmas_Journaling2 as a new layer.
Resize by 40% - Smart Size and position on the tag.
Add a slight Drop Shadow.
Select the font of your choice and add your message and/or name to the SE_NightBeforeChristmas_Journaling2 tag.
Add the artists copyright and save.


No comments:
Post a Comment