


This tutorial was written by Monti on December 5th 2007. It's concept is copyrighted to Monti. Any creation you make from my ideas are yours. You may print out this tutorial for your own personal use, but please do not copy it in any way to put online, pass out or rewrite without my permission or worse yet attempt to claim as your own.
This was written for psp 9 but will work in other versions.
For this tutorial you will need
Paint Shop Pro
My Supplies
Download Here.
This includes Notepaper and Doodle by Melissa of Scrappy Expressions.
My Render, Stitches, Ribbon and textured renders.
Open the supplies in PSP.
I am also enclosing the brush I used by Lyndie at My Addiction.
She has a wonderful selection of brushes so please check out her site.
Open PSP and go to File - Import - Custom Brush and find the lyndiebrush025.jbr brush.
Font of your Choice
I used Weekend in Paris
A Tube of your Choice
I am using the wonderful art of Jennifer Janesko used with a license from CILM.
You can purchase a license to use her work from CDO.
Ok we are ready to start.
REMEMBER TO SAVE OFTEN
Step 1:
You can recolour my render for this tutorial if you wish. Activate my Render and with your selection tool set to Rectangle - Feather 0, select a part of the render that you like and would like to use for the tut.
I selected a part from the top right corner, about 350 pixels wide and 400 pixels high.
Go to Edit - Copy and minimize the large render for now. Edit - Paste the selection as a new image. Minimize for now.
Open a new image 195x325 pixel - white background.
Edit - Paste the selected part of the render (it should still be in your clipboard ) as a new layer on this canvas. Use your mover tool to move it into postion so you have the part you want showing on the canvas.
Lower the opacity of the render layer to 36.
Copy and paste your tube as a new layer and move into position. Lower the opacity of the tube layer to about 65.
Merge all visible.
Copy and paste the Monti-CrossStitche as a new layer and move to the top of the canvas.
Duplicate the stitches and go to Image Flip.
In the layer palette right click on the duplicate layer and merge down.
Add the following Drop Shadow
Vertical: 0
Horizontal: 0
Opacity: 78
Blur: 2
Colour: Black
Merge all visible.
Go to Image - Add Border. Add a 6 pixel border using a bright colour not in your tube.
Promote background to layer in the layer palette.
Select the border with your Magic Wand - Feather 0 - Tolerance 10 and press delete on your keyboard.
Add a new raster layer and fill with white.
Add the following Drop Shadow
Vertical: 2
Horizontal: 2
Opacity: 45
Blur: 3
Colour: Black
Repeat the Drop Shadow but change the Vertical and Horizonal to -2.
Merge visible.
Step 2:
Open a new canvas 500x500 pixels and fill with white.
Copy and paste the image we were just working on as a new layer.
Maximize the Render Selection you created earlier and press Shift D to make a duplicate. Minimize the duplicate for now.
On the original, apply a filter or texture of your choice.
I used Random Smelter, I don't remember where I got that filter from so if you like that effect I have enclosed a jpg of it which you can use if you like. Just open it in psp and use that.
Open a new canvas 240x370 and fill with white.
Add a new raster layer and fill with the render image we just added a filter to.
Lower the opacity to about 28 and merge all visible.
Maximize the duplicate of the Render Selection, press Shift D to duplicate it and minimize the duplicate for now.
Apply another filter or effect to the original duplicate render image.
I used Diamond Flip. I don't remember where I got that filter from so if you like that effect I have enclosed a jpg of it which you can use if you like. Just open it in psp and use that.
Go back to the 240 x 370 image and go to Selections All - Selections - Float - Selections Modify - Contract by 17.
Add a new raster layer, go to Selections Invert and fill with white.
Add a new layer and fill with the render effect or my Diamond Flip image and lower the opacity to about 80.
Deselect.
Hide the background layer and merge all visible.
Apply a texture effect. I used Filters Unlimited 2 - Paper Textures - Canvas Fine - Intensity 89 - Lightness 100.
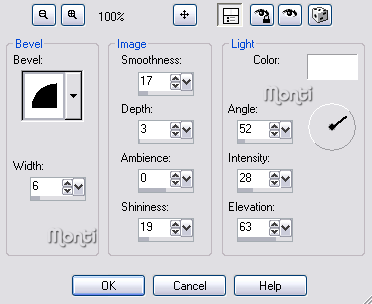
Add the following Inner Bevel.
Select your Preset Shape tool set to Rectangle - Line Width 2 - Line Style small Dash - Foreground White - Background Null.
Draw out a rectangle slightly smaller than the outside frame.
Go to Objects - Align - Center in Canvas then convert to raster layer.
Apply the same Inner Bevel we used on the frame and add the following Drop Shadow
Vertical: 0
Horizontal: 0
Opacity: 77
Blur: 3
Colour: Black
Using the same settings draw out a rectangle slightly larger than the inside frame area.
Go to Objects - Align - Center in Canvas then convert to raster layer.
Repeat the Inner Bevel and Drop Shadow and merge all visible.
Add the following Drop Shadow
Vertical: 2
Horizontal: 2
Opacity: 30
Blur: 3
Colour: Black
Repeat the Drop Shadow but change the vertical and Horizontal to -2.
Unhide the background layer and merge all visible.
Copy and paste this image onto your main 500 x 500 canvas.
Move it below your tube layer.
Go to Image - Rotate - Left - 27 making sure all layers is UNchecked. Sharpen.
Use your mover tool to move the tube layer over to the right slightly.
Step 3:
Open the Notepaper and go to Adjust - Brightness/Contrast. Set the brightness to 34 and the contrast to 10.
Then go to Adjust - Hue/Saturation and change the Hue to 129 and the Saturation to 84.
Go to Image - Resize 85% .
Copy and paste it as a new layer on your canvas and position. Use my tag as a guide.
Move this layer below your render and tube layers.
Open the SE_doodleART_4 and go to Selections - Select All - Float and add a new raster layer.
Set your Foreground to pattern and find the duplicated (without filters) render selection. Fill the doodle layer with that pattern and deselect.
Edit - Copy the filled layer and paste as a new layer on the main canvas. Resize by 80% - Bicubic selected - All layers UNchecked.
Move it to just above the white background layer.
If you are using my render then copy and paste my matching ribbon as a new layer, move it to just below the tube layer and move into position. Use my tag as a guide.
If you are using another render you are welcome to colourize my ribbon if you want.
Activate the top layer, add a new raster layer and add LyndieBrush025 003 to the edge of the tube frame using your render selection as the Foreground.
Mirror the brush and line it up at the top right of the tube layer. dulpicate the brush layer and go to Image - Flip - Image - Mirror and position at the bottom left of the tube layer.
Add the following Drop Shadow to all layers apart from the ribbon layer.
Vertical: 0
Horizontal: 0
Opacity: 84
Blur: 13
Colour: #85C8D1
Add the artists copyright and Render by Monti Cole.
Select your text tool with your Foreground set to a dark colour from your render. I used #455352 and your Background to the render selection and add your name.
Add the same Drop Shadow we used on all the other layers.
Hide your white background layer, crop to size and save.

Just lovely-thanks!
ReplyDeleteEvita