

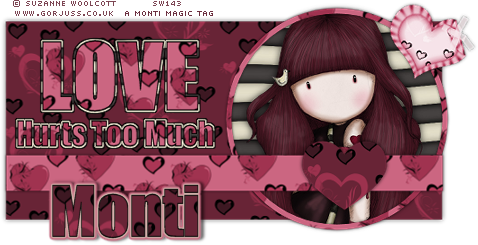
This tutorial was written by Monti on January 24th 2009. It's concept is copyrighted to Monti. Any creation you make from my ideas are yours. You may print out this tutorial for your own personal use, but please do not copy it in any way to put online, pass out or rewrite without my permission or worse yet attempt to claim as your own.
This was written for psp 9 but will work in other versions.
For my original tag I used a template from Missy at Divine Intentionz but when people asked me to tut it I decided to show you how to make the shapes so that every tag can be different shapes and sizes. That and I am not really a fan of cut and paste tuts.
For this tutorial you will need
Paint Shop Pro
Scrap Kit Of Your Choice
The kit I used is unfortunately no longer available so please use any kit you like.
Font Of Your Choice
I used Impact.
Tube of your Choice
I am using the wonderful art of Suzanne Woolcott.
Unfortunately Suzanne is no longer selling her work so please use an artist you have permission for.
Eye Candy 4000 - Gradient Glow
Ok we are ready to start.
REMEMBER TO SAVE OFTEN
Step 1:
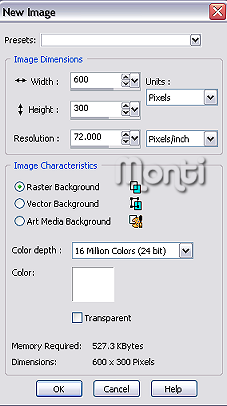
Open a new 600 x 300 White canvas in PSP.
Open a paper of your choice from the kit. Let's call this Paper 1.
Colourize to match your tube.
To do this go to Adjust - Hue and Saturation - Colourize.
I set mine to Hue: 244 - Saturation: 130.
Minimize Paper 1 in psp.
Activate your Preset Shapes tool set to Rectangle with the following settings:
Foreground: 0 - Background: Colourized Paper 1 - Angle: 0 - Scale: 50 - Create as Vector: Checked.
Draw out a rectangle about 485 x 220 pixels.
If you look in the bottom right hand corner you will see some numbers. The ones marked below show the size.
Go to Objects - Align - Center in Canvas and convert to Raster layer.
Rename this layer Large Rectangle and add the following Drop Shadow
Vertical: 0
Horizontal: 0
Opacity: 70
Blur: 8
Colour: Black
Step 2:
Open another paper of your choice from the kit. Let's call this Paper 2.
Colourize with the same settings we used earlier and minimize.
Still on your Rectangle Preset Shapes change your Background to the colourized Paper 2 - Angle: 0 - Scale: 30.
Draw out a thin rectangle about 485 x 40 pixels - use the numbers again to guide you.
Go to Objects - Align - Horizontal in Canvas.
Move this down towards the bottom of the other rectangle - see my tag for guide - and convert to raster layer.
Rename this layer Small Rectangle and add the following Drop Shadow
Vertical: 0
Horizontal: 0
Opacity: 80
Blur: 4
Colour: Black
Step 3:
Select your Preset Shapes set to Ellipse/Circle with the following settings:
Background: Null - Foreground: Colourized Paper 2 - Angle: 0 - Scale: 30 - Line Width: 6
Draw out a circle about 240 x 240 pixels - look at your numbers as shown below.
Convert to Raster layer and move into position as shown below.
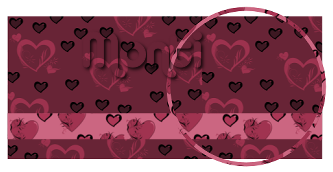
Go to Layers - Arrange - Move Down so that the circle layer is now beneath the Thin Rectangle.
Rename this layer Circle Frame.
Select your Magic Wand - Feather and Tolerance: 0 and click inside the circle frame you just made.
Go to Selections - Modify - Expand by 3 and add a new raster layer. Name this layer Fill.
Go to Layers - Arrange - Move Down so it is below your Frame layer.
Set your Foreground to another paper of your choice - Let's call this Paper 3 - Angle: 0 - Scale: 50
Fill the selection.
DO NOT Deselect.
Copy and paste your tube as a new layer and resize if neccessary.
Move into position, then go to Selections - Invert and press Delete on your keyboard.
Deselect.
Add the following Drop Shadow to your tube
Vertical: 0
Horizontal: 0
Opacity: 80
Blur: 12
Colour: Black
Rename this layer Tube.
Click on your Circle Frame to activate it and add the following Drop Shadow
Vertical: 0
Horizontal: 0
Opacity: 80
Blur: 4
Colour : Black
Step 4:
Click on the top layer - should be your Small Rectangle - to activate it.
Select your Preset Shapes set to a Heart shape - I used Heart 1 which came with my psp.
Set your Foreground to Null and your Background to Paper 1 - Angle: 0 - Scale: 50 - Create as Vector: Checked.
Draw a small heart and move into position on top of the small rectangle in roughly the center of the circle.
See my tag as a guide.
Once you are happy with the position convert to Raster layer and add the following Drop Shadow
Vertical: 0
Horizontal: 0
Opacity: 80
Blur: 6
Colour: Black
Rename this layer Heart.
Step 5:
Now we will add the text.
Activate your text tool with the following settings:
Foreground: Black - Background: Colourised Paper 2 - Angle: 0 - Scale: 30
Vector: Selected - Anti-alias: Checked - Stroke Width: 1 - Text Size: 72 - Font: I used Impact. If you don't have Impact use a thick plain style of font.
Type out LOVE (in capital letters and move into position on the canvas - see tag for guide.
Convert to Raster Layer.
Go to Selections - Select All - Float - Defloat - Selections - Modify - Expand by 2.
Set your Foreground to Paper 3 - Angle: 0 - Scale: 30.
Add a new raster layer and go to Layers - Arrange - Move Down so it is below your text layer and fill with Paper 3.
DO NOT Deselect.
Add a new raster layer and go to Layers - Arrange - Move Down.
Go to Selections - Select All - Float - Defloat - Selections - Modify - Expand by 1 and fill the selection with black.
Deselect.
In the layer palette hide all layers apart from the 3 text layers and Merge All Visible.
Rename this layer LOVE.
Unhide all layers by going to Layers - View - All.
Stay on your text tool with the following settings:
Foreground: Black - Background: Colourised Paper 2 - Angle: 0 - Scale: 30
Vector: Selected - Anti-alias: Checked - Stroke Width: 1 - Text Size: 26 - Font: Impact.
Type out your text. I used "Hurts Too Much".
Move into position beneath the LOVE text and convert to raster layer.
Go to Selections - Select All - Float - Defloat - Selections - Modify - Expand by 2.
Set your Foreground to Paper 3 - Angle: 0 - Scale: 30.
Add a new raster layer and go to Layers - Arrange - Move Down so it is below your text layer and fill with Paper 3.
DO NOT Deselect.
Add a new raster layer and go to Layers - Arrange - Move Down.
Go to Selections - Select All - Float - Defloat - Selections - Modify - Expand by 1 and fill the selection with black.
Deselect.
In the layer palette hide all layers apart from the 3 new text layers and Merge All Visible.
Unhide all layers.
Step 6:
From your kit open an element of choice.
Go to Adjust - Hue and Saturation and colourize with the following settings:.
Hue: 244 - Saturation: 130.
Copy and paste as a new layer on your canvas.
Go to Image - Resize: 20% - Smart Size - All Layers: UNchecked.
Go to Image - Rotate - Free Rotate - Right: 20.
Move into position at the top right of the tag - see my tag as a guide.
Go to Adjust - Sharpen and add the following Drop Shadow
Vertical: 0
Horizontal: 0
Opacity: 60
Blur: 5
Colour: Black
Step 7:
Resize if required making sure all layers is checked.
Add the artists copyright and any license number if required.
Activate the top layer of your canvas and activate your text tool again with the following settings.
Foreground: Black - Background: Paper 1 - Angle: 0 - Scale: 50 - Font Size: 48 - Font: Impact.
Type your name and move into position - see my tag as a guide - and convert to raster layer.
Go to Effects - Plugins - Eye Candy 4000 and apply with the following settings
Glow Width: 3 - Soft Corners: 25 - Overall Opacity: 100 - Draw outside selection: checked.
Under Colour select Fat but click on the first arrow colour and change the colour to #DED9C4. Click on the second arrow colour and change the colour to #c56A80 - Press OK.
Add the following Drop Shadow.
Vertical: 0
Horizontal: 3
Opacity: 60
Blur: 4
Colour: Black
Save your finished tag.
No comments:
Post a Comment