

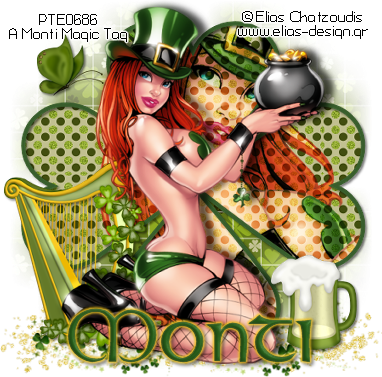
This tutorial was written by Monti on February 27th 2013. It's concept is copyrighted to Monti. Any creation you make from my ideas are yours. You may print out this tutorial for your own personal use, but please do not copy it in any way to put online, pass out or rewrite without my permission or worse yet attempt to claim as your own.
This was written for psp 9 but will work in other versions.
For this tutorial you will need
Paint Shop Pro
Tube of your Choice
I am using the art of Elias Chatzoudis.
I am using mine with a license from PSP tubes emporium but you can now purchase a license to use his work from Elias Art Shop.
Mask of your Choice
I used WSL_Mask84.
You can download this and other awesome masks from WeeScotsLass Creations.
Fonts of your Choice
I used Celtic Plain font for my name.
You will also need a small pixel font for the artist credits. I used Pixel Berry 08/84 Ltd.Edition.
Plugins
Eye Candy 4000 - Gradient Glow - Optional.
Scrap Kit
I used a wonderful Freebie kit by Melissaz Creationz called Kiss My Shamrocks
Preset Shape
I used SK Hearts 08.PspShape by Shawna.
Click HERE and download her Hearts Preset Shapes pack. Unzip and move to your PSP Preset Shapes folder.
You will need to open PSP after you have moved them for it to recognize the new shapes.
Ok we are ready to start.
REMEMBER TO SAVE OFTEN
Step 1:
In PSP open a new 450 x 450 image with a transparent background.
Activate your Preset shapes tool and set it to SK Hearts 08.PspShape with the following settings.
Anti-alias: Checked - Create as Vector: Checked - Line Style: Solid - Line width: 5.
Set your Foreground colour to #385D2C and your Background colour to Null.
Click in the top left corner of your canvas and while holding down the Shift key on the keyboard draw out your shape so it almost fills the canvas.
Go to Object - Align - Center in Canvas and convert to raster layer.
Rename Frame.
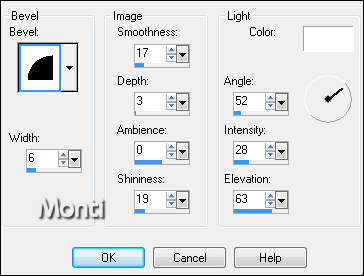
Add the following Inner Bevel.
Select your Magic Wand with the following settings:
Mode: Add/Shift - Match Mode: RGB Value - Tolerance: 10 - Continguous: Checked - Feather: 0 - Anti-alias: Checked.
With your Magic Wand click inside each of the 4 shape sections. Go to Selections - Modify - Expand: 3.
From the kit, open the papers in PSP. Activate Raster 6 or a paper of your choice and go to Edit - Copy - Edit - Paste as a New Image.
Activate your canvas and click on the bottom layer to activate it.
Set your Foreground colour to Pattern and locate the paper you have chosen. Set the Scale to 25 and fill your Selection.
DO NOT Deselect.
Open your tube and if you have a close up use that, if not just use the tube copy and paste it as a new layer over the paper.
Move it into position so the parts you want to see are inside the selected areas then go to Selections - Invert and press delete on your keyboard.
Deselect.
Change the blend mode of the tube layer to Hard Light.
Activate the Preset shape layer and add the following Drop Shadow:
Vertical: 2
Horizontal: 2
Opacity: 45
Blur: 4
Colour: Black
Step 2:
Activate the top layer of your canvas and copy and paste your full size tube onto the canvas.
Resize if necessary - I resized mine by 80% - and move into position.
Add the following Drop Shadow:
Vertical: 0
Horizontal: 6
Opacity: 45
Blur: 6
Colour: Black
Duplicate your tube layer and working on the duplicate to go Adjust - Blur - Gaussian Blur - Radius: 3.
Change the Blend Mode to Soft light.
Step 3:
Use Elements from the kit to decorate your tag. I will tell you below what I used but feel free to use whatever you want.
From the kit Elements select Raster 13 and copy and paste as a new layer onto your canvas.
Resize it by 60% using Weighted Average and then go to Adjust - Sharpen - unsharp Mask with the following settings: Radius: 1 - Strength: 47 - Clipping: 0.
Go to Image - Flip and then move it down to the bottom on the canvas.
Go to Layers - Arrange - send To Bottom and add the following Drop Shadow:
Vertical: 1
Horizontal: 2
Opacity: 40
Blur: 3
Colour: Black
Activate the top layer of your canvas and from the kit Elements select Raster 1 - the harp. Copy and paste this as a new layer onto your canvas.
Go to Image - Mirror and then resize by 50% using the same settings as earlier.
Go to Adjust - Sharpen with the same settings as ealier.
Move this layer to just above your Frame layer in the layer palette.
Add the following Drop Shadow
Vertical: 1
Horizontal: 3
Opacity: 40
Blur: 3
Colour: Black
Activate the top layer of your canvas and from the kit Elements select Raster 4 - the beer. Copy and paste this as a new layer onto your canvas and resize by 50% using the same settings as earlier.
Go to Adjust - Sharpen with the same settings as ealier.
Move this layer to just above your Frame layer in the layer palette.
Add the following Drop Shadow
Vertical: 1
Horizontal: 3
Opacity: 40
Blur: 3
Colour: Black
Activate the top layer of your canvas and from the kit Elements select Raster 20 - the butterfly. Copy and paste this as a new layer onto the top left side of your canvas and resize by 35% using the same settings as earlier.
Go to Adjust - Sharpen with the same settings as ealier.
Move this layer to just above your Frame layer in the layer palette.
Add the following Drop Shadow
Vertical: 1
Horizontal: 3
Opacity: 40
Blur: 3
Colour: Black
Step 4:
Add a new layer on your Canvas and go to Layers - Arrange - Send to Bottom.
Go to Selections - Select All.
From the kit, open the papers in PSP. Activate Raster 2 or a paper of your choice and go to Edit - Copy.
Back on your Canvas go to Edit - Paste Into Selection.
Deselect.
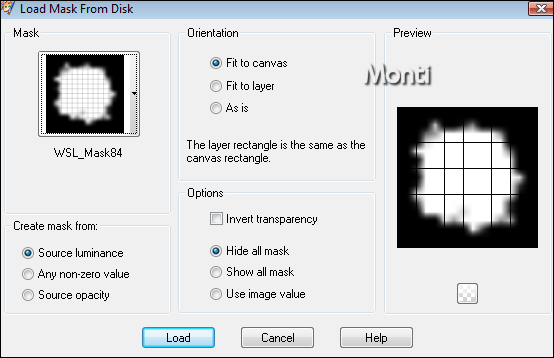
Go to Layers - Load/Save Mask - Load Mask from Disk.
Find WSL_Mask84 and apply with the following settings:
Merge Group.
If you want to resize your tag do it now.
Add your artists credits and any license number ona new layer.
Add your name using your chosen font and apply the same Inner Bevel we used on the frame.
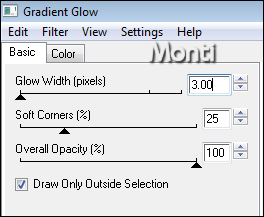
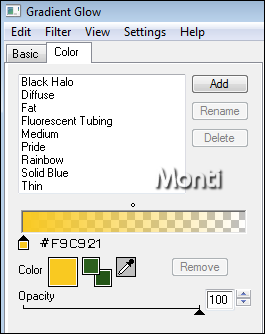
I added a medium Gradient Glow to my name using Eye Candy 4000 with the following settings:
Add the following Drop Shadow.
Vertical: 2
Horizontal: 3
Opacity: 40
Blur: 4
Colour: Black
Save as a png file.
No comments:
Post a Comment