

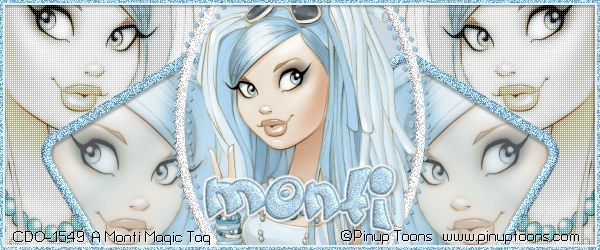
This tutorial was written by Monti on July 26th 2013. It's concept is copyrighted to Monti. Any creation you make from my ideas are yours. You may print out this tutorial for your own personal use, but please do not copy it in any way to put online, pass out or rewrite without my permission or worse yet attempt to claim as your own.
This was written for psp 9 but will work in other versions.
For this tutorial you will need
Paint Shop Pro
Tube of your Choice
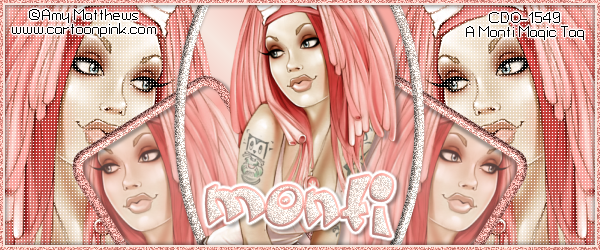
I am using the art of PinUp Toons.
You can purchase a license to use his work from CDO.
Fonts of your Choice
I used Cream and Sugar font for my name.
You will also need a small pixel font for the artist credits. I used Pixel Berry 08/84 Ltd.Edition.
Filters
Eye Candy 4000 - Gradient Glow
Ok we are ready to start.
REMEMBER TO SAVE OFTEN
Step 1:
In PSP open a new 600 x 250 image with a transparent background.
Set your Foreground to a light colour from your tube and the Background to a dark colour from your tube.
Change your Foreground to Gradient: Foreground-Background - Style: Linear - Angle: 45 - Repeats: 3.
Flood fill your image.
Copy and paste a close up of your tube and position it on either the left or right side of the image depending on which way your tube is facing.
When you have it where you want it go to Layers: Duplicate - Image: - Mirror.
Select your crop tool and crop using Merged Opaque on the tool bar.
Click on your top tube and go to Layers - Merge down.
Go to Effects: Texture Effects - Weave with the following settings:
Gap size: 1 - Width: 2 - Opacity: 10 - Fill Gaps: Checked - Weace and Gap colour: White.
Step 2:
Set your Foreground to your darker colour and your Background to Null.
Activate your Preset Shape and select Rounded Rectangle - Line Style: Solid - Line Width: 10.
Draw out a rectangle about 200 x 250 pixels.
Go to Image - Rotate - Free Rotate - Left: 32 - Single layer.
Move into position - see my tag as a guide.
Convert to raster layer.
Go to Effects - Inner Bevel with the following settings:
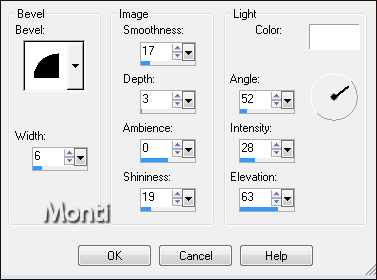
Go to Adjust - Add/Remove Noise - Add Noise - Uniform: checked - Monochrome: checked - Percentage: 55.
Click on the Frame to activate it and select your Magic Wand - Tolerance and Feather: 0.
Click inside the frame and go to Selections - Modify - Expand by 5.
Add a new layer and move it beneath your Frame layer in the layer palette.
Set your Foreground to the light colour from your tube and the Background to the dark colour from your tube.
Change your Foreground to Gradient: foreground-Background - Style: Linear - Angle: 328 - Repeats: 7.
Floodfill your selection.
DO NOT deselect.
Copy and paste your tube as a new layer and move to the left of the selection.
Go to Selections - Invert - Delete.
Lower the opacity of this tube to 65.
Activate the Gradient flood fill layer and go to Layers - Duplicate - Image - Mirror.
Activate the Tube layer and go to Layers - Duplicate - Image - Mirror.
Activate the Frame layer and go to Layers - Duplicate - Image - Mirror.
Add the following Drop Shadow to the left frame:
Vertical: 2
Horizontal: 4
Opacity: 35
Blur: 4
Colour: Black
Add the following Drop Shadow to the right frame:
Vertical: 2
Horizontal: -4
Opacity: 35
Blur: 4
Colour: Black
Select your crop tool and crop using Merged Opaque on the tool bar.
Step 3:
Go to Image - Canvas Size and change the size to Width: 600 - Height: 500 - center Placement.
Change the Foreground back to the light colour from your tube and the background to Null.
Select the Preset Shape - Shape:Ellipse - Line Style: Solid - Line Width: 10.
Place your cursor at across : 180 down : 50 - look at the counter in the bottom right of your PSP to make sure you have it in the right place. See below:
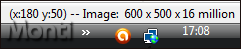
Drag your shape out until the numbers in the bottom read as below:
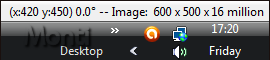
Go to Objects - Align - Center in Canvas and convert to raster layer.
Apply the same Inner Bevel we used earlier and then go to Adjust - Add/Remove Noise - Add Noise with the same settings we used earlier.
Add the following Drop Shadow
Vertical: 0
Horizontal: 0
Opacity: 35
Blur: 4
Colour: Black
Optional
Change the Foreground to the dark colour from your tube, Background still on Null.
Still using the Ellipse Preset Shape start with your cursor at 200/60 and drag it out until the numbers in the bottom right read 400/440.
Go to Objects - Align - Centre in Canvas.
Pull the nodes on the centre out a bit to pull it slighty nearer the solid elipse and convert to raster layer.
Add the following Drop Shadow:
Vertical: 1
Horizontal: 2
Opacity: 35
Blur: 2
Colour: Black
Still using the Ellipse Preset Shape start with your cursor at 170/30 and drag it out until the numbers in the bottom right read 430/470.
Go to Objects - Align - Centre in Canvas.
Add the following Drop Shadow:
Vertical: 1
Horizontal: 2
Opacity: 35
Blur: 2
Colour: Black
Click on your Background layer to activate it and Crop using Layer Opaque on the tool bar.
Step 4:
Copy and paste your tube in the centre of the tag.
Add the following Drop Shadow:
Vertical: 2
Horizontal: 4
Opacity: 35
Blur: 5
Colour: Black
Crop image - Merged Opaque.
Add a new raster layer and fill with your light colour.
Go to selections - Select All - Modify - Contract: 5 and press Delete on your keyboard. Add the following Drop Shadow:
Vertical: 2
Horizontal: 2
Opacity: 35
Blur: 5
Colour: Black
Repeat but change the Vertical and Horizontal to -2.
Add a new layer and fill with the dark colour.
Go to selections - Select All - Modify - Contract: 3 and press Delete on your keyboard.
Deselect and go to Adjust - Add/Remove Noise - Add Noise - Uniform: checked - Monochrome: checked - Percentage: 55.
Select your font. I used Cream and Sugar font - Size 48 - Vector: checked - Stroke: 2.
Set your Foreground to the dark colour from the tube and your Background to the light colour and type your name.
Go to Objects - Align - Horizontal in Canvas and convert to raster layer.
Apply the following Inner Bevel:
Go to Adjust - Add/Remove Noise - Add Noise - Uniform: checked - Monochrome: checked - Percentage: 30.
Go to Effects - Eye Candy 4000 - Gradient Glow - Glow Width: 3 - Under the colour tab select the Fat option.
Add the following Drop Shadow:
Vertical: 2
Horizontal: 3
Opacity: 35
Blur: 4
Colour: Black
Save.

No comments:
Post a Comment