

This was written for psp 9 but will work in other versions.
For this tutorial you will need
Paint Shop Pro
Animation Shop
Scrap Kit Of Choice
I am using Shot Through The Heart by Lisa of Sophisticated Scraps. Thanks Lisa. You will find this in the supplies below.
WSL-122Mask by Chelle
This is included in the supplies below but please visit Chelle's site to check out all her awesome work. Masks can be found on the right hand side at Wee Scots Lass. Place this in your masks folder.
Supplies
You can download them here.
A Font of your Choice
I used Tinker Toy which is a pay font so I am unable to supply it.
A Tube of your Choice
I am using the wonderful art of Suzanne Woolcott.
Unfortunately Suzanne is no longer selling her work so please use an artist you have permission for.
Ok we are ready to start.
REMEMBER TO SAVE OFTEN
Step 1:
Open a new Transparent image 650 x 500 and flood fill with white.
Copy and paste one of the papers from the kit (I used Paper 6) as a new layer onto your canvas.
Go to Layers - Load/Save Mask and apply WSL_Mask122 with Source Luminence - Fit to Canvas and Hide all Mask Checked.
Right Click on the top layer in the layer palette and choose Merge Group.
Resize the mask layer by 80% - Bicubic - All layers UNchecked.
Duplicate the mask layer and on the ooriginal go to Adjust - Blur - Gaussian Blur - Radius:19
Repeat the Blur.
Duplicate the blurred layer and right click on the top copy layer in the layer palette and choose Merge Down.
Rename Blur.
On the Blurred layer go to Effects - Texture Effects - Weave with the following settings.
I used a colour from my background for the weave colour.

Activate the original mask layer (the top layer) and add the following Drop Shadow.
Vertical: 0
Horizontal: 0
Opacity: 100
Blur: 0
Colour: White
Step 2:
Open the Doodle 1 and Copy and Paste as a new layer onto your canvas.
Resize by 40% Smart Size and move into postition at the bottom left of your heart. (See my tag as a guide.)
Once happy with the positioning duplicate this layer and mirror the duplicate.
In the layer palette right click on the duplicate layer and choose merge down.
Move this layer beneath your mask and your blur layers and add the following Drop Shadow.
Vertical: 0
Horizontal: 3
Opacity: 50
Blur: 5
Colour: Black
Step 3:
In the layer palette click on the top mask layer to activate it.
Copy and Paste your tube as a new layer and resize to fit. I resized by 70% Bicubic selected - All layers UNchecked.
Move it to the left of the canvas and add the following Drop Shadow.
Vertical: 0
Horizontal: 5
Opacity: 50
Blur: 5
Colour: Black
Copy and paste the Flower as a new layer onto your canvas.
Resize by 50% Smart Size - All layers UNchecked.
Position at the bottom of your tube and add the following Drop Shadow.
Vertical: 0
Horizontal: 3
Opacity: 50
Blur: 5
Colour: Black
Add any other embellishments you like but try and keep it quite plain so as not to distract from the text.
If you want to resize your tag do this now.
Step 4:
Add a new layer and add the artist's copyright and your watermark.
Hide your white background layer and crop to size.
Go to Edit - Copy Merged and paste as a New Image in Animation Shop.
Go to Edit - Copy and then Edit - Paste After Current Frame. Repeat until you have 9 frames of your image.
Back in PSP select your Text Tool with your chosen font.
I used font Tinker Toy size between 14 and 18 depending on if you resized it or not.
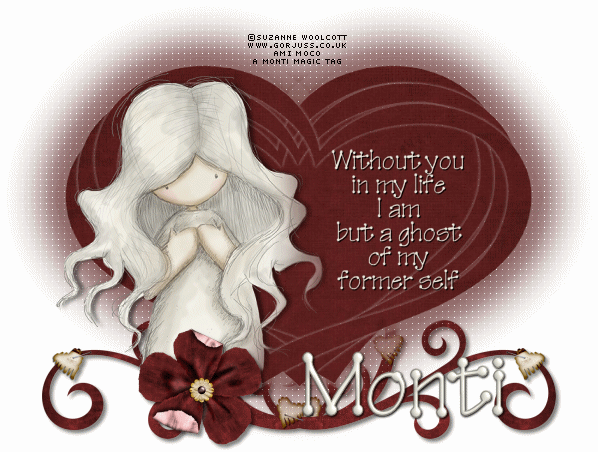
Background = #E9E8DC - Foreground = NULL and type out your text. I used
"Without you
in my life
I am
but a ghost
of my
former self"
Convert to Raster layer and add the following Drop Shadow.
Vertical: 0
Horizontal: 1
Opacity: 100
Blur: 1
Colour: Black
Step 5:
Copy and paste the text as a New Image in Animation Shop.
Go to Effects - Insert Image Transition with the following settings

Go to Edit - Select All - Edit - Copy.
Activate your 9 frame Image canvas and while holding down the Shift key on your keyboard click on Frame 1 and then on Frame 7.
This will select Frames 1 - 7.
Go to Edit - Paste and paste your text into the Image canvas. Position it on the right of the heart.
Go to Animation - Frame Properties and set it to 25 - 30.
Step 6:
Back in PSP delete the text layer and select your Text Tool with the same settings yu used earlier. Type out
"Please come
back to me
and let me
live again."
Convert to raster layer and add the following Drop Shadow
Vertical: 1
Horizontal: 1
Opacity: 100
Blur: 1
Colour: Black
Copy and paste as a New Image in Animation Shop and go to Edit - Copy.
On your main image canvas click on Frame 8 to activate it.
Go to Edit - Paste into Selected Frame and position it in the same place as you did the other text.
Go to Animation - Frame Properties and set it to 200.
Click on Frame 9 to activate it go to Animation - Frame Properties and set it to 100.
Then go to Edit - Select All.
Step 7:
Back in PSP select your Text Tool again.
Leave the Background colour as it is and set your Foreground to a darker colour from your tube. I used #939185.
Change the size to between 48 and 72 depending on what font you use and how long your name is and type your name.
Convert to raster layer and apply the following Inner Bevel.

Add the following Drop Shadow
Vertical: 1
Horizontal: 1
Opacity: 100
Blur: 3
Colour: Black
Copy and Paste as a New Image in Animation Shop.
Go to Edit- Copy.
Activate the main image - all layers should still be selected.
Click on the Propagate Paste Button to activate it.

Go to Edit - Paste into Selected Frames.
See my tag as a guide for placing.
Save.
No comments:
Post a Comment