


This tutorial was written by Monti on May 9th 2007. It's concept is copyrighted to Monti. Any creation you make from my ideas are yours. You may print out this tutorial for your own personal use, but please do not copy it in any way to put online, pass out or rewrite without my permission or worse yet attempt to claim as your own.
This was written for psp 9 but will work in other versions.
For this tutorial you will need
Paint Shop Pro
Animation Shop
My Supplies
You can download them Here
This includes 10 different backgrounds made by me in case you don't have Flaming Pear Glitterato.
The Picture Frame - Install this in your psp Frames folder. This came with my psp but I am supplying it as different versions may not have it.
I have also enclosed a psp file of the frame incase you can't get the installed one to work.
My Gif of the meteor in case you don't have Ulead Gif Animator 2. NOTE: This gif looks better on the darker backgrounds and the effect is best if you do have Ulead.
Flaming Pear - Glitterato
Available from www.flamingpear.com/glitterato.html
ULead Gif Animator 2
Optional
Eye Candy 4000 - Gradient Glow
Fonts
Long Cool Woman
Long Cool Mother
A Tube of your choice
I am using the wonderful art of Suzanne Woolcott.
Unfortunately Suzanne is no longer selling her art so please use a tube you have permission to use.
Ok we are ready to start.
REMEMBER TO SAVE OFTEN
Step 1:
Open a new transparent image 550 x 400 pixels.
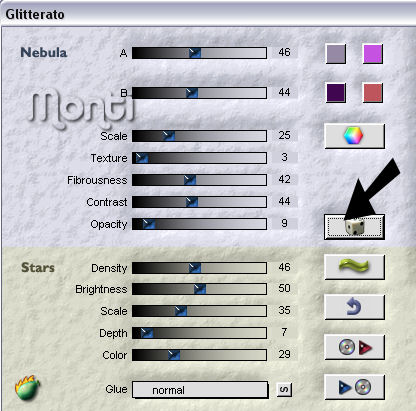
Go to Effects - Flaming Pear - Glitterato.
Press the little dice as shown in the screen shot below until you find an effect you are happy with. You can adjust the star density, colour, brightness etc by using the sliders at the bottom. Play around until you are happy with it.
If you don't have Glitterato choose one of the enclosed backgrounds, you can colourise it to match your tube and copy and paste it as a new layer.
Step 2:
Go to Selections - Select All.
Then go to Effects - Ulead Effects - Gif x 2.0
Click on Light at the top, then on Gallery at the bottom.
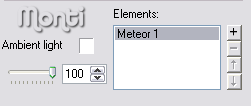
In the box that pops up scroll down until you find Meteor 1 and click ok.

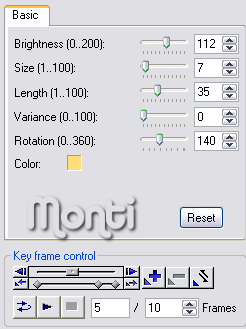
In the Key Frame Panel change the frames in the second box to 10 as shown below.
Change the Ambience Light to 100 as shown below.
Then move the slider shown by the arrow in the box below all the way to the left.

Click on the arrow to the right of this slider so that it scrolls through the frames one by one, If you want to change the colour of your flare do this in the colour box above, I just made the bright yellow flare frames a bit paler.
When you are happy with your meteor click on save at the bottom.
Name your file and save it where you can find it easily. I saved to my desktop.
Then press cancel at the bottom of the ulead box and Deselect your layer.
Step 3:
Copy and paste your tube as a new layer on your original image and move it to the right hand side.
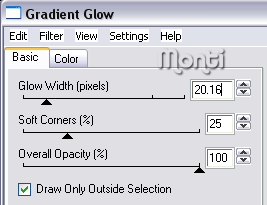
Apply Eye Candy 4000 Gradient Glow with the following settings changing the colour to a pale one from your tube.
Go to Image - Picture Frame and add Edge Brush 04 picture frame using the settings shown below. If you can't get the frame to show in your version of psp I have included a psp file of it, so just copy and paste that as a new layer on your canvas.

Step 4:
Hide your background layer so you can see to apply your text.
Select your text tool with the following settings.
Font - Long Cool Woman
Foreground and Background - Black, Align Left, Size 26, Bold.
Type the text of your choice. I used lyrics from the song Cry Over Me by Meat Loaf.
Position the text on the left hand side and convert to Raster layer.
Apply Eye Candy Gradient Glow with the same settings as before but CHANGE the glow width to 10.
Change the font to Long Cool Mother
Change the text Align to Center, Size 72 and type your name.
Position it and convert to Raster layer. Apply the same Gradient Glow as we used on the last text.
Add a new Raster Layer and add the artists copyright and your water mark.
Step 5: Animation if you made your own meteor.
Your background layer should still be hidden, if it isn't hide it now.
Go to Edit - Copy Merged and then open Animation Shop.
Paste the merged image as a new image in Animation Shop.
Go to File - Open and find the meteor gif you saved earlier.
Open it in Animation Shop and go to Edit - Select All.
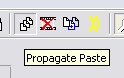
Press your Propergate Paste icon on the tool bar in Animation Shop.
Activate the Merged image you just pasted from PSP and copy and paste that into your meteor image.
Right click on the first frame and choose Paste into Selected Frames. Because you selected propergate paste it will appear in all selected frames.
Make sure you line it up so the white frames fits neatly against the edges.
While all the frames are still selected go to Animation - Frame Properties and set the frame properties to 10.
Click on the last frame and change the frame properties for that frame only to 300.
Step 5a: Animation if you are using my meteor gif.
Unhide your background layer and activate it. Copy and paste this in Animation Shop and duplicate until you have 10 Frames.
Go to Edit - Select All to select all the frames.
Go to File - Open and find my Meteor gif in my supplies.
Open it in Animation Shop and go to Edit - Select All.
Copy the Meteor gif and paste it into the background frames, lining it up in the left top corner in Frame 1.
In PSP hide your background layer.
Go to Edit - Copy Merged and then open Animation Shop.
Paste the merged image as a new image in Animation Shop.
Go to File - Open and find the meteor gif you saved earlier.
Open it in Animation Shop and go to Edit - Select All.
Press your Propergate Paste icon on the tool bar in Animation Shop.
Activate the Merged image you just pasted from PSP and copy and paste that into your meteor image.
Right click on the first frame and choose Paste into Selected Frames. Because you selected propergate paste it will appear in all selected frames.
Make sure you line it up so the white frames fits neatly against the edges.
While all the frames are still selected go to Animation - Frame Properties and set the frame properties to 10.
Click on the last frame and change the frame properties for that frame only to 300.
Save.

No comments:
Post a Comment