

This tutorial was written by Monti on April 20th 2007. It's concept is copyrighted to me. Any creation you make from my ideas are yours. You may print out this tutorial for your own personal use, but please do not copy it in any way to put online, pass out or rewrite without my permission or worse yet attempt to claim as your own.
This was written for psp 9 but will work in other versions.
For this tutorial you will need
Paint Shop Pro
Mura Meisters Copies
Available from www.oocities.org/murakuma/mmplugins.html
A Tube of your choice
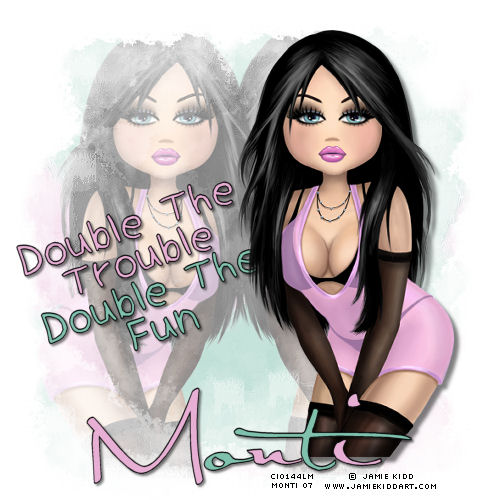
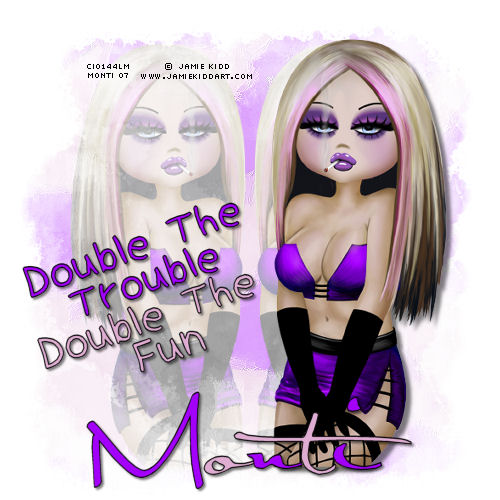
I am using the art of Jamie Kidd used with a license from CILM. If you wish to use her work please visit www.cdoestore.com to purchase a license.
Fonts of your choice
I used Childish Alpha and Satisfaction
Beckys Mask 22
Download Here
This was made by Becky (formerly Secrets of the Imagination)
Put the mask in your mask folder.
Ok we are ready to start.
REMEMBER TO SAVE OFTEN
Step 1:
Open a new transparent image 500 x 500 pixels.
Set your Foreground and Background to the same colour from your tube.
Select your Preset Shapes tool and draw out a shape of your choice. I used a Triangle.
Don't make it too big, see my sample below.
Convert to Raster Layer.
Change your Foreground and Background to a contrasting colour from your tube and draw out another same size shape.
Convert to Raster layer and position similar to the image shown below.
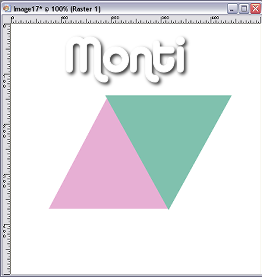
Merge visible.
Go to Effects - Mura Meisters - Copies and use the following settings.
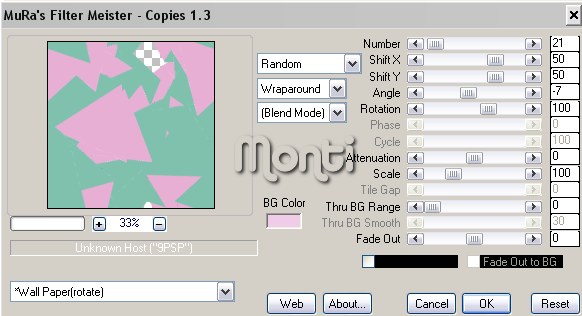
If you want you can apply a texture effect of your choice. I used Effects - Art Media Effects - Brush Strokes with the default settings.
Step 2:
Copy and paste your tube as a new layer. Resize if neccessary and move to one side.
Duplicate the tube and go to Image - Mirror.
Merge all visible and lower the Opacity to between 40 and 70 depending on what colours you used.
If the colours are light leave your opacity higher, if the colours are dark lower the opacity more.
Activate the merged layer and go to Layers - Load/Save Mask - Load Mask from Disk.
Select Becky-Mask22 with the following settings

Layers - Merge Group.
Copy and paste your tube as a new layer, resize if neccessary and move into position.Resize if neccessary.
Add the following Drop Shadow
Vertical: 5
Horizontal: 5
Opacity: 50
Blur: 5
Colour: Black
Step 3:
Select your text tool with the font of your choice. I used Childish Alpha - Size 30 - Stroke 1- Foreground Black - Background colour from your tube.
Type "Double the Trouble" and convert to Raster layer.
Change your Background to the contrasting colour we used earlier and type "Double the FUN!!"
Convert to Raster layer and Merge Down.
Go to Image - Rotate - Free Rotate - Left 20 - all layers UNchecked.
Add the following Drop Shadow
Vertical: 2
Horizontal: 2
Opacity: 50
Blur: 3
Colour: Black
Add your name in a font and colour of your choice.
Add the same Drop Shadow we used on the other text.
If you want to resize your tag do it now.
Crop using Merged Opaque.
Add the artists copyright and your watermark and save.
No comments:
Post a Comment