

This tutorial was written by Monti on March 19th 2007. It's concept is copyrighted to Monti. Any creation you make from my ideas are yours. You may print out this tutorial for your own personal use, but please do not copy it in any way to put online, pass out or rewrite without my permission or worse yet attempt to claim as your own.
This was written for psp 9 but will work in other versions.
For this tutorial you will need
Paint Shop Pro
Animation Shop
My Easel Tube
You can download it Here
NOTE:
This Easel PSP tube was made for this tut. DO NOT share it or use elsewhere without my permission.
A Font of your choice
I used HW Stone which is a pay font so I can unable to supply it.
1 Tube and between 4 and 7 Images of your choice, all by the same artist.
I am using the wonderful art of Suzanne Woolcott.
Unfortunately Suzanne is no longer selling her tubes so please use an artist you have permission for.
Ok we are ready to start.
REMEMBER TO SAVE OFTEN
Step 1:
Open the Easel tube making sure the clips layer remains hidden, the tube and the images in psp. Press Shift D to duplicate them and close the originals.
Open a new transparent image 200 x 90. Press Shift D and duplicate so you have one for each of the images you are using.
I am using 7 images so need 7 of them.
Copy and paste an image into one of the 200 x 90 canvases. Resize the image layer if necessary.
Go to Image - Add Border - 2 pixels - Colour = #404040.
Copy and paste into animation shop.
Repeat for the other images, pasting after Current Frame in animation shop. Click on Frame 1 and copy and paste it after the last frame.
Step 2:
Once you have them all pasted after each other in animation shop click on the first frame and go to Insert Image Transition with the following settings.
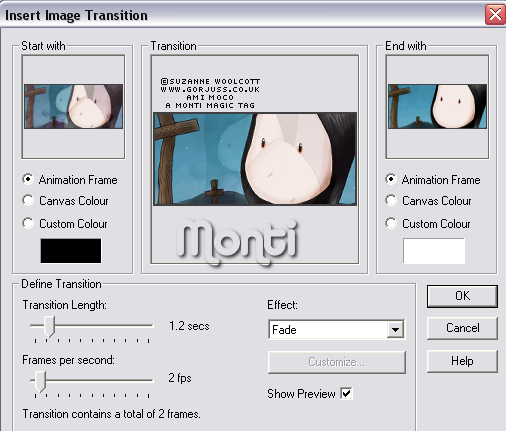
Click on the second image which should now be Frame 4. Insert Image Transition again with the same settings.
Click on the third image which should now be Frame 7. Insert Image Transition again with the same settings.
Click on the fourth image which should now be Frame 10. Insert Image Transition again with the same settings.
Click on the fifth image which should now be Frame 13. Insert Image Transition again with the same settings.
Click on the sixth image which should now be Frame 16. Insert Image Transition again with the same settings.
Click on the seventh image which should now be Frame 19. Insert Image Transition again with the same settings.
Click on the last frame to activate it and delete that last frame.
Step 3:
Back to PSP.
Activate the Easel and go to Image Canvas size 600 x 500. Add a new raster layer, fill with white and send to the bottom.
Click on the easel layer and add a Drop Shadow of your choice. I used
Vertical: 2
Horizontal: 4
Opacity: 50
Blur: 5
Colour: Black
Edit - Copy Merged and paste as a new image in animation shop, then copy and paste this after Current Frame until you have the same amount of frames as your animation.
I have 21 frames on my animation so I need 21 frames of my easel.
Once that's done go to Edit Select All.
Click on your animated frames, go to Edit Select All and then Edit Copy and paste them onto your easel using the gray area as a placement guide.
Back in PSP unhide the clips layer on the easel, go to Edit Copy and paste as a new animation in animation shop.
Edit Copy them again and click on your Propagate paste icon in the top tool bar.

Edit paste into selected frame.
Provided you still had all frames selected and the propagate paste button activated the Clips will now appear in all frames. See my tag as a placement guide.
Step 4:
Back in PSP Copy and Paste your tube as a new layer on your easel image. Resize if necessary and postition.
Add a Drop Shadow of your choice. I used the same one I used on my Easel.
Add a new layer and add your name using a font of your choice and colours to match your tube. Add a Drop Shadow.
Add a new layer and add the artists copyright and your watermark.
Hide the white background layer, the easel, guide and clips layers and merge all visible.
Crop to size and copy and paste as a new image in animation shop.
In animation shop make sure all your frames are still selected (Edit Select All) and then copy and paste the tube, name and copyright image into selected frames.
Crop off the excess white area.
Go to Animation - Frame Properties and change it to 25.
Save as a .gif file.
No comments:
Post a Comment