

This tutorial was written by Monti on June 17th 2007. It's concept is copyrighted to Monti. Any creation you make from my ideas are yours. You may print out this tutorial for your own personal use, but please do not copy it in any way to put online, pass out or rewrite without my permission or worse yet attempt to claim as your own.
For this tutorial you will need
Paint Shop Pro
My Grass
Save and open in PSP. DO NOT share this.
The Following Colour Chart
Save and open in PSP.

Ok we are ready to start.
REMEMBER TO SAVE OFTEN
Step 1:
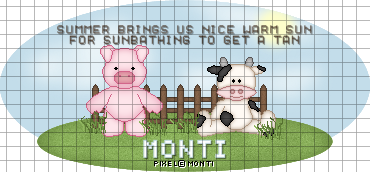
We will be making a simple background for your pixels.
Note: The sizes are a rough guide and will depend on what pixels you are adding a background to, so please change sizes to fit your images.
Select your Eclipse tool in PSP.
Set your Foreground colour to NULL, Background colour to Colour 1 (#90B75F).
Draw out an Eclipse, mine is 295 x 60 pixels.
Convert to Raster Layer.
Go to Selections - Select all - Float - Defloat and add a new Raster layer.
Change your Foreground to colour 2 (#719247).
Select your Airbrush tool with the settings shown below.
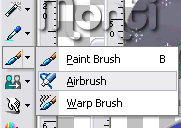
Shape: Round - Size: 14 - Hardness: 35 - Step: 32 - Density: 100 - Thickness: 100 - Opacity: 38
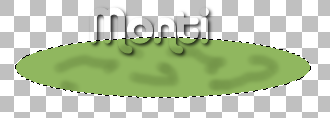
Add some darker areas on the grass as shown below.
Go to Adjust - Blur - Guassian Blur - Radius = 7.
Deselect and merge all visible.
Go to Add/Remove Noise - Add Noise - Gaussian checked - Monochrome checked - Noise set to 10.
Go to Selections - Select all - Float - Effects 3D effects - Cutout with the following settings
Vertical: 0
Horizontal: 0
Opacity: 100
Blur: 30
Shadow colour: Colour 3 (#607E39).
Deselect.
Step 2:
Select your Eclipse tool again.
Set your Foreground colour to NULL, Background colour to Colour 4 (#C3DDEA).
Draw out an Eclipse, mine is 370 x 170 pixels.
Convert to Raster Layer.
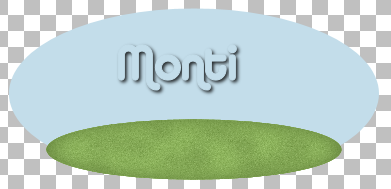
Move this below your grass layer and move into position as shown below.
Go to Selections - Select all - Float - Defloat and add a new Raster layer.
Change your Foreground to colour 5 (#EBF5F9).
Select your Airbrush tool with the settings shown below.
Shape: Round - Size: 25 - Hardness: 35 - Step: 32 - Density: 100 - Thickness: 100 - Opacity: 38
Add some clouds to the sky as shown below.
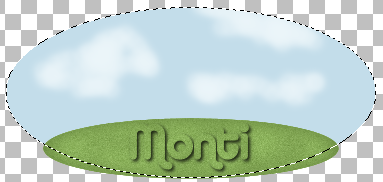
Go to Adjust - Blur - Guassian Blur - Radius: 7.
DO NOT Deselect.
Step 3:
Add a new Raster layer.
Set your Foreground to colour 6 (#FFFFC6)
Select your Airbrush tool with the settings shown below.
Shape: Round - Size: 42 - Hardness: 35 - Step: 32 - Density: 100 - Thickness: 100 - Opacity: 38
Decide where you want the sun to be and click a few times in the same place with your Airbrush tool to make a sun (I clicked 5 times for mine).
Deselect.
Hide your grass layer and Merge All Visible.
Unhide grass layer.
Add whatever pixels you want to your image and position.
For a finishing touch you can use my grass tube.
Copy and paste it as a new layer, move into position with your mover tool. Repeat until you are happy with it.
I just added mine around the feet of my animals.
Add your name and any saying.
Merge all visible and save as a png.
No comments:
Post a Comment