Showing posts with label How To Tutorial. Show all posts

Friday, 31 October 2014

Keep Sake Box


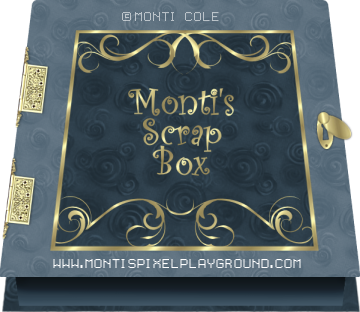
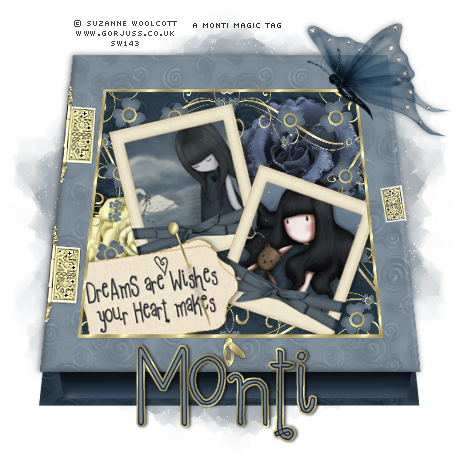
You can see a tag made with this box at the bottom of the page.

This tutorial was written by Monti on August 27th 2009. You may print out this tutorial for your own personal use, but please do not copy it in any way to put online, pass out or rewrite without my permission or worse yet attempt to claim as your own.

This was written for psp 9 but will work in other versions.

For this tutorial you will need 

Paint Shop Pro

Some Textures of your choice
There are plenty on Deviant Art that allow usage. 

Some Hinges
The ones I am using came from DoziBaers site.
Click on Scrapbooking Embellishments and scroll down to enter, then choose Hinges on the right.

A Gold Fill
Just right click and save to your PSP Patterns folder.

Some Swirl Brushes of your Choice

Step 1:
I am working on a 700 x 700 canvas as I am doing one for a tag, if you want one bigger please increase all sizes to your choice.
Turn on your Rulers by going to View- Rulers so you can see sizes.
Select your Preset Shapes tool set to Rectangle. 
Set your Background to a dark colour of your choice and your Foreground to Null. Line Style: Solid.
Starting at 100 x 100 pixels draw a Rectangle down to 600 x 600 pixels.
Go to Objects - Align - Center In Canvas. 
Convert to Raster layer and rename Back. 
Go to Selections - Select All - Float - Defloat.
Set your Foreground to a medium shade of the same colour and tick the Texture box as shown below.
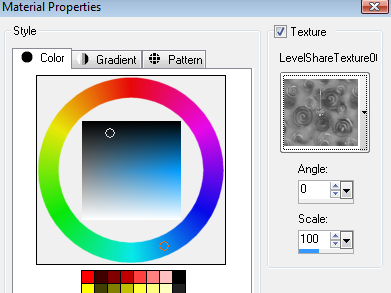
Set the texture to the one you want to use. I have had mine for ages and can't remember where they came from sorry, but any nice texture will do.
Add a new raster layer and fill the selection with the medium coloured texture. 
Deselect.
In the Layer Palette right click on the top layer and choose Merge Down.
Activate your Deform/Pick tool. 
While holding down the Ctrl key click on the top left node and pull inwards slightly. 
While still holding Ctrl click on the bottom left node and pull out slightly.
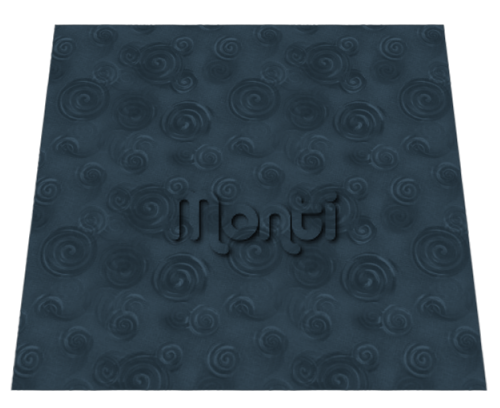
Then click on the top center node and move it down slightly until your shape looks like the image below. 
Step 2:
We are now going to do the strip at the bottom that gives the box depth. 
Set your Foreground to the medium shade we used for the Back layer and your Background to the dark colour we used earlier. 
Then set your Foreground to Null and set your Background to Gradient - Foregound/Background - Style: Linear - Angle: 0 - Repeats: 0. 
Make sure your dark colour is at the top, if it isn't then check the Invert Gradient box. 
Select your Preset Shapes tool set to Rectangle. 
Draw out a rectangle about 50 pixels high and not quite as wide as the Back layer. 
Go to Objects - Align - Horizontal Center In Canvas. 
Convert to raster layer and rename Height.
Activate your Deform/Pick tool again and while holding the Ctrl key click on the bottom left node and move it in slightly.
Please note I have lowered the opacity of the Back layer so you can see this shape properly. 
Whether you do the next part is up to you but I wanted to give the top a bit more shadow. 
Select the Burn tool from the tool bar - see below:
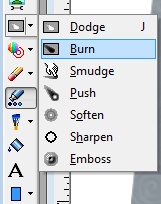
Use the following settings:

Place your Burn brush over your rectangle so that the brush lines up with the top left corner. 
Hold down the Shift key and click on the top right corner. This will darken in a stright line across the top. 
Repeat a few times until you are happy with the shading.

Step 3:
Click on the Back layer to activate it. 
Duplicate this layer - Layers - Duplicate - and move above the height layer in the layer palette. 
Rename Lid. 
Go to Selections - Modify - Expand by 2 - Selections - Modify - Smooth and set both boxes to 10.
Fill with the medium colour we used earlier.
Add a new raster layer and change the Foreground to a light shade of the same colour making sure you check the Texture button and choose a texture.
I chose to use the same one I used on the back layer. 
Fill the selection with this colour/texture. 
Deselect and click on the top layer in the Layer Palette and choose Merge Down. 
Select your Move tool and move the lid up a bit so that you can see most of the the height layer at the bottom.

Open up the hinge you wish to use. 
We only need one side of the hinge so activate your Selection Tool set to Rectangle and select the right half of the hinge. 
Go to Edit - Copy and then paste as a new layer on your box canvas.
Resize to suit your box. I resized at 60% - Smart Size - All Layers Unchecked.
Use your Move tool to move into postion then use your Deform/Pick tool to rotate it slightly so it lines up with your lid.
Use my image as a guide.
Go to Adjust - Sharpen - Sharpen More.
Duplicate the hinge and move the other hinge into position.
Click on the duplicate hinge in the layer palette and choose Merge Down to merge it with the other hinge.
Rename this layer Hinges and add a slight Drop Shadow if you wish.

Step 4:
Before we finish the box we are now going to make a key hole so save your box psp file and minimize for now. 
Open a new transparent canvas 150 x 150 pixels. 
Set your Foreground to Null and your Background to the Gold Fill Pattern.
Activate your Preset Shapes tool set to Ellipse. 
Draw out an Ellipse similar in shape to the one below. 
Go to Objects - Align - Center In Canvas and convert to raster layer. Rename Base. 
Set your Background to a dark colour (it doesn't matter which one as we will be deleting this layer later).
Still on your Ellipse Preset Shape draw out a small cirlce in the top half of the ellipse for the top of our keyhole. 
Go to Objects - Align - Horizontal Center In Canvas and convert to a raster layer.
Select your Preset Shapes again, this time set to Rounded Rectangle.
Draw out a small Rectangle and go to Objects - Align - Horizontal Center In Canvas and convert to a raster layer.
Activate your Deform/Pick tool and while holding down your Ctrl key click on the bottom left node and move it out slightly.
Then click on the top left one and while holding down the Ctrl key move it in slightly.
In the Layer Palette click on the top rectangle layer and choose merge down to merge it with the coloured circle layer. 
While still on the coloured shapes layer go to Edit - Cut - Edit - Paste as New Layer. This will center the shape. 
In the layer palette delete Raster 2.
Select Raster 3 layer and go to Selections - Select All - Float - Defloat.
In the layer palette activate the Base layer and press Delete on the keyboard. 
Deselect and then delete Raster 3.
Activate Base layer and go to Selections - Select All - Float and apply the following Cutout. 
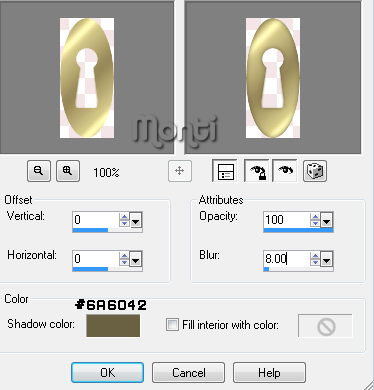
Deselect. 
Select your Preset Shapes tool again set to Ellipse and draw out a small circle at the bottom of the ellipse to act as a screw. 
Go to Objects - Align - Horizontal Center In Canvas and convert to a raster layer. 
Go to Selections - Select All - Float and apply the same Cutout.
Add the following Drop Shadow to the screw. 
Vertical = 0 
Horizontal = 0 
Opacity = 50 
Blur = 3 
Colour = Black.

In the layer palette right click on the Screw layer and Merge Down to merge it with the Base layer.
Now we are going to do the cover for the lock. 
With your Background still on your Gold Fill and your Foreground still Null draw out a circle - see my screen shot below for an idea of the size. 
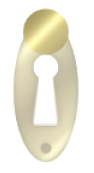
Go to Objects - Align - Horizontal Center In Canvas and convert to a raster layer. 
Go to Selections - Select All - Float and apply the same Cutout but change the blur to 10.

With the same Preset Shapes settings draw out an Ellipse and make sure it is big enough to cover the Base Shape layer. 
Move this beneath the top circle layer and go to Objects - Align - Horizontal Center In Canvas and convert to a raster layer. 
Go to Selections - Select All - Float and apply the same Cutout but change the blur to 15.
Click on the top Circle layer and choose Merge Down to merge it with the lock cover. 
Use your Deform/Pick tool on the top layer (the cover) to angle it so it looks like it is open. See below:
On the top layer go to Adjust - Sharpen. 
Then go to Edit - Copy Merged and paste onto the box. 
Move to the right hand side in the middle and resize to suit. 
Go to Adjust - Sharpen - Sharpen More and add a small Drop Shadow. 
Rename Lock.

Step 5:
Now we will finish working on the Box. 
Activate your Preset Shapes tool set to Rectangle with the following settings:
Line Style: Solid - Line Width: 6 - Foreground: Gold Fill - Background: Null. 
Draw out a rectangle - use my tag as a guide to the size.
Go to Objects - Align - Horizontal Center In Canvas and convert to a raster layer. 
Use your Deform/Pick tool and while holding down your Ctrl key pull out the bottom nodes until the shape is similar to the main box. See below. 
Rename this layer Gold Edge.
With your Magic Wand - Tolerance and Feather: 0 - click inside the gold edge.
Go to selections - Modify - Expand by 4
Click on your Lid layer to activate it and click on Delete on your keyboard. 
Deselect.
Sometimes when you do this you will notice that the area you just removed isn't all filled with the Back layer.
If this is the clase click on the Back layer to activate it then select your Deform/Pick tool and just use the nodes to stretch it slightly to fit.

That is the main box done. 
I added a new layer under the gold edge and added some swirls using brushes and my gold fill as the colour. 
Hide your Back and Height layers and Merge All - Visible.
Rename Lid. 
Making sure you are on the back layer, fill with anything you want making sure you erase anything that goes over the edges.


Sunday, 26 October 2014

How To Colourize


This tutorial was written by Monti in 2003 and updated on December 10th 2006. You may print out this tutorial for your own personal use, but please do not copy it in any way to put online, pass out or rewrite without my permission or worse yet attempt to claim as your own.

This was written for psp 9 but will work in other versions. 

For this tutorial you will need 

Paint Shop Pro

The Tube you wish to Colorize
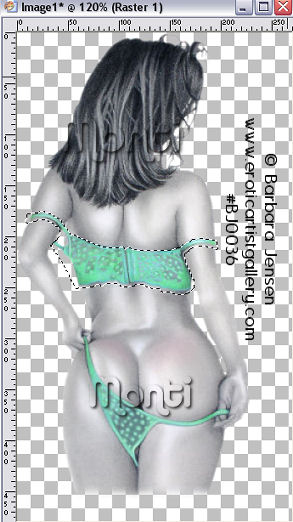
I am using a tube by Barbara Jensen for the purposes of this tutorial. 
If you wish to use her work please visit www.barbarajensentubes.com to purchase a license. 
Open the tube you want to colourize in psp. 
Press Shift and D to make a duplicate image of the tube and close the original.

Step 1: 
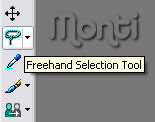
Select your lasso tool in psp. Set Feather to 1 and make sure antialias is checked. 
Now what you need to do is draw around the area that you want to colourize, so that it is surrounded in marching ants. Try and stay as close to the edge as possible but don't worry if you get a bit of skin etc. in the selections. I will show you how to get rid of that later. 

It should look similar to this when you have finished. 
Now you need to go to selections, promote to layer. Rename according to the part you promoted.

Deselect. 

NOTE:  Do ALL areas APART from the skin area. 

Step 2: 
Hide your bottom layer, then click on the promoted layer to activate it. 
Now zoom in on the image so that you can see any areas of skin etc that shouldn't be there and change your feather on the lasoo tool to 0. 
Zoom in and select the areas that shouldn't be there, then hit delete on your keyboard. 
See screen shots below.
Before 
After


Repeat this until you have all the areas you want to colourize promoted to seperate layers and have them cleaned up. 

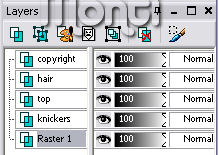
TIP: Rename the layers so you know what they are. eg skin, hair, clothes etc. (See below). Remember to do the whites of the eyes too. 

Once you have all the layers promoted you can begin colourizing. 

Step 3: 
Now on your tool bar go to Adjust - Hue and Saturation - Colorize and play around with your hue and saturation until you get the colour you want.
NOTE:  The hue changes the colour and the saturation changes the depth and intensity of the colour. 
Play around with it, and if you can't quite get the colour you want try adjusting the brightness and the contrast first. 
Colourize the rest of the layers. 

Step 4: 
Once all the other layers are coloured activate the original layer (bottom).
Go to Selections - Select all - Float - Defloat.
Add a new Raster layer and fill with a skin tone of your choice, I used #D2AC90.
DO NOT deselect.
Change the skin tone layer to Colour Legacy (in your layer palette) and go to Selections - Modify - Feather by 2 - Selections - Invert and press delete on your keyboard. 
Deselect.
NOTE: It is a good idea to save the tube in layered format should you ever want to change the colours again in the future. 
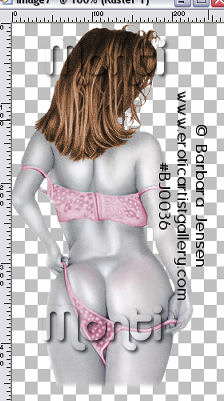
This is what mine looks like when finished.


How To Make Blings


This tutorial was written by Monti. You may print out this tutorial for your own personal use, but please do not copy it in any way to put online, pass out or rewrite without my permission or worse yet attempt to claim as your own.

This was written for psp 9 but will work in other versions.

For this tutorial you will need

Paint Shop Pro
Animation Shop

A Preset Shape or Ding Font of your Choice

My Supplies
This zip file contains my Line Style, my Colour Chart and My Twink. Download *HERE*.
Open the Twink in Animation Shop, place the MontiBlingLine.PspStyledLine in your PSP Styled Lines folder, then open PSP and open the Colour Chart in PSP. 
NOTE: If for some reason the Line Style doesn't show up in your psp, don't worry I will tell you how I made it so you should be able to make your own.

Step 1: Making a Line Style.
Open a blank canvas in PSP.
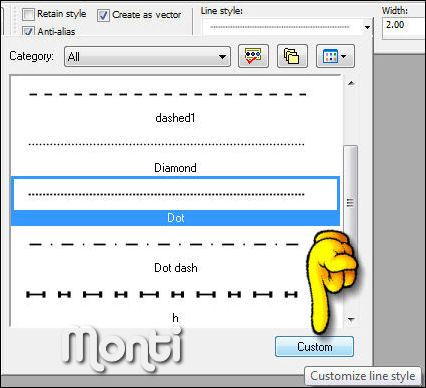
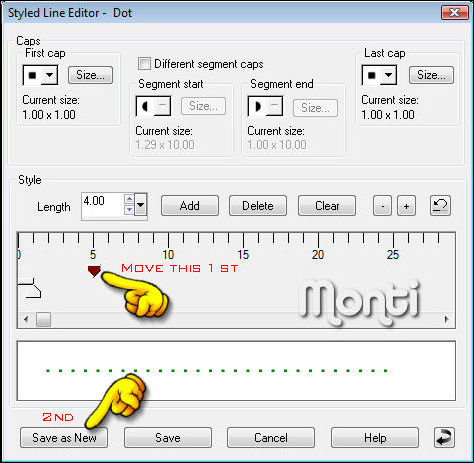
While on your Preset Shape change your Line Style to Dot and then click on Custom at the bottom as shown below.
In the next box that opens click the arrow indicated in the image below and move it over to the right so it is below the number 5.
NOTE: These are the settings I used in PSP 9, you might have to play with them in other versions. 
Save As NEW. I called mine MontiBlingLine.
To use it just find it in your Line Styles Drop Down box.

Step 2:
In Animation Shop open the Twink. 
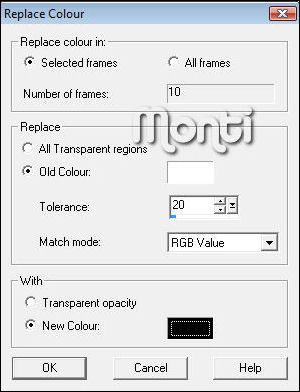
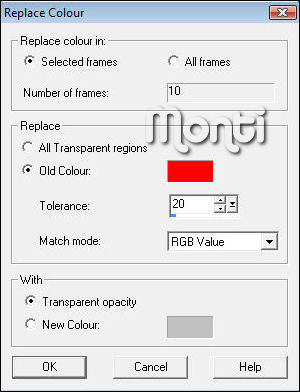
If you want it to be a different colour to white then to go Edit - Select All - Animation - Replace Colour
Use the settings shown below but change the new colour to whatever colour you want your bling to be.
Once you have done that go back to PSP.
Open a new transparent image 250 x 250 pixels.
Set your Foreground to Black and your Background to Null - Line Width: 2 - Line Style: MontiBlingLine.
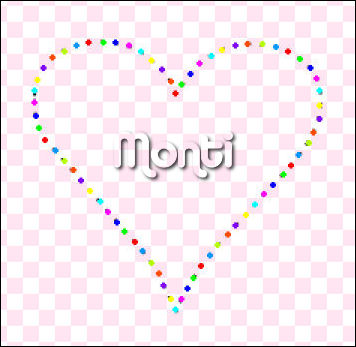
Using your Preset Shape or a Ding Font of your choice draw a shape on the canvas about 200 x 200 pixels in size - for the purpose of this tutorial I am using a simple heart shape.
Go to Objects - Align - Center in Canvas and then convert to Raster layer.
Now you could just place the twinks on top of that in order but I always found that because they were all the same colour it got confusing and I kept losing count so I found a much easier way.

Step 3:
Open my Colour Chart and set your Paintbrush to Round - Size: 4 - Colour 1 on the colour chart.
Add a new raster layer onto your shape canvas.
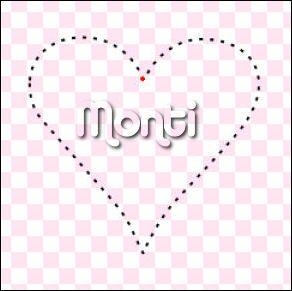
Zoom in close and start at the top center of your shape and paint a red dot over the black dot where you are starting as shown below.
Counting the red dot you just did as number 1 count your way round the dots until you get to dot 11.
Paint a red dot over that dot too. 
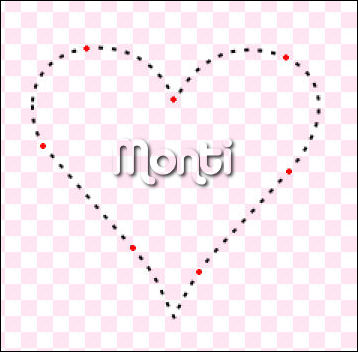
Continue round doing the same thing until it looks like the one below. 
Change your Paintbrush to colour 2 on the colour chart and paint a green dot after each of the red ones. 
Carry on like this in colour order until you have painted over all the black dots. 
Do NOT worry if you have an area where you can't fit all the 10 colours in it really doesn't matter. 
Once you have done this it will look something like the one below.
Now delete the bottom black dot layer and copy MERGED and paste your coloured dots image into Animation Shop. 
You must copy merged otherwise the space around the outside is cropped off.

Step 4:
In Animation Shop duplicate your dotted shape image until you have 10 frames then go to Edit - Select All.
Zoom in on the 1st frame. 
Activate your Twink image making sure all frames are selected. 
Copy the Twink and activate your dotted shape image. 
Go to Edit - Paste into Selected Frame and place it over the number 1 (Red) dots.
Repeat the paste until all the red dots are covered - make sure you do the red ones and not the orange ones. 
As this is the 1st set of twinks you can still count the spaces if you need to. It doesn't matter if some of the red or other colours show over the edge we will get rid of that later.

Once all the red dots are covered go back to your twink image.
Click on the 1st frame to activate it and go to Edit - Cut. Right click on Twink frame 9 to activate it and choose Paste after Current Frame. 
Go to Edit - Select All - Edit - Copy.
Back on your dotted shape image make sure all frames are still selected and go to Edit - Paste into Selected Frame covering all of the number 2 (Green) dots. 
Repeat the paste until all the green dots are covered.

Once all the green dots are covered go back to your twink image. 
Click on the 1st frame to activate it. Go to Edit - Cut then click on frame 9 to activate it and go to Edit - Paste after Current Frame. 
Go to Edit - Select All - Edit - Copy.
Back on your dotted shape image make sure all frames are still selected and and go to Edit - Paste into Selected Frame covering all of the number 3 (Blue) dots.

Once all the blue dots are covered go back to your twink image. 
Click on the 1st frame to activate it. Go to Edit - Cut then click on frame 9 to activate it and go to Edit - Paste after Current Frame. 
Go to Edit - Select All - Edit - Copy.
Back on your dotted shape image make sure all frames are still selected and and go to Edit - Paste into Selected Frame covering all of the number 4 (Pink) dots.

Carry on doing this - remembering to cut the 1st frame of the Twink image and paste after frame 9 - until all colours are covered by the twinks.

Step 5:
Once you have done that and covered every dot with a twink frame you will notice we still have some of the coloured dots showing.
Open the Colour chart in animation shop.
Make sure all Frames of your dotted shape are still selected then go to Animaton - Replace Colour.
On the Replace colour click on the colour box to open it and then with your dropper click on colour 1 on the colour chart press ok. 
In the bottom box change it to Transparency as shown below.

Repeat this step with every colour on the Colour Chart.

Step 6: Testing
As the bling is white on a transparent canvas you can't really see it to see if you are happy with it so once again use the Animation - Replace Colour but this time in the Replace set it to Transparent and set the bottom box to black. 
Click on View Animation. 
If you are happpy with it go back to Animation - Replace Colour.
In the Replace section change the old colour box to black and in the bottom section choose white or whatever colour you want the bling to be.
Click ok.

Save your bling as a .gif or an .mng file.

Congratulations on making your first Bling, with a bit of practice you will be turning every shape into a Bling.