

This tutorial was written by Monti on September 27th 2008. It's concept is copyrighted to Monti. Any creation you make from my ideas are yours. You may print out this tutorial for your own personal use, but please do not copy it in any way to put online, pass out or rewrite without my permission or worse yet attempt to claim as your own.
For this tutorial you will need
Paint Shop Pro
The Following Colour Chart
Save and open in PSP.
This colour chart is just a guide, feel free to use whatever colours you want.

Ok we are ready to start.
REMEMBER TO SAVE OFTEN
Step 1: - Outline
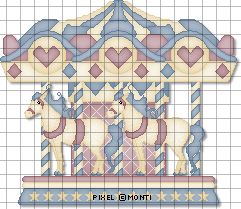
Because this is quite a complicated outline I decided not to split the main image into pieces and needed to make the count quite large.
Because of this I can't load it onto this page so please click the small image below which will open the main count. Right click and save this and open in PSP.
To help you keep count of what you have done you can add a new layer to the count in PSP and draw a line through the pixels you have drawn to keep your place.
Carousel Count

To make this easier I have numbered all pixels over 1.
Select the brush tool with the following settings.
Size: 1 - Hardness, Opacity and Density: 100
Zoom in to about 800% - 1000%
Set your foreground to colour 2 on the outline colour chart (#6B859E) and start at the top of your carousel, the blue part.
Change the colours as you go. The yellow is Colour 1 (#E5CF9D) - the pink is colour 3 (#9E6C75).
Open a new image 400 x 400 and fill with white so you can see what you are working on.
Make sure you draw in all the diamonds at the top and all the stars at the bottom. I have only done the count for one star as they are all the same so if you do the star on a new layer you can duplicate and move them into position.
Once your outline is complete it will look like the small image above. Hide the white background layer and merge all visible. Unhide the background layer again.
______________________________
Step 2: - Blue Fills
When the outline is complete select your magic wand with the following settings.
Using the image below we are going to do all the blue fills.
I have numbered the blue areas 1 - 19 so we will be filling them in order.
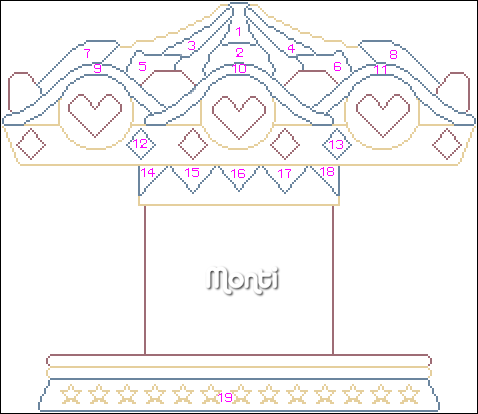
With your Magic Wand on the settings shown above click inside area 1.
Set your Foreground to Colour 6 (#B5C2D0) on your colour chart and flood fill this selection.
Keep selected.
Selections float, Effects 3D effects, Cutout with the following settings
Vertical: 0
Horizontal: 0
Opacity: 100
Blur: 8
Shadow colour: #6B859E
Make sure fill interior with colour is UNchecked.
Deselect.
Select your magic wand with the same settings and click inside area 2.
Fill this selection with Colour 6 (#B5C2D0).
Keep selected.
Selections float, Effects 3D effects, Cutout with the following settings
Vertical: 0
Horizontal: 0
Opacity: 100
Blur: 8
Shadow colour: #6B859E
Make sure fill interior with colour is UNchecked.
Deselect.
Select your magic wand with the same settings and click inside area 3.
Fill this selection with Colour 6 (#B5C2D0).
Keep selected.
Selections float, Effects 3D effects, Cutout with the following settings
Vertical: 0
Horizontal: 0
Opacity: 100
Blur: 7
Shadow colour: #6B859E
Make sure fill interior with colour is UNchecked.
Deselect.
Repeat this cutout for area 4.
Select your magic wand with the same settings and click inside area 5.
Fill this selection with Colour 6 (#B5C2D0).
Keep selected.
Selections float, Effects 3D effects, Cutout with the following settings
Vertical: 0
Horizontal: 0
Opacity: 100
Blur: 9
Shadow colour: #6B859E
Make sure fill interior with colour is UNchecked.
Deselect.
Repeat this cutout for area 6.
Select your magic wand with the same settings and click inside area 7.
Fill this selection with Colour 6 (#B5C2D0).
Keep selected.
Selections float, Effects 3D effects, Cutout with the following settings
Vertical: 0
Horizontal: 0
Opacity: 100
Blur: 7
Shadow colour: #6B859E
Make sure fill interior with colour is UNchecked.
Deselect.
Repeat this cutout for area 8.
Select your magic wand with the same settings and click inside area 9.
Fill this selection with Colour 6 (#B5C2D0).
Keep selected.
Selections float, Effects 3D effects, Cutout with the following settings
Vertical: 0
Horizontal: 0
Opacity: 80
Blur: 4
Shadow colour: #6B859E
Make sure fill interior with colour is UNchecked.
Deselect.
Repeat this cutout for areas 10 and 11.
Select your magic wand with the same settings and click inside area 12.
Fill this selection with Colour 6 (#B5C2D0).
Keep selected.
Selections float, Effects 3D effects, Cutout with the following settings
Vertical: 0
Horizontal: 0
Opacity: 100
Blur: 5
Shadow colour: #6B859E
Make sure fill interior with colour is UNchecked.
Deselect.
Repeat this cutout for area 13.
Select your magic wand with the same settings and click inside area 14.
Fill this selection with Colour 6 (#B5C2D0).
Keep selected.
Selections float, Effects 3D effects, Cutout with the following settings
Vertical: 0
Horizontal: 0
Opacity: 100
Blur: 4
Shadow colour: #6B859E
Make sure fill interior with colour is UNchecked.
Deselect.
Repeat this cutout for area 18.
Select your magic wand with the same settings and click inside area 15.
Fill this selection with Colour 6 (#B5C2D0).
Keep selected.
Selections float, Effects 3D effects, Cutout with the following settings
Vertical: 0
Horizontal: 0
Opacity: 100
Blur: 6
Shadow colour: #6B859E
Make sure fill interior with colour is UNchecked.
Deselect.
Repeat this cutout for areas 16 and 17.
Select your magic wand with the same settings and click inside area 19.
Fill this selection with Colour 6 (#B5C2D0).
Keep selected.
Selections float, Effects 3D effects, Cutout with the following settings
Vertical: 0
Horizontal: 0
Opacity: 100
Blur: 4
Shadow colour: #6B859E
Make sure fill interior with colour is UNchecked.
Deselect.
______________________________
Step 3: - Yellow Fills
Using the image below we are going to do all the yellow fills.
I have numbered the yellow areas 1 - 11 so we will be filling them in order.
With your Magic Wand on the settings shown above click inside area 1.
Set your Foreground to Colour 5 (#FDF9EB) on your colour chart and flood fill this selection.
Keep selected.
Selections float, Effects 3D effects, Cutout with the following settings
Vertical: 0
Horizontal: 0
Opacity: 100
Blur: 8
Shadow colour: #E5CF9D
Make sure fill interior with colour is UNchecked.
Deselect.
Repeat this cutout for area 2.
Select your magic wand with the same settings and click inside area 3.
Fill this selection with Colour 5 (#FDF9EB).
Keep selected.
Selections float, Effects 3D effects, Cutout with the following settings
Vertical: 0
Horizontal: 0
Opacity: 100
Blur: 9
Shadow colour: #E5CF9D
Make sure fill interior with colour is UNchecked.
Deselect.
Repeat this cutout for area 4.
Select your magic wand with the same settings and click inside area 5.
Fill this selection with Colour 5 (#FDF9EB).
Keep selected.
Selections float, Effects 3D effects, Cutout with the following settings
Vertical: 0
Horizontal: 0
Opacity: 100
Blur: 9
Shadow colour: #E5CF9D
Make sure fill interior with colour is UNchecked.
Deselect.
Repeat cutout.
Repeat this cutout for areas 6 and 7.
Select your magic wand with the same settings and click inside area 8.
Fill this selection with Colour 5 (#FDF9EB).
Keep selected.
Selections float, Effects 3D effects, Cutout with the following settings
Vertical: 0
Horizontal: 0
Opacity: 100
Blur: 9
Shadow colour: #E5CF9D
Make sure fill interior with colour is UNchecked.
Deselect.
Select your magic wand with the same settings and click inside area 9.
Fill this selection with Colour 5 (#FDF9EB).
Keep selected.
Selections float, Effects 3D effects, Cutout with the following settings
Vertical: 0
Horizontal: 0
Opacity: 100
Blur: 11
Shadow colour: #E5CF9D
Make sure fill interior with colour is UNchecked.
Deselect.
Select your magic wand with the same settings and click inside area 10.
Fill this selection with Colour 5 (#FDF9EB).
Keep selected.
Selections float, Effects 3D effects, Cutout with the following settings
Vertical: 0
Horizontal: 0
Opacity: 100
Blur: 5
Shadow colour: #E5CF9D
Make sure fill interior with colour is UNchecked.
Deselect.
Select your magic wand with the same settings and click inside area 11 - one of the stars.
Fill this selection with Colour 5 (#FDF9EB).
Keep selected.
Selections float, Effects 3D effects, Cutout with the following settings
Vertical: 0
Horizontal: 0
Opacity: 100
Blur: 2
Shadow colour: #E5CF9D
Make sure fill interior with colour is UNchecked.
Deselect.
Repeat this cut out for all the other stars.
______________________________
Step 4: - Pink Fills
Using the image below we are going to do all the pink fills.
I have numbered the pink areas 1 - 19 so we will be filling them in order.

With your Magic Wand on the settings shown above click inside area 1.
Set your Foreground to Colour 7 (#D0B6BB) on your colour chart and flood fill this selection.
Keep selected.
Selections float, Effects 3D effects, Cutout with the following settings
Vertical: 0
Horizontal: 0
Opacity: 100
Blur: 11
Shadow colour: #9E6C75
Make sure fill interior with colour is UNchecked.
Deselect.
Repeat this cutout for area 2.
Select your magic wand with the same settings and click inside area 3.
Fill this selection with Colour 7 (#D0B6BB).
Keep selected.
Selections float, Effects 3D effects, Cutout with the following settings
Vertical: 0
Horizontal: 0
Opacity: 100
Blur: 9
Shadow colour: #9E6C75
Make sure fill interior with colour is UNchecked.
Deselect.
Repeat this cutout for area 4.
Select your magic wand with the same settings and click inside area 5.
Fill this selection with Colour 7 (#D0B6BB).
Keep selected.
Selections float, Effects 3D effects, Cutout with the following settings
Vertical: 0
Horizontal: 0
Opacity: 100
Blur: 6
Shadow colour: #9E6C75
Make sure fill interior with colour is UNchecked.
Deselect.
Repeat this cutout for areas 6, 7, 8, 9 and 10.
Select your magic wand with the same settings and click inside area 11.
Fill this selection with Colour 7 (#D0B6BB).
Keep selected.
Selections float, Effects 3D effects, Cutout with the following settings
Vertical: 0
Horizontal: 0
Opacity: 100
Blur: 8
Shadow colour: #9E6C75
Make sure fill interior with colour is UNchecked.
Deselect.
Repeat this cutout for areas 12 and 13.
Select your magic wand with the same settings and click inside area 14.
Fill this selection with Colour 7 (#D0B6BB).
Keep selected.
Selections float, Effects 3D effects, Cutout with the following settings
Vertical: 0
Horizontal: 0
Opacity: 100
Blur: 6
Shadow colour: #9E6C75
Make sure fill interior with colour is UNchecked.
Deselect.
Repeat this cutout for areas 15, 16 and 17.
Select your magic wand with the same settings and click inside area 18.
Fill this selection with Colour 7 (#D0B6BB).
Keep selected.
Selections float, Effects 3D effects, Cutout with the following settings
Vertical: 0
Horizontal: 0
Opacity: 100
Blur: 25
Shadow colour: #9E6C75
Make sure fill interior with colour is UNchecked.
Deselect.
Select your magic wand with the same settings and click inside area 19.
Fill this selection with Colour 7 (#D0B6BB).
Keep selected.
Selections float, Effects 3D effects, Cutout with the following settings
Vertical: 0
Horizontal: 0
Opacity: 100
Blur: 4
Shadow colour: #9E6C75
Make sure fill interior with colour is UNchecked.
Deselect.
______________________________
Step 5: - Pattern
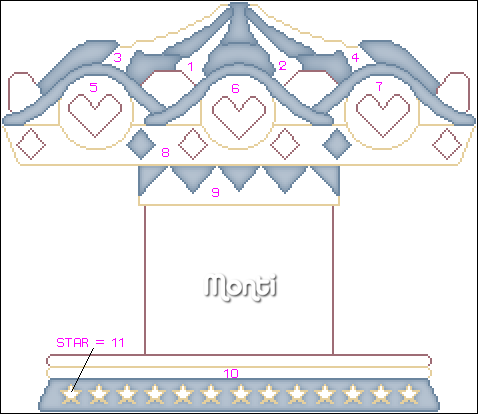
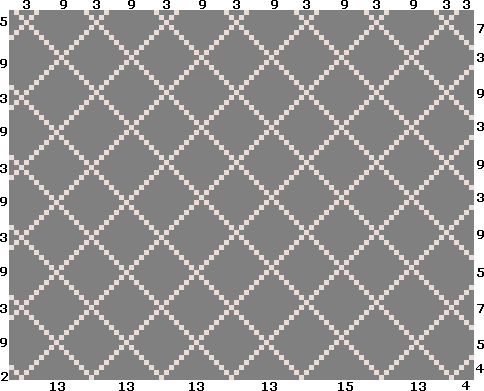
Now the fills are complete we are going to add the Criss Cross pattern to the center pink area.
Note: On this image I have numbered the spaces where you paint at the edges. Once you do the edge pixel continue downwards and diagonally until you reach the opposite side.
Set your Foreground to colour 4 on the colour chart (#E9DCD6) and using the image below we are going to add the pattern.
The grey area is where the pink is on your carousel, I used grey on the preview to show up the pale pattern better.
Once the pattern is complete your image should look like the one below.

______________________________
Step 6: - Poles
Open a new image 40 x 120 and fill with white so you can see what you are working on.
Select your paint brush with the same settings we used earlier.
Using the image below draw out a pole, changing colours as you go.
You will need colours 1, 2 and 3 on the colour chart.

When the outline is complete select your magic wand with the same settings we used earlier.
Using the image below we are going to do all the blue fills.
I have numbered the blue areas 1 - 7 so we will be filling them in order.

With your Magic Wand on the settings shown above click inside area 1.
Set your Foreground to Colour 6 (#B5C2D0) on your colour chart and flood fill this selection.
Keep selected.
Selections float, Effects 3D effects, Cutout with the following settings
Vertical: 0
Horizontal: 0
Opacity: 100
Blur: 4
Shadow colour: #6B859E
Make sure fill interior with colour is UNchecked.
Deselect.
Repeat this cutout for areas 2, 3, 4, 5, 6 and 7.
Using the image below we are going to do all the yellow fills.
I have numbered the yellow areas 1 - 6 so we will be filling them in order.

With your Magic Wand on the settings shown above click inside area 1.
Set your Foreground to Colour 5 (#FDF9EB) on your colour chart and flood fill this selection.
Keep selected.
Selections float, Effects 3D effects, Cutout with the following settings
Vertical: 0
Horizontal: 0
Opacity: 100
Blur: 4
Shadow colour: #E5CF9D
Make sure fill interior with colour is UNchecked.
Deselect.
Repeat this cutout for area areas 2, 3, 4, 5 and 6.
Finally we are going to add the poles to our main carousel.
Copy and paste your pole as a new layer and duplicate it 4 times for a total of 5 poles.
Use the image below to help you position the poles.

Hide the white background layer and save as a psp file so we can add the horses.
I will show you how to do the horses in the next tutorial.
I love carousels so I will definitely have to try this one!
ReplyDeleteAudrey