Showing posts with label Pixel Animals. Show all posts

Wednesday, 22 October 2014

Pixel Zebra - Sitting

 
This tutorial was written by Monti on September 20th 2009. It's concept is copyrighted to Monti. Any creation you make from my ideas are yours. You may print out this tutorial for your own personal use, but please do not copy it in any way to put online, pass out or rewrite without my permission or worse yet attempt to claim as your own.

For this tutorial you will need 

Paint Shop Pro

The Following Colour Chart
Save and then open in PSP
Of course you are free to use any colours you want.

Ok we are ready to start.

REMEMBER TO SAVE OFTEN 

Step 1:
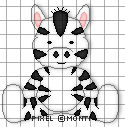
We will be be making the Zebra shown below. 
The outline below have been resized a lot so you can see it clearly. 
To make this easier I have numbered all pixels over 1.
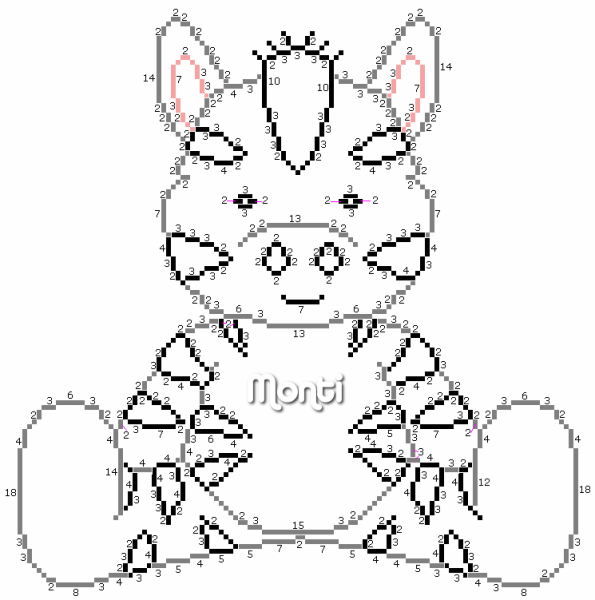
Open a new image 200 x 200 transparent. 
Flood fill with white so you can see what you are working on. Delete this layer at the end.
Turn the grid on so you can see the single pixels by going to View - Grid - then View - Change Grid, Guide and Snap Properties. Under Current Image Settings change the Horizontal and Vertical grids to 1.
Add a new Raster Layer and name Outline.
Select the brush tool with the following settings.
Size: 1 - Hardness, Opacity and Density: 100 
Zoom in to about 800% - 1000% 
I find it easier to start the highest point, in this case one of his ears. (You can move the image later using your move tool if you need to). 

Set your foreground to colour 3 on the colour chart (#808080) and start drawing the Zebra outline changing colours as you go.
The stripes and face are colour 1 (#000000) on your colour chart and the inner ears are colour 5 (#F5A3A3) on your colour chart.

Step 2:
When all of your outline is complete, click on the outline layer to activate it.
Select your magic wand with the following settings and click inside the main area of the Zebras head.
Add a new raster layer called Fills and move this beneath your outline layer in the layer palette.
Select colour 4 (#FFFFFF) on your Zebra colour chart, click on the Fill layer to activate it and flood fill that selection.
Keep selected.
Selections float, Effects 3D effects, Cutout with the following settings
Vertical: 0
Horizontal: 0
Opacity: 50
Blur: 5
Shadow colour: Use your Zebra outline. Colour 3 (#808080).
Make sure fill interior with colour is UNchecked. 
Deselect.

Step 3:
Select your magic wand and making sure you are on the outline layer click inside the body area and hold down your shift key and click in each of the main arm areas too as shown below. 
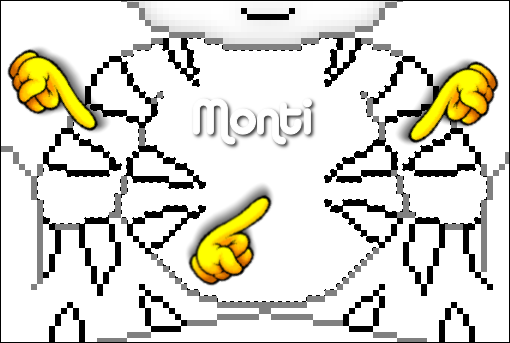
Select colour 4 (#FFFFFF) on your Zebra colour chart, click on the Fill layer to activate it and flood fill that selection.
Keep selected.
Selections float, Effects 3D effects, Cutout with the following settings
Vertical: 0
Horizontal: 0
Opacity: 50
Blur: 6
Shadow colour: Use your Zebra outline. Colour 3 (#808080).
Make sure fill interior with colour is UNchecked. 
Deselect.

Step 4:
Select your magic wand and making sure you are on the outline layer click inside the left leg. 
Select colour 4 (#FFFFFF) on your Zebra colour chart, click on the Fill layer to activate it and flood fill that selection.
Keep selected.
Selections float, Effects 3D effects, Cutout with the following settings
Vertical: 0
Horizontal: 0
Opacity: 50
Blur: 6
Shadow colour: Use your Zebra outline. Colour 3 (#808080).
Make sure fill interior with colour is UNchecked. 
Deselect.
Repeat this for the right leg making sure you fill on the Fill layer.

Step 5:
Select your magic wand and making sure you are on the outline layer click inside the left outer ear. 
Select colour 4 (#FFFFFF) on your Zebra colour chart, click on the Fill layer to activate it and flood fill that selection.
Keep selected.
Selections float, Effects 3D effects, Cutout with the following settings
Vertical: 0
Horizontal: 0
Opacity: 50
Blur: 3
Shadow colour: Use your Zebra outline. Colour 3 (#808080).
Make sure fill interior with colour is UNchecked. 
Deselect.
Repeat this for the right outer ear making sure you fill on the Fill layer.

Step 6:
Select your magic wand and making sure you are on the outline layer click inside the left inner ear. 
Select colour 6 (#FBD5D5) on your Zebra colour chart, click on the Fill layer to activate it and flood fill that selection.
Keep selected.
Selections float, Effects 3D effects, Cutout with the following settings
Vertical: 0
Horizontal: 0
Opacity: 100
Blur: 4
Shadow colour: Use your inner ear outline. Colour 5 (#F5A3A3).
Make sure fill interior with colour is UNchecked. 
Deselect.
Repeat this for the right inner ear making sure you fill on the Fill layer.

Step 7:
Select your magic wand and making sure you are on the outline layer click inside the main stripe on the top of the zebra's head. Shown below.
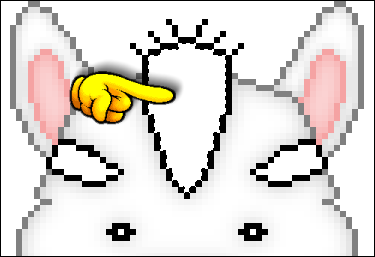
Select colour 2 (#303030) on your Zebra colour chart, click on the Fill layer to activate it and flood fill that selection.
Keep selected.
Selections float, Effects 3D effects, Cutout with the following settings
Vertical: 0
Horizontal: 0
Opacity: 100
Blur: 7
Shadow colour: Use your Zebra stripe outline. Colour 1 (#000000).
Make sure fill interior with colour is UNchecked. 
Go to Adjust - Add/Remove Noise - Add Noise - Gaussian: Checked - Noise Amount: 5 - Monochrome: Checked.
Deselect.

Step 8:
Use the following settings for all the other stripes, making sure that when you get to the shoulder stripes you select the stray pixels shown below.
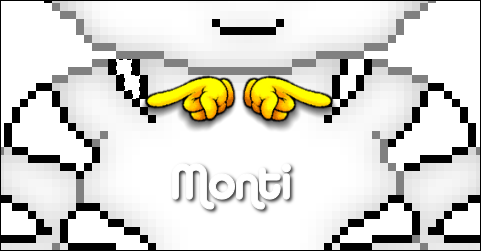
Select colour 2 (#303030) on your Zebra colour chart, click on the Fill layer to activate it and flood fill that selection.
Keep selected.
Selections float, Effects 3D effects, Cutout with the following settings
Vertical: 0
Horizontal: 0
Opacity: 100
Blur: 4
Shadow colour: Use your Zebra stripe outline. Colour 1 (#000000).
Make sure fill interior with colour is UNchecked. 
Deselect.

Step 9:
Select your magic wand and making sure you are on the outline layer click inside the left nostril. 
Select colour 2 (#303030) on your Zebra colour chart, click on the Fill layer to activate it and flood fill that selection.
Keep selected.
Selections float, Effects 3D effects, Cutout with the following settings
Vertical: 0
Horizontal: 0
Opacity: 100
Blur: 2
Shadow colour: Use your Zebra stripe outline. Colour 1 (#000000).
Make sure fill interior with colour is UNchecked. 
Deselect.
Repeat this for the right nostril making sure you fill on the Fill layer.

Step 10:
Set your foreground to a colour of your choice to fill the eyes. I used #441E0A.
Making sure you are on your fill layer paint in the 1 pixel square in the center of the eyes.

Step 11: - Optional
Zebra's have a darker nose area so I have added this step as an option. 
The zebra on the left at the top of the page has had this option added and the one on the right hasn't, so you can decide which you prefer. 
Activate your paintbrush with the settings shown below. 
Set your foreground to colour 2 (#303030) on th ezebra colour chart and add a new raster layer. 
With your paintbrush click on the nose area as shown below.
Note: I have lowered the opacity of the fill and outline layers so you can see the paintbrush area more clearly.

Making sure you are on the nose layer go to Adjust - Blur - Gaussian Blur - Radius: 5

Delete the White layer.

Merge all visible and save as a png.


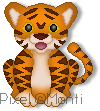
Pixel Tiger - Sitting


This tutorial was written by Monti on November 5th 2013. It's concept is copyrighted to Monti. Any creation you make from my ideas are yours. You may print out this tutorial for your own personal use, but please do not copy it in any way to put online, pass out or rewrite without my permission or worse yet attempt to claim as your own.

For this tutorial you will need 

Paint Shop Pro

The Following Colour Charts 
Save and then open in PSP
Of course you are free to use any colours you want.
Outline Colour Chart
Fill Colour Chart
Ok we are ready to start.

REMEMBER TO SAVE OFTEN 

Step 1: Outline
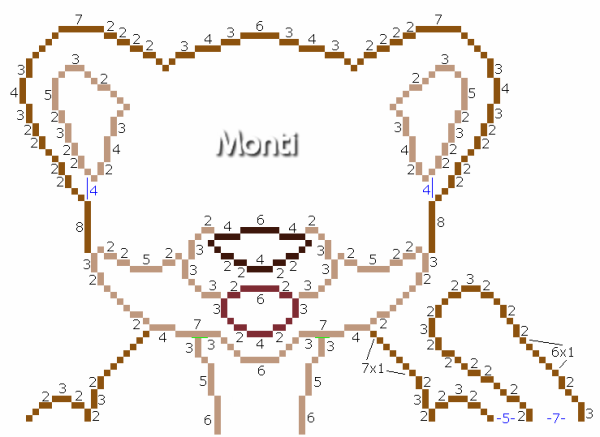
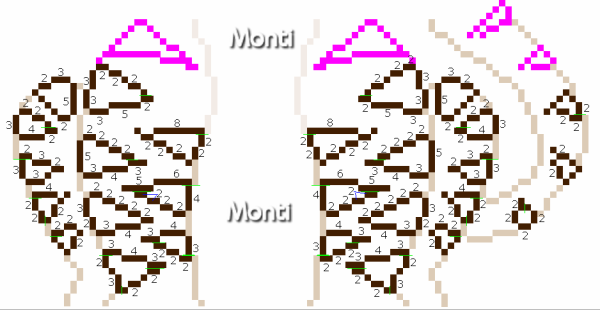
We will be be making the Tiger shown above. The outlines below have been resized a lot so you can see them clearly. 
I have done the outline in 2 parts, we will be starting with the top half of the Tiger.
To make this easier I have numbered all pixels over 1.
The blue numbers are the pixel spaces in the gaps. 
Open a new image 200 x 200 transparent. 
Add a new raster layer and name it Tiger.
Select the brush tool with the following settings.
Size: 1 - Hardness, Opacity and Density: 100 
Zoom in to about 800% - 1000% 
Set your foreground to colour 1 on the outline colour chart (#8D530F) and start at the top of your canvas.
I started on the left ear.
Change colours as you go as indicated on the outline chart.
The inner ears, cheeks and belly (up to the legs) are colour 2 (#BF997F), the nose is colour 3 (#3E170C) and the mouth are colour 4 (#802C34).

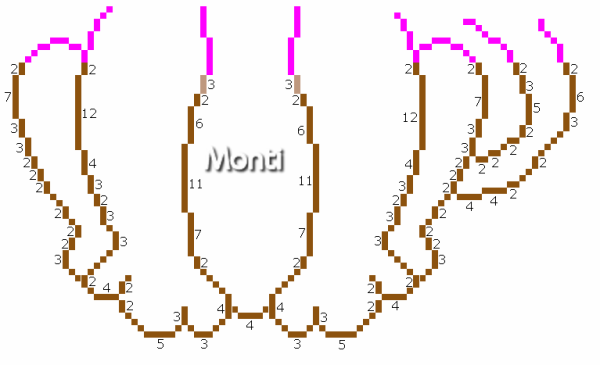
Step 2:
When you have completed that outline we will carry on with the outline below. 
NOTE: The parts shown in pink are the parts you have already drawn from the first outline.


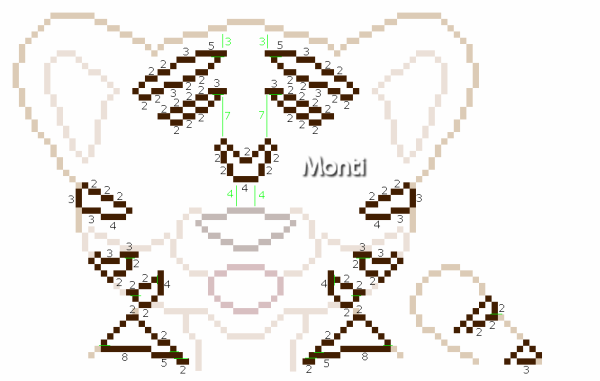
Step 3: Stripes
Add a new raster layer and name it Stripes. 
Change your Foreground to colour 5 (#431F02) on the Outline Colour Chart and use the guide below to draw in your stripes. 
I have lowered the opacity on the outline layer so you can see the stripes more clearly. 
The numbers in green are the pixel spaces between the lines to help you put them in the right place.


When you have completed that outline we will carry on with the outline below. 
NOTE: The parts shown in pink are the parts you have already drawn from the first outline.


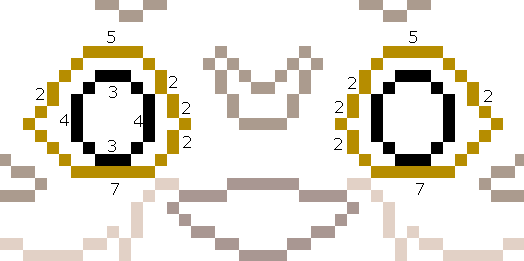
Step 4: - Eyes
Add a new raster layer and name it Eyes. 
Change your Foreground to colour 6 (#B68D00) on the Outline Colour Chart and use the guide below to draw in the outer eye. 

Change your Foreground to Black (#000000) and use the guide below to draw in the inner eye.


Hide all layers apart from the Tiger Layer.
_______________________________________________

Fills

Step 5: - Front Legs
When your outline is complete, add a new raster layer and name it Tiger Fill. Move this down in the layer palette until it is below the Tiger layer. 
Click on the Tiger layer to activate it. 

Select your magic wand with the following settings and click inside the tiger's left leg. 


Click on the Tiger Fill layer to activate it and select colour 1 (#FD8C0A) on your fill colour chart and flood fill this selection. 
Keep selected. 
Selections float, Effects 3D effects, Cutout with the following settings
Vertical: 0
Horizontal: 0
Opacity: 100
Blur: 15
Shadow colour: Use your body outline.(#8D530F)
Make sure fill interior with colour is UNchecked. 
DO NOT Deselect. Defloat.

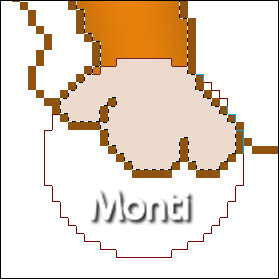
Add a new raster layer above the Tiger Fill layer and change your Foreground to Colour 2 (#EEDACC) on the fill colour chart.
Select your paint brush on round and size 25.

Click once with your paint brush in the toe section of the foot. See image below for placement.


Making sure the area is still selected to go Adjust Blur - Gaussian Blur - 2.
Deselect. 
Right click on the blur layer in the layer palette and merge down to the Tiger Fill layer.
Repeat for the right leg.
_______________________________________________

Step 6: - Back Legs
Click on the Tiger layer to activate it. 
Select your magic wand with the same settings and click inside the left back leg.
Click on the Tiger Fill layer to activate it and select colour 1 (#FD8C0A) on your fill colour chart and flood fill this selection. 
Keep selected. 
Selections float, Effects 3D effects, Cutout with the following settings
Vertical: 0
Horizontal: 0
Opacity: 100
Blur: 10
Shadow colour: Use your body outline.(#8D530F)
Deselect.
Repeat for the right back leg.
_______________________________________________


Step 7: - Tummy
Click on the Tiger layer to activate it. 
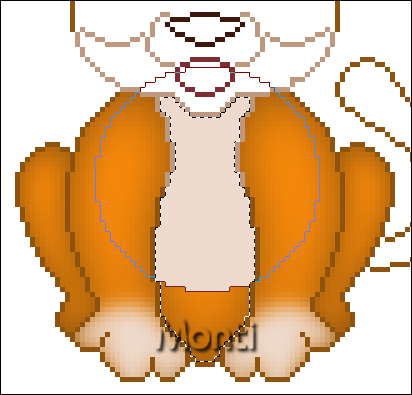
Select your magic wand with the same settings and click inside the tummy area.
Click on the Tiger Fill layer to activate it and select colour 1 (#FD8C0A) on your fill colour chart and flood fill this selection. 
Keep selected. 
Selections float, Effects 3D effects, Cutout with the following settings
Vertical: 0
Horizontal: 0
Opacity: 100
Blur: 18
Shadow colour: Use your body outline.(#8D530F)
Make sure fill interior with colour is UNchecked. 
DO NOT Deselect. Defloat.

Add a new raster layer above the Tiger Fill layer and change your Foreground to Colour 2 (#EEDACC) on the fill colour chart.
Select your paint brush on round and size 45.

Click once with your paint brush in the top section of the tummy. See image below for placement.


Making sure the area is still selected to go Adjust Blur - Gaussian Blur - 3.
Deselect. 
Right click on the blur layer in the layer palette and merge down to the Tiger Fill layer.
_______________________________________________

Step 8: - Tail
Click on the Tiger layer to activate it. 
Select your magic wand with the same settings and click inside the tail area.
Click on the Tiger Fill layer to activate it and select colour 1 (#FD8C0A) on your fill colour chart and flood fill this selection. 
Keep selected. 
Selections float, Effects 3D effects, Cutout with the following settings
Vertical: 0
Horizontal: 0
Opacity: 100
Blur: 8
Shadow colour: Use your body outline.(#8D530F)
Make sure fill interior with colour is UNchecked. 
Deselect.
_______________________________________________

Step 9: - Head
Click on the Tiger layer to activate it. 
Select your magic wand with the same settings and click inside the top of the head.
Click on the Tiger Fill layer to activate it and select colour 1 (#FD8C0A) on your fill colour chart and flood fill this selection. 
Keep selected. 
Selections float, Effects 3D effects, Cutout with the following settings
Vertical: 0
Horizontal: 0
Opacity: 100
Blur: 18
Shadow colour: Use your body outline.(#8D530F)
Make sure fill interior with colour is UNchecked. 
Deselect
_______________________________________________


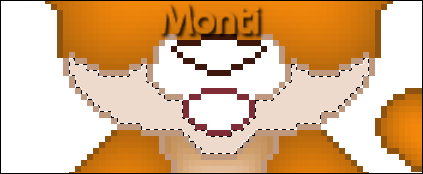
Step 10: - Cheeks
Click on the Tiger layer to activate it. 

Select your magic wand with the same settings and click inside the cheek area shown below.


Click on the Tiger Fill layer to activate it and select Colour 2 (#EEDACC) on your fill colour chart and flood fill this selection. 
Keep selected. 
Selections float, Effects 3D effects, Cutout with the following settings
Vertical: 0
Horizontal: 0
Opacity: 100
Blur: 3
Shadow colour: Use your cheek outline.(#BF997F)
Make sure fill interior with colour is UNchecked. 
Deselect.

Click on the Tiger layer to activate it. 
Select your magic wand with the same settings and click inside the upper cheek area above his mouth. 
Click on the Tiger Fill layer to activate it and select Colour 2 (#EEDACC) on your fill colour chart and flood fill this selection. 
Keep selected. 
Selections float, Effects 3D effects, Cutout with the following settings
Vertical: 0
Horizontal: 0
Opacity: 100
Blur: 2
Shadow colour: Use your cheek outline.(#BF997F)
Make sure fill interior with colour is UNchecked. 
Deselect.
_______________________________________________


Step 11: - Ears
Click on the Tiger layer to activate it. 
Select your magic wand with the same settings and click inside the left inner ear. 
Click on the Tiger Fill layer to activate it and select Colour 2 (#EEDACC) on your fill colour chart and flood fill this selection. 
Keep selected. 
Selections float, Effects 3D effects, Cutout with the following settings
Vertical: 0
Horizontal: 0
Opacity: 100
Blur: 3
Shadow colour: Use your inner ear outline.(#BF997F)
Make sure fill interior with colour is UNchecked. 
Deselect.

Repeat for the right inner ear.
_______________________________________________

Step 12: - Mouth
Click on the Tiger layer to activate it. 
Select your magic wand with the same settings and click inside the mouth. 
Click on the Tiger Fill layer to activate it and select Colour 3 (#BF7F90) on your fill colour chart and flood fill this selection. 
Keep selected. 
Selections float, Effects 3D effects, Cutout with the following settings
Vertical: 2
Horizontal: 0
Opacity: 100
Blur: 5
Shadow colour: Use your mouth outline.(#802C34)
Make sure fill interior with colour is UNchecked. 
Deselect.
_______________________________________________

Step 13: - Nose
Click on the Tiger layer to activate it. 
Select your magic wand with the same settings and click inside the nose. 
Click on the Tiger Fill layer to activate it and select Colour 4 (#6C2616) on your fill colour chart and flood fill this selection. 
Keep selected. 
Selections float, Effects 3D effects, Cutout with the following settings
Vertical: 2
Horizontal: 0
Opacity: 100
Blur: 5
Shadow colour: Use your nose outline.(#431F02)
Make sure fill interior with colour is UNchecked. 
Deselect.
_______________________________________________

Unhide the Stripes Layer.
_______________________________________________


Step 14: - Stripes
Zoom in really close as a lot of the stripes have little pixel areas that require you to select them ALL such as the one shown below.


Add a new raster layer and name it Stripe Fill. Move this down in the layer palette until it is below the Stripes layer. 
Click on the Stripes layer to activate it. 
Select your magic wand with the same settings and click inside one of the stripes. 
Click on the Stripe Fill layer to activate it and select Colour 5 (#6A2F04) on your fill colour chart and flood fill this selection. 
Keep selected. 
Selections float, Effects 3D effects, Cutout with the following settings
Vertical: 0
Horizontal: 0
Opacity: 100
Blur: 3
Shadow colour: Use your stripe outline.(#431F02)
Make sure fill interior with colour is UNchecked. 
Deselect.

Repeat for all other stripes.
_______________________________________________

Unhide the Eyes Layer.
_______________________________________________

Add a new raster layer and name it Eye Fill. Move this down in the layer palette until it is below the Eyes layer. 
Click on the Eye layer to activate it. 
Select your magic wand with the same settings and click inside one of the left outer eye. 
Make sure you select ALL Pixels.
Click on the Eye Fill layer to activate it and select Colour 6 (#FEC310) on your fill colour chart and flood fill this selection. 
Keep selected. 
Selections float, Effects 3D effects, Cutout with the following settings
Vertical: 0
Horizontal: 0
Opacity: 100
Blur: 2
Shadow colour: Use your outer eye outline.(#B68D00)
Make sure fill interior with colour is UNchecked. 
Deselect.

Repeat for the right outer eye.

Click on the Eye layer to activate it. 
Select your magic wand with the same settings and click inside one of the left inner eye. 
Click on the Eye Fill layer to activate it and select Colour 7 (#FEC310) on your fill colour chart and flood fill this selection. 
Keep selected. 
Selections float, Effects 3D effects, Cutout with the following settings
Vertical: 0
Horizontal: 0
Opacity: 100
Blur: 3
Shadow colour: Use your outer eye outline.(#000000)
Make sure fill interior with colour is UNchecked.

Optional

Add a new raster layer above the Eye Fill layer and change your Foreground to white (#FFFFFF).
Select your paint brush on round and size 2.
Click once with your paint brush in the middle of the eye. 
Making sure the area is still selected to go Adjust Blur - Gaussian Blur - 1.

Deselect.

Repeat for the right inner eye.

Merge visible and save as a png.
Pixel Sheep

This tutorial was written by Monti on January 1st 2007. It's concept is copyrighted to Monti. Any creation you make from my ideas are yours. You may print out this tutorial for your own personal use, but please do not copy it in any way to put online, pass out or rewrite without my permission or worse yet attempt to claim as your own.

For this tutorial you will need 

Paint Shop Pro

The Following Colour Charts 
Save and then open in PSP
Of course you are free to use any colours you want.

Sheep Colour Chart
Sheep Face Colour Chart
Ok we are ready to start.

REMEMBER TO SAVE OFTEN 

Step 1:
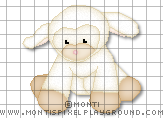
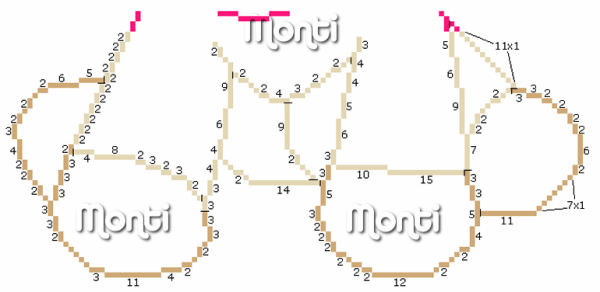
We will be be making the sheep shown above. The outlines below have been resized a lot so you can see them clearly. 
I have done the outline in 2 parts, we will be starting with the top half of the sheep.
To make this easier I have numbered all pixels over 1.
Open a new image 150 x 150 transparent. 
Flood fill with white so you can see what you are working on. Delete this layer at the end.
Add a new Raster Layer.
Select the brush tool with the following settings.
Size: 1 - Hardness, Opacity and Density = 100 
Zoom in to about 800% - 1000% 
Set your foreground to colour 1 on the outline colour chart (#E4D7B4) and start at whichever point you prefer. I find it easier to start the highest point, in this case the 15px line at the top of his head. (You can move the image later using your move tool if you need to). 
Do all of the sheep outline apart from the his inner ears, in that colour.

Change your foreground to colour 3 (#f2DCCE) and paint his inner ears.

Step 2:
Change your foreground back to colour 1 on the outline colour chart (#E4D7B4) and draw in the rest of the sheep outline using the guide below.
When you get to the feet change your foreground to colour 5 on the outline colour chart (#CfAA77).

NOTE: The parts shown in pink and the parts you have already drawn from the first outline.
When your outline is complete, select your magic wand with the following settings and click inside the head.
Select colour 2 (#FFFFFF) on your sheep colour chart and flood fill that selection.
Keep selected.
Selections float, Effects 3D effects, Cutout with the following settings
Vertical: 0
Horizontal: 0
Opacity: 100
Blur: 14
Shadow colour: Use your sheep outline.(#E4D7B4).
Make sure fill interior with colour is UNchecked. 
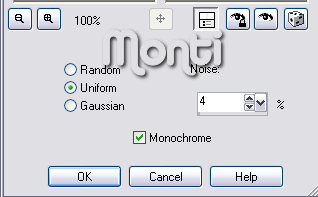
Add Noise with the following settings.
Deselect.

Step 3:
Select your magic wand and click inside the left (as you look at it) ear. 
Select colour 2 (#FFFFFF) on your sheep colour chart and flood fill that selection.
Selections float, Effects 3D effects, Cutout with the following settings
Vertical: 0
Horizontal: 0
Opacity: 100
Blur: 4
Shadow colour: Use your sheep outline.(#E4D7B4).
Make sure fill interior with colour is UNchecked. 
Add noise with the same settings shown above.
Deselect.

Step 4:
Select your magic wand and click inside the right (as you look at it) ear. 
Select colour 2 (#FFFFFF) on your sheep colour chart and flood fill that selection.
Selections float, Effects 3D effects, Cutout with the following settings
Vertical: 0
Horizontal: 0
Opacity: 100
Blur: 6
Shadow colour: Use your sheep outline.(#E4D7B4).
Make sure fill interior with colour is UNchecked. 
Add noise with the same settings shown above.
Deselect.

Step 5:
Select your magic wand and click inside the main body. 
Select colour 2 (#FFFFFF) on your sheep colour chart and flood fill that selection.
Selections float, Effects 3D effects, Cutout with the following settings
Vertical: 0
Horizontal: 0
Opacity: 100
Blur: 11
Shadow colour: Use your sheep outline.(#E4D7B4).
Make sure fill interior with colour is UNchecked. 
Add noise with the same settings shown above.
Deselect.

Step 6:
Select your magic wand and click inside the left back body. See Screen Shot below.
Select colour 2 (#FFFFFF) on your sheep colour chart and flood fill that selection.
Selections float, Effects 3D effects, Cutout with the following settings
Vertical: 0
Horizontal: 0
Opacity: 100
Blur: 8
Shadow colour: Use your sheep outline.(#E4D7B4).
Make sure fill interior with colour is UNchecked. 
Add noise with the same settings shown above.
Deselect.
Repeat with the Right Back body.

Step 7:
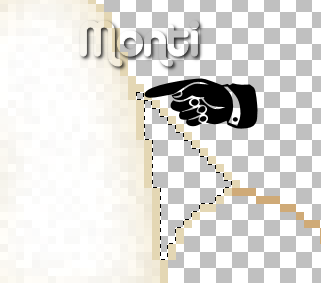
Select your magic wand and click inside the right leg. Make sure you select the stray pixel shown in the Screen Shot below.
Select colour 2 (#FFFFFF) on your sheep colour chart and flood fill that selection.
Selections float, Effects 3D effects, Cutout with the following settings
Vertical: 0
Horizontal: 0
Opacity: 100
Blur: 5
Shadow colour: Use your sheep outline.(#E4D7B4).
Make sure fill interior with colour is UNchecked. 
Add noise with the same settings shown above.
Deselect.

Step 8:
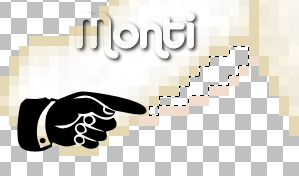
Select your magic wand and click inside the left (as you look at it) inner ear. Make sure you select the stray pixel shown in the Screen Shot below.
Select colour 4 (#FDF3ED) on your sheep colour chart and flood fill that selection.
Selections float, Effects 3D effects, Cutout with the following settings
Vertical: 0
Horizontal: 0
Opacity: 100
Blur 2
Shadow colour = Use your ear outline.(#F2DCCE).
Make sure fill interior with colour is UNchecked. 
DO NOT Deselect.
Repeat cutout. Deselect.

Repeat for the right inner ear. 
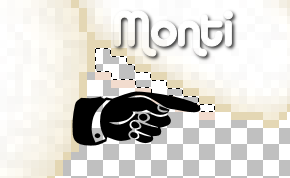
Once again make sure you select the stray pixel shown in the Screen Shot below.
Step 9:
Select your magic wand and click inside the left (as you look at it) front foot. Select colour 6 (#ECDAC4) on your sheep colour chart and flood fill that selection.
Selections float, Effects 3D effects, Cutout with the following settings
Vertical: 0
Horizontal: 0
Opacity: 100
Blur: 13
Shadow colour: Use your foot outline.(#CFAA77).
Make sure fill interior with colour is UNchecked. 
Deselect.

Repeat for the other 3 feet.

Step 10: Face
Make sure you are now using your Sheep Face Colour Chart.
Add a new Raster Layer.
Using the guide below draw out your sheep face.
NOTE:  The face outline is done using Colour 1 (#E4D7B4) on your face colour chart and the nose line is done using Colour 3 (#DBBE92) on your face colour chart.
Add the nose using Colour 5 (#EDBBBD) on your face colour chart and add your eyes using black.

Step 11:
Select your magic wand and click inside the top part of the face (the part with the eyes in).
Select colour 2 (#FBF9F3) on your sheep face colour chart and flood fill that selection.
Selections float, Effects 3D effects, Cutout with the following settings
Vertical: 0
Horizontal: 0
Opacity: 100
Blur: 7
Shadow colour: Use your face outline.(#E4D7B4).
Make sure fill interior with colour is UNchecked. 
Add noise with the same settings we used earlier.
Deselect.

Step 12:
Select your magic wand and click inside the bottom part of the face (the part with the nose in).
Select colour 4 (#F3E8D7) on your sheep face colour chart and flood fill that selection.
Selections float, Effects 3D effects, Cutout with the following settings
Vertical: 0
Horizontal: 0
Opacity: 100
Blur: 7
Shadow colour: Use your nose line outline.(#DBBE92).
Make sure fill interior with colour is UNchecked. 
Deselect.

Step 13:
Select your magic wand and click inside the nose.
Select colour 6 (#F8E2E3) on your sheep face colour chart and flood fill that selection.
Selections float, Effects 3D effects, Cutout with the following settings
Vertical: 0
Horizontal: 0
Opacity: 100
Blur: 2
Shadow colour: Use your nose outline.(#EDBBBD).
Make sure fill interior with colour is UNchecked. 
DO NOT Deselect.
Repeat cutout. Deselect.

Merge all visible and save as a png.