This tutorial was written by Monti on November 6th 2010. It's concept is copyrighted to Monti. Any creation you make from my ideas are yours. You may print out this tutorial for your own personal use, but please do not copy it in any way to put online, pass out or rewrite without my permission or worse yet attempt to claim as your own.
For this tutorial you will need
Paint Shop Pro
The Following Colour Chart
Save and then open in PSP
Of course you are free to use any colours you want.
Ok we are ready to start.
We will be doing this pixel in layers starting with the bear on the bottom layer. This allows the shading to work evenly and for you to move things around at the end if you wish.
This is a long tutorial despite being broken down into sections, so grab yourself a drink before you start.
REMEMBER TO SAVE OFTEN
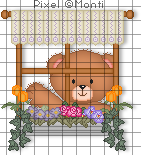
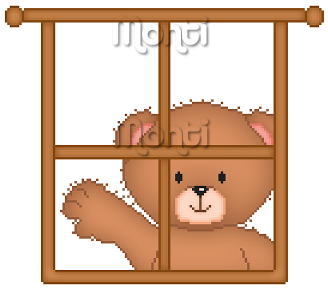
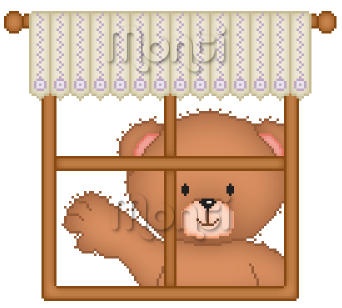
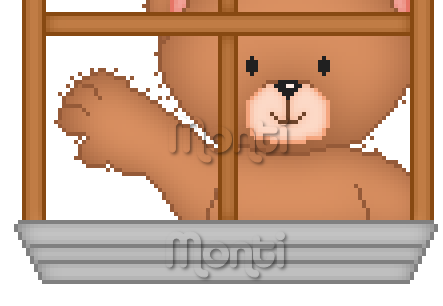
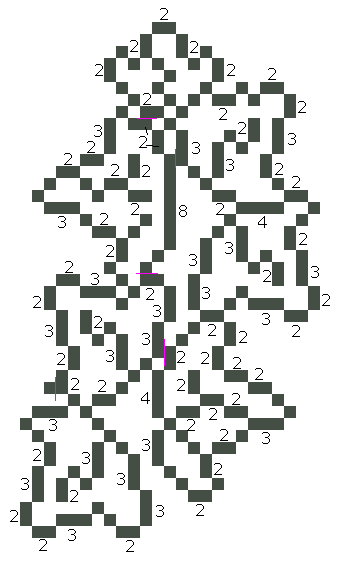
We will be be making the Bear at the Window shown above. The outlines below have been resized a lot so you can see them clearly.
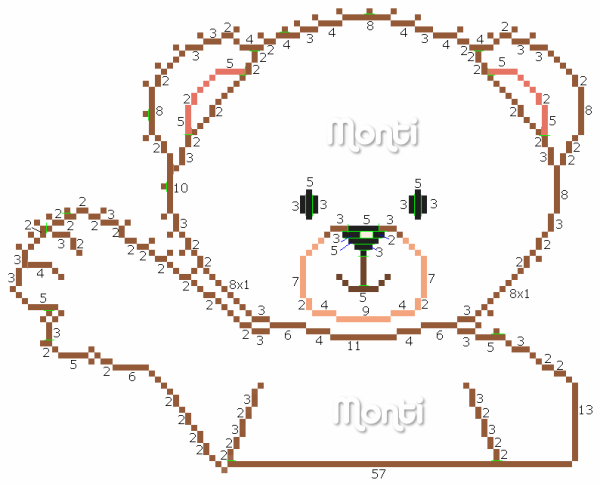
I have done the outline in several parts, we will be starting with the Bear.
To make this easier I have numbered all pixels over 1.
The colours used for the outline are listed below.
Bear Outline: #955A38 (Colour 1)
Bear Inner Ear Outline: #E67566 (Colour 2)
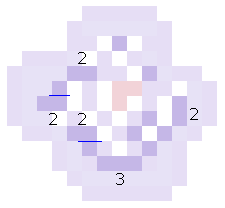
Bear Muzzle Outline: #F4A57E (Colour 3)
Nose and Eyes: #000000 (Colour 4)
Highlight on Nose: #FFFFFF (Colour 5)
Step 1:
Open a new image 200 x 200 transparent.
Select the brush tool with the following settings.
Size: 1 - Hardness, Opacity and Density: 100
Zoom in to about 800% - 1000%
Set your foreground to colour 1 on the outline colour chart (#955A38) and start at the top of your canvas.
Start with the bears head and begin drawing your outline.
Change the colours when shown on the outline and use the outline guide above as well if you need to.
Step 2: Bear Fills
When your outline is complete, select your magic wand with the following settings and click inside bears head.
Select colour 6 (#DB9162) on your Fill Colour Chart and flood fill this selection.
Keep selected.
Selections float, Effects 3D effects, Cutout with the following settings
Vertical: 0
Horizontal: 0
Opacity: 100
Blur: 20
Shadow colour: Use your bear outline #955A38 (Colour 1)
Make sure fill interior with colour is UNchecked.
Deselect.
______________________________________
Select your magic wand and click inside the left outer ear.
Select colour 6 (#DB9162) on your Fill Colour Chart and flood fill this selection.
Keep selected.
Selections float, Effects 3D effects, Cutout with the following settings
Vertical: 0
Horizontal: 0
Opacity: 100
Blur: 8
Shadow colour: Use your bear outline #955A38 (Colour 1)
Make sure fill interior with colour is UNchecked.
Deselect.
Repeat for the right outer ear.
______________________________________
Select your magic wand and click inside the body/arm of the bear.
Select colour 6 (#DB9162) on your Fill Colour Chart and flood fill this selection.
Keep selected.
Selections float, Effects 3D effects, Cutout with the following settings
Vertical: 0
Horizontal: 0
Opacity: 100
Blur: 14
Shadow colour: Use your bear outline #955A38 (Colour 1)
Make sure fill interior with colour is UNchecked.
Deselect.
______________________________________
Select your magic wand and click inside the left inner ear.
Select colour 7 (#F3ADA4) on your Fill Colour Chart and flood fill this selection.
Keep selected.
Selections float, Effects 3D effects, Cutout with the following settings
Vertical: 0
Horizontal: 0
Opacity: 100
Blur: 3
Shadow colour: Use your bear inner ear outline #E67566 (Colour 2)
Make sure fill interior with colour is UNchecked.
Deselect.
Repeat for the right inner ear.
______________________________________
Select your magic wand and click inside the bears muzzle.
Select colour 8 (#FCD9C7) on your Fill Colour Chart and flood fill this selection.
Keep selected.
Selections float, Effects 3D effects, Cutout with the following settings
Vertical: 0
Horizontal: 0
Opacity: 100
Blur: 3
Shadow colour: Use your muzzle outline #F4A57E (Colour 3)
Make sure fill interior with colour is UNchecked.
Deselect and save.
______________________________________
Window
You will need the following Colour Chart.
Save and then open in PSP
Of course you are free to use any colours you want.
Step 3: Window Outline
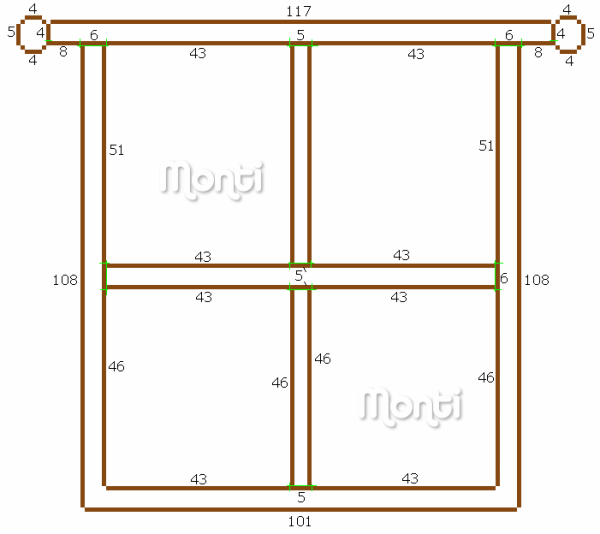
Hide your bear layer and add a new raster layer. Select the brush tool with the same settings we used earlier and draw in the outline shown below.
Set your foreground to colour 1 on the colour chart (#874912) and start at the top of your canvas.
To make this easier I have numbered all pixels over 1.
Step 4: Window Fills
When your outline is complete, select your magic wand with the with the same settings we used earlier and click inside the left top circle.
Select colour 2 (#D28D56) on your Colour Chart and flood fill this selection.
Keep selected.
Selections float, Effects 3D effects, Cutout with the following settings
Vertical: 0
Horizontal: 0
Opacity: 100
Blur: 5
Shadow colour: Use your window outline #874912 (Colour 1)
Make sure fill interior with colour is UNchecked.
Deselect.
Repeat for the right top circle.
______________________________________
Select your magic wand and click inside the top window frame.
Select colour 2 (#D28D56) on your Colour Chart and flood fill this selection.
Keep selected.
Selections float, Effects 3D effects, Cutout with the following settings
Vertical: 0
Horizontal: 0
Opacity: 100
Blur: 5
Shadow colour: Use your window outline #874912 (Colour 1)
Make sure fill interior with colour is UNchecked.
Deselect.
Repeat for all the other parts of the frame.
Unhide your bear layer and use your move tool to move the frame into position over the bear as shown below.
______________________________________
Blinds
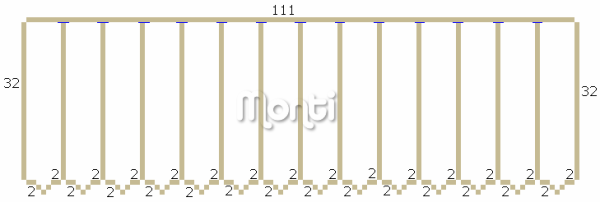
I am not giving a colour chart for this part. You just need a dark and a light shade of the same colour of your choice.
Step 5: Blind Outline
Hide your bear and frame layers and add a new raster layer.
Select the brush tool with the same settings we used earlier and draw in the outline shown below.
Pick a dark colour of your choice for the blind outline.
To make this easier I have numbered all pixels over 1.
Each Vertical line is 32 pixels high and the pixels between each vertical line is 7.
Step 6: Blind Fills
When your outline is complete, select your magic wand with the same settings we used earlier and click inside the left blind segment.
Select your light shade of your chosen colour and flood fill this selection.
Keep selected.
Selections float, Effects 3D effects, Cutout with the following settings
Vertical: 0
Horizontal: 0
Opacity: 100
Blur: 6
Shadow colour: Use your blind outline.
Make sure fill interior with colour is UNchecked.
Deselect.
Repeat for all the other blind sections.
Step 7: Blind Pattern - Optional
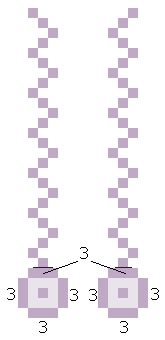
Add a new raster layer and using a different light and dark shade of a colour of your choice draw the following design into the left and second to left blind segments.
Once done duplicate the design layer and move it along to the next segments.
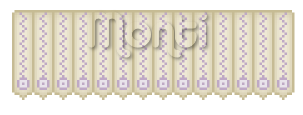
Repeat until all segments are filled as shown below.
Merge the Blind and Blind Design layers visible.
Unhide the frame and bear layers and use your move tool to move your blinds into position as shown below.
______________________________________
Window Box
You will need the following Colour Chart
Save and then open in PSP
Of course you are free to use any colours you want.
Step 8: Window Box Outline
Hide your bear, frame and blinds layer and add a new raster layer.
Select the brush tool with the same settings we used earlier and draw in the outline shown below.
Set your foreground to colour 1 on the colour chart (#808080) and start at the top of your canvas.
To make this easier I have numbered all pixels over 1.
Step 9: Window Box Fills
When your outline is complete, select your magic wand with the same settings we used earlier and click inside the top segment.
Select colour 2 (#DDDDDD) on your Colour Chart and flood fill this selection.
Keep selected.
Selections float, Effects 3D effects, Cutout with the following settings
Vertical: 0
Horizontal: 0
Opacity: 100
Blur: 7
Shadow colour: Use your window box outline (#808080).
Make sure fill interior with colour is UNchecked.
Deselect.
______________________________________
Select your magic wand and click inside the middle window box segment.
Select colour 2 (#DDDDDD) on your Colour Chart and flood fill this selection.
Keep selected.
Selections float, Effects 3D effects, Cutout with the following settings
Vertical: 0
Horizontal: 0
Opacity: 100
Blur: 5
Shadow colour: Use your window box outline (#808080).
Make sure fill interior with colour is UNchecked.
Deselect.
______________________________________
Select your magic wand and click inside the bottom window box segment.
Select colour 2 (#DDDDDD) on your Colour Chart and flood fill this selection.
Keep selected.
Selections float, Effects 3D effects, Cutout with the following settings
Vertical: 0
Horizontal: 0
Opacity: 100
Blur: 6
Shadow colour: Use your window box outline (#808080).
Make sure fill interior with colour is UNchecked.
Deselect.
Unhide the frame, bear and blind layers and use your move tool to move your window box into position as shown below.
Save this as a PSP file so you can open it later to add the flowers to it.
______________________________________
Flowers - Rose
You will need the following Colour Chart
Save and then open in PSP
Of course you are free to use any colours you want.
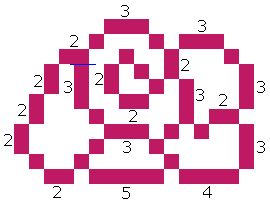
Step 10: Rose Outline
Open a new image 200 x 200 transparent.
Select the brush tool with the same settings we used earlier and draw in the outline shown below.
Set your foreground to colour 1 on the colour chart (#BE1962) and start at the top of your canvas.
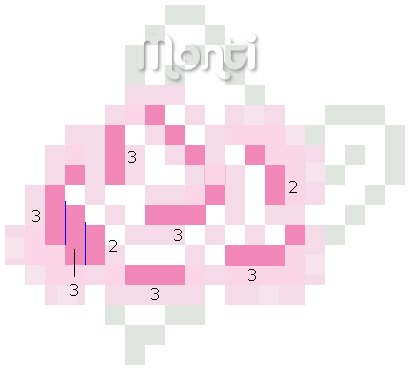
To make this easier I have numbered all pixels over 1.
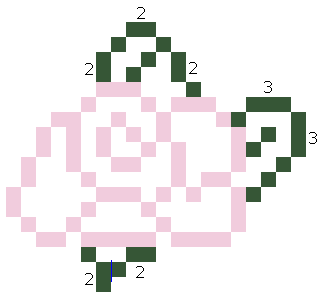
When the Rose outline is complete change your foreground to colour 2 on the colour chart (#365636) and draw in the leaves outline shown below.
To make this easier I have numbered all pixels over 1.
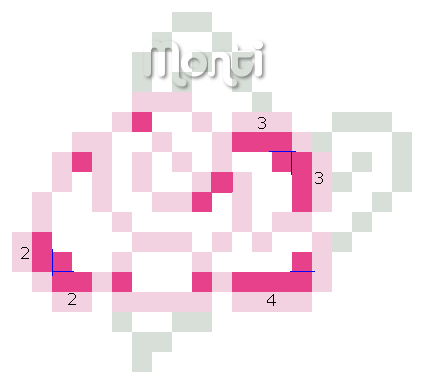
Step 11: Rose Fills
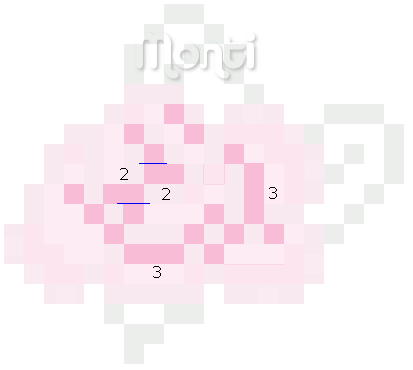
When your outline is complete, change your foreground to colour 3 (#E7418B) on your Colour Chart and draw in the areas shown below.
Change your foreground to colour 4 (#F187B6) on your Colour Chart and draw in the areas shown below.
Change your foreground to colour 5 (#F8BCD7) on your Colour Chart and draw in the areas shown below.
Select your magic wand and click inside all of the leaf areas.
Select colour 6 (#9BAC83) on your Colour Chart and flood fill this selection.
Keep selected.
Selections float, Effects 3D effects, Cutout with the following settings
Vertical: 0
Horizontal: 0
Opacity: 100
Blur: 3
Shadow colour: Use your leaf outline (#365636).
Make sure fill interior with colour is UNchecked.
Deselect.
Save the rose as a psp file so we can add it to the window box after we finish the other flowers.
Step 12: Tulip Outline
Open a new image 200 x 200 transparent.
Select the brush tool with the same settings we used earlier and draw in the outline shown below.
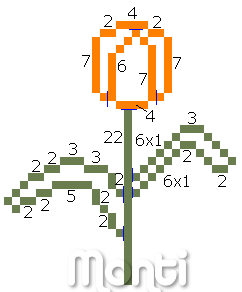
Set your foreground to colour 1 on the colour chart (#FF8000) and start at the top of your canvas, changing to colour 2 (#697D4E) when you get to the stem and leaves.
To make this easier I have numbered all pixels over 1.
Step 13: Tulip Fills
Select your magic wand with the same settings we used earlier and click inside the left part of the tulip.
Select colour 3 (#EEB24A) on your Colour Chart and flood fill this selection.
Keep selected.
Selections float, Effects 3D effects, Cutout with the following settings
Vertical: 0
Horizontal: 0
Opacity: 100
Blur: 2
Shadow colour: Use your tulip outline (#FF8000).
Make sure fill interior with colour is UNchecked.
Deselect.
______________________________________
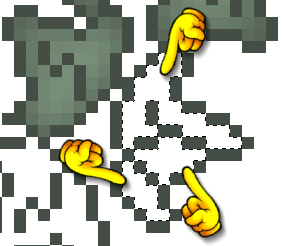
Select your magic wand with the same settings we used earlier and click inside the right part of the tulip making sure you select the stray pixel shown below.
Select colour 3 (#EEB24A) on your Colour Chart and flood fill this selection.
Keep selected.
Selections float, Effects 3D effects, Cutout with the following settings
Vertical: 0
Horizontal: 0
Opacity: 100
Blur: 2
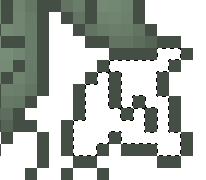
Shadow colour: Use your tulip outline (#FF8000).
Make sure fill interior with colour is UNchecked.
Deselect.
______________________________________
Select your magic wand with the same settings we used earlier and click inside the center part of the tulip.
Select colour 3 (#EEB24A) on your Colour Chart and flood fill this selection.
Keep selected.
Selections float, Effects 3D effects, Cutout with the following settings
Vertical: 0
Horizontal: 0
Opacity: 100
Blur: 3
Shadow colour: Use your tulip outline (#FF8000).
Make sure fill interior with colour is UNchecked.
Deselect.
______________________________________
Select your magic wand with the same settings we used earlier and click inside the left leaf making sure you select the stray pixel shown below.
Select colour 4 (#9EAF86) on your Colour Chart and flood fill this selection.
Keep selected.
Selections float, Effects 3D effects, Cutout with the following settings
Vertical: 0
Horizontal: 0
Opacity: 100
Blur: 3
Shadow colour: Use your leaf outline (#697D4E).
Make sure fill interior with colour is UNchecked.
Deselect.
______________________________________
Select your magic wand with the same settings we used earlier and click inside the right leaf making sure you select ALL the pixels in the leaf.
Select colour 4 (#9EAF86) on your Colour Chart and flood fill this selection.
Keep selected.
Selections float, Effects 3D effects, Cutout with the following settings
Vertical: 0
Horizontal: 0
Opacity: 100
Blur: 3
Shadow colour: Use your leaf outline (#697D4E).
Make sure fill interior with colour is UNchecked.
Deselect.
Save the rose as a psp file so we can add it to the window box after we finish the other flowers.
______________________________________
Flowers - Pansies
You will need the following Colour Chart
Save and then open in PSP
Of course you are free to use any colours you want.
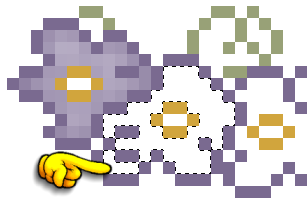
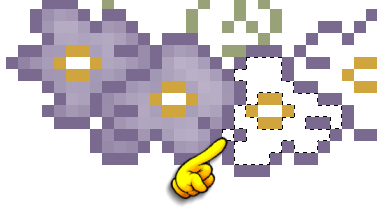
Step 14: Pansies Outline
Open a new image 200 x 200 transparent.
Select the brush tool with the same settings we used earlier and draw in the outline shown below.
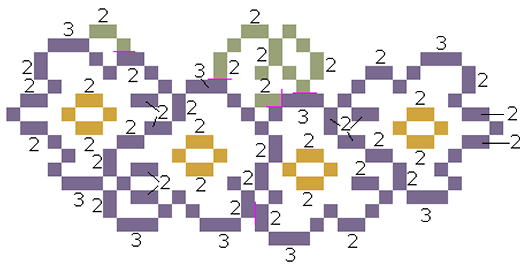
Set your foreground to colour 1 on the colour chart (#7A6A90) and start drawing your pansies, changing to colour 2 (#98A177) when you get to the leaves and change to colour 3 (#D1A53D) for the flower centers.
To make this easier I have numbered all pixels over 1.
Step 15: Pansy Fills
Select your magic wand with the same settings we used earlier and click inside the left pansy.
Select colour 4 (#C5BDD1) on your Colour Chart and flood fill this selection.
Keep selected.
Selections float, Effects 3D effects, Cutout with the following settings
Vertical: 0
Horizontal: 0
Opacity: 100
Blur: 3
Shadow colour: Use your pansy outline (#7A6A90).
Make sure fill interior with colour is UNchecked.
Deselect.
______________________________________
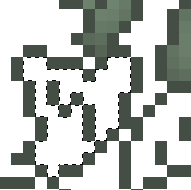
Select your magic wand with the same settings we used earlier and click inside the next pansy along making sure you select the stray pixels shown below.
Select colour 4 (#C5BDD1) on your Colour Chart and flood fill this selection.
Keep selected.
Selections float, Effects 3D effects, Cutout with the following settings
Vertical: 0
Horizontal: 0
Opacity: 100
Blur: 3
Shadow colour: Use your pansy outline (#7A6A90).
Make sure fill interior with colour is UNchecked.
Deselect.
______________________________________
Select your magic wand with the same settings we used earlier and click inside the right pansy.
Select colour 4 (#C5BDD1) on your Colour Chart and flood fill this selection.
Keep selected.
Selections float, Effects 3D effects, Cutout with the following settings
Vertical: 0
Horizontal: 0
Opacity: 100
Blur: 3
Shadow colour: Use your pansy outline (#7A6A90).
Make sure fill interior with colour is UNchecked.
Deselect.
______________________________________
Select your magic wand with the same settings we used earlier and click inside the left pansy center.
Select colour 5 (#E9D379) on your Colour Chart and flood fill this selection.
Keep selected.
Selections float, Effects 3D effects, Cutout with the following settings
Vertical: 0
Horizontal: 0
Opacity: 100
Blur: 2
Shadow colour: Use your pansy center outline (#D1A53D).
Make sure fill interior with colour is UNchecked.
Deselect.
Repeat for the other pansy centers.
______________________________________
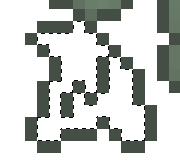
Select your magic wand with the same settings we used earlier and click inside ALL the leaf areas making sure you select the stray pixel shown below.
Select colour 6 (#C1C7AB) on your Colour Chart and flood fill this selection.
Keep selected.
Selections float, Effects 3D effects, Cutout with the following settings
Vertical: 0
Horizontal: 0
Opacity: 100
Blur: 3
Shadow colour: Use your leaf outline (#98A177).
Make sure fill interior with colour is UNchecked.
Deselect.
Save the pansies as a psp file so we can add it to the window box after we finish the other flowers.
______________________________________
You will need the following Colour Chart
Save and then open in PSP
Of course you are free to use any colours you want.
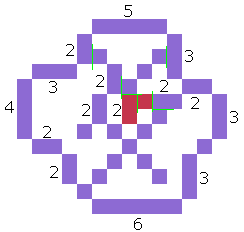
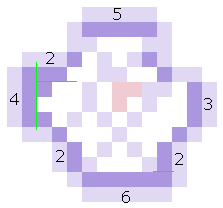
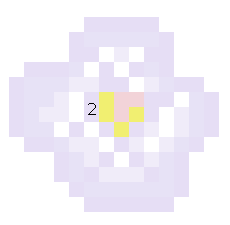
Step 16: Single Flower Outline
Open a new image 200 x 200 transparent.
Select the brush tool with the same settings we used earlier and draw in the outline shown below.
Set your foreground to colour 1 on the colour chart (#8D6AD3) and start drawing your flower, changing to colour 6 (#C5354D) when you get to the flower center.
To make this easier I have numbered all pixels over 1.
Step 17: Single Flower Fills
When your outline is complete, change your foreground to colour 2 (#AA97DF) on your Colour Chart and draw in the areas shown below.
Change your foreground to colour 3 (#C5B7E7) on your Colour Chart and draw in the areas shown below.
Change your foreground to colour 5 (#F1EF71) on your Colour Chart and draw in the areas shown below.
Change your foreground to colour 4 (#DED7F3) on your Colour Chart and draw in the blank areas to complete your flower, so it looks like the one below.
Save the flower as a psp file so we can add it to the window box after we finish the other flowers.
______________________________________
Leaves
You will need the following Colour Chart.
Save and then open in PSP
Of course you are free to use any colours you want.
Step 18: Leaves Outline
Open a new image 200 x 200 transparent.
Select the brush tool with the same settings we used earlier and draw in the outline shown below.
Set your foreground to colour 1 on the colour chart (#636041) and start drawing your leaves.
To make this easier I have numbered all pixels over 1.
Step 19: Leaf Fills
Select your magic wand with the same settings we used earlier and click inside the left leaf as shown below.
Select colour 2 (#A8A681) on your Colour Chart and flood fill this selection.
Keep selected.
Selections float, Effects 3D effects, Cutout with the following settings
Vertical: 0
Horizontal: 0
Opacity: 100
Blur: 3
Shadow colour: Use your leaf outline (#636041).
Make sure fill interior with colour is UNchecked.
Deselect.
______________________________________
Select your magic wand with the same settings we used earlier and click inside the 2nd leaf as shown below.
Select colour 2 (#A8A681) on your Colour Chart and flood fill this selection.
Keep selected.
Selections float, Effects 3D effects, Cutout with the following settings
Vertical: 0
Horizontal: 0
Opacity: 100
Blur: 3
Shadow colour: Use your leaf outline (#636041).
Make sure fill interior with colour is UNchecked.
Deselect.
______________________________________
Select your magic wand with the same settings we used earlier and click inside the 3rd leaf making sure you select all the stray pixels as shown below.
Select colour 2 (#A8A681) on your Colour Chart and flood fill this selection.
Keep selected.
Selections float, Effects 3D effects, Cutout with the following settings
Vertical: 0
Horizontal: 0
Opacity: 100
Blur: 3
Shadow colour: Use your leaf outline (#636041).
Make sure fill interior with colour is UNchecked.
Deselect.
______________________________________
Select your magic wand with the same settings we used earlier and click inside the 4th leaf making sure you select both sides as shown below.
Select colour 2 (#A8A681) on your Colour Chart and flood fill this selection.
Keep selected.
Selections float, Effects 3D effects, Cutout with the following settings
Vertical: 0
Horizontal: 0
Opacity: 100
Blur: 3
Shadow colour: Use your leaf outline (#636041).
Make sure fill interior with colour is UNchecked.
Deselect.
______________________________________
Select your magic wand with the same settings we used earlier and click inside the 5th leaf making sure you select both sides as shown below.
Select colour 2 (#A8A681) on your Colour Chart and flood fill this selection.
Keep selected.
Selections float, Effects 3D effects, Cutout with the following settings
Vertical: 0
Horizontal: 0
Opacity: 100
Blur: 3
Shadow colour: Use your leaf outline (#636041).
Make sure fill interior with colour is UNchecked.
Deselect.
______________________________________
Select your magic wand with the same settings we used earlier and click inside the 6th leaf as shown below.
Select colour 2 (#A8A681) on your Colour Chart and flood fill this selection.
Keep selected.
Selections float, Effects 3D effects, Cutout with the following settings
Vertical: 0
Horizontal: 0
Opacity: 100
Blur: 3
Shadow colour: Use your leaf outline (#636041).
Make sure fill interior with colour is UNchecked.
Deselect.
______________________________________
Select your magic wand with the same settings we used earlier and click inside the 7th leaf making sure you also select the part underneath as shown below.
Select colour 2 (#A8A681) on your Colour Chart and flood fill this selection.
Keep selected.
Selections float, Effects 3D effects, Cutout with the following settings
Vertical: 0
Horizontal: 0
Opacity: 100
Blur: 3
Shadow colour: Use your leaf outline (#636041).
Make sure fill interior with colour is UNchecked.
Deselect.
______________________________________
Select your magic wand with the same settings we used earlier and click inside the 8th leaf making sure you also select the part underneath as shown below.
Select colour 2 (#A8A681) on your Colour Chart and flood fill this selection.
Keep selected.
Selections float, Effects 3D effects, Cutout with the following settings
Vertical: 0
Horizontal: 0
Opacity: 100
Blur: 3
Shadow colour: Use your leaf outline (#636041).
Make sure fill interior with colour is UNchecked.
Deselect.
______________________________________
Select your magic wand with the same settings we used earlier and click inside the 9th leaf as shown below.
Select colour 2 (#A8A681) on your Colour Chart and flood fill this selection.
Keep selected.
Selections float, Effects 3D effects, Cutout with the following settings
Vertical: 0
Horizontal: 0
Opacity: 100
Blur: 3
Shadow colour: Use your leaf outline (#636041).
Make sure fill interior with colour is UNchecked.
Deselect.
______________________________________
Select your magic wand with the same settings we used earlier and click inside the 10th and last leaf ,making sure you select both parts as shown below.
Select colour 2 (#A8A681) on your Colour Chart and flood fill this selection.
Keep selected.
Selections float, Effects 3D effects, Cutout with the following settings
Vertical: 0
Horizontal: 0
Opacity: 100
Blur: 3
Shadow colour: Use your leaf outline (#636041).
Make sure fill interior with colour is UNchecked.
Deselect.
Save the leaves as a psp file so we can add it to the window box after we finish the vines.
______________________________________
Vines
You will need the same colour chart we used for the leaves above.
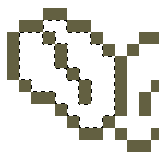
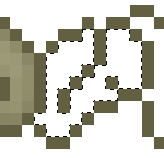
Step 20: Vine Outline
Open a new image 200 x 200 transparent.
Select the brush tool with the same settings we used earlier and draw in the outline shown below.
Set your foreground to colour 3 on the colour chart (#444E44) and start drawing your vine leaves.
To make this easier I have numbered all pixels over 1.
Step 21: Vine Fills
Select your magic wand with the same settings we used earlier and click inside the top leaf making sure you select all 3 sections as shown below.
Select colour 4 (#91AD91) on your Colour Chart and flood fill this selection.
Keep selected.
Selections float, Effects 3D effects, Cutout with the following settings
Vertical: 0
Horizontal: 0
Opacity: 100
Blur: 4
Shadow colour: Use your vine outline (#444E44).
Make sure fill interior with colour is UNchecked.
Deselect.
______________________________________
Select your magic wand with the same settings we used earlier and click inside the top left leaf as shown below.
Select colour 4 (#91AD91) on your Colour Chart and flood fill this selection.
Keep selected.
Selections float, Effects 3D effects, Cutout with the following settings
Vertical: 0
Horizontal: 0
Opacity: 100
Blur: 5
Shadow colour: Use your vine outline (#444E44).
Make sure fill interior with colour is UNchecked.
Deselect.
______________________________________
Select your magic wand with the same settings we used earlier and click inside the top right leaf as shown below.
Select colour 4 (#91AD91) on your Colour Chart and flood fill this selection.
Keep selected.
Selections float, Effects 3D effects, Cutout with the following settings
Vertical: 0
Horizontal: 0
Opacity: 100
Blur: 6
Shadow colour: Use your vine outline (#444E44).
Make sure fill interior with colour is UNchecked.
Deselect.
______________________________________
Select your magic wand with the same settings we used earlier and click inside the middle right leaf as shown below.
Select colour 4 (#91AD91) on your Colour Chart and flood fill this selection.
Keep selected.
Selections float, Effects 3D effects, Cutout with the following settings
Vertical: 0
Horizontal: 0
Opacity: 100
Blur: 6
Shadow colour: Use your vine outline (#444E44).
Make sure fill interior with colour is UNchecked.
Deselect.
______________________________________
Select your magic wand with the same settings we used earlier and click inside the middle left leaf as shown below.
Select colour 4 (#91AD91) on your Colour Chart and flood fill this selection.
Keep selected.
Selections float, Effects 3D effects, Cutout with the following settings
Vertical: 0
Horizontal: 0
Opacity: 100
Blur: 5
Shadow colour: Use your vine outline (#444E44).
Make sure fill interior with colour is UNchecked.
Deselect.
______________________________________
Select your magic wand with the same settings we used earlier and click inside the right bottom leaf making sure you select all 3 sections as shown below.
Select colour 4 (#91AD91) on your Colour Chart and flood fill this selection.
Keep selected.
Selections float, Effects 3D effects, Cutout with the following settings
Vertical: 0
Horizontal: 0
Opacity: 100
Blur: 5
Shadow colour: Use your vine outline (#444E44).
Make sure fill interior with colour is UNchecked.
Deselect.
______________________________________
Select your magic wand with the same settings we used earlier and click inside the bottom left leaf as shown below.
Select colour 4 (#91AD91) on your Colour Chart and flood fill this selection.
Keep selected.
Selections float, Effects 3D effects, Cutout with the following settings
Vertical: 0
Horizontal: 0
Opacity: 100
Blur: 5
Shadow colour: Use your vine outline (#444E44).
Make sure fill interior with colour is UNchecked.
Deselect.
Save the vines as a psp file so we can add it to the window box with all the flowers.
______________________________________
Finish
Open your window bear PSP file and all your flowers and leaves in PSP.
Copy and paste the flowers and leaves onto your canvas as new layers.
Use my tag to help you position them.
Feel free to move them around and mirror some leaves and flowers to give you the desired effect.















No comments:
Post a Comment