This tutorial was written by Monti on February 27th 2007 and reworked on 17th October 2014. It's concept is copyrighted to me. Any creation you make from my ideas are yours. You may print out this tutorial for your own personal use, but please do not copy it in any way to put online, pass out or rewrite without my permission or worse yet attempt to claim as your own.
This was written for psp 9 but will work in other versions.
For this tutorial you will need
Paint Shop Pro
Eye Candy 5 Impact - Optional
Xenofex 2 - Rip Open
Brushes and a pattern of your choice
Fonts of your choice
I used Greyhound for the text and Milk and Cereal for my name.
A Tube of your choice
I am using the wonderful art of PinUp Toons used with a license from CILM.
You can now buy his tubes from www.cdoestore.com.
Open the tube in PSP.
Ok we are ready to start.
REMEMBER TO SAVE OFTEN
Step 1:
Open a new image 500 x 500 transparent.
Select your Preset Shapes set to Rectangle.
Set your Background to a pattern of your choice. I used a leopard print.
Set your Foreground to a dark colour from your pattern, I used a dark brown.
Draw out a rectangle approximately 400 high x 50 wide.
Hold down your shift key and use your nodes to push one end in a bit and pull the other end out slightly so it looks like one of the sides in my tag above. Rotate it to the left slightly.
Once you are happy with it, convert to Raster layer.
Apply an inner bevel of your choice. I used Eye Candy 5 - Impact - Bevel - Lumpy surface subtle.
Duplicate this layer and go to Image - Flip, Image - Mirror.
Use your deform tool to rotate the bottom inwards slightly.
Select your Preset Shapes again and still on Rectangle with the same settings draw a rectangle to join the frame across the top.
Again use your nodes to push and pull the edges.
Convert to Raster layer and apply the same inner bevel you used on the others.
Duplicate this layer and go to Image - Flip, Image - Mirror.
Use your deform tool to rotate it sightly.
See my tag as a guide.
Change your Preset Shape to Circle and using the same foreground and background draw a small circle where two of the frames join.
Add the same inner bevel and add the following Drop Shadow.
Vertical: 0
Horizontal: 0
Opacity: 97
Blur: 6
Colour: Black
Duplicate 3 times and position one in each corner where the frames join.
Merge all visible and resize by 85% - Weighted average.
Step 2:
Add a new Raster layer and send to the bottom.
On your frame layer select your Magic Wand - Feather and Tolerance 0 and click inside the frame.
Selections - Modify - Expand by 5.
Activate your bottom layer and fill with a pattern of your choice or fill with a light colour from your tube and add some brushes for effect.
Selections - Modify - Contract by 25.
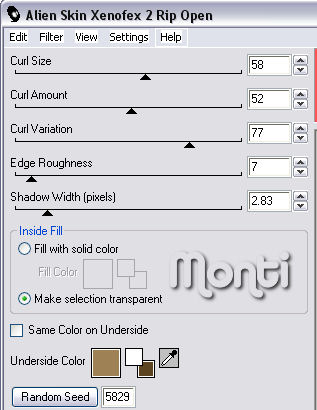
Apply Xenofex 2 Rip Open with the following settings but change the Underside colour to a colour from your frame.
Deselect.
Go to Image - Canvas size 600 x 600 pixels.
Step 3:
Copy and paste the tube you wish to use as a new layer on your canvas, resize if necessary and position it so it looks like part of it is coming through the hole.
Move this to the bottom of the layer palette.
Duplicate this layer and move the duplicate layer to the top.
Select your Lasoo tool, set to Point to Point, Feather 0 and zoom in.
Draw around any parts you wish to delete to add to the effect of the tube coming through the rip.
Once they are all selected, press delete on your keyboard.
Activate the bottom tube layer and select any parts showing outside the frame and delete those areas.
Deselect.
Apply the following Drop Shadow to the top tube layer
Vertical: 4
Horizontal: 4
Opacity: 50
Blur: 5
Colour: Black
Activate your frame layer and add the same Drop Shadow.
Add a new Raster layer and move to the bottom of the layer palette. Select the area inside the frame and fill with a pattern of your choice to show through the frame.
Add a saying of your choice. I added
"I am woman hear me" at the top of that tag and added "ROAR" at the bottom in a larger size.
Select a font of your choice and add your name and the artists copyright.
Add your watermark.
Crop off the excess white area and save.


Love this-thanks!
ReplyDeleteEvita