This tutorial was written by Monti on January 2nd 2009. It's concept is copyrighted to Monti. Any creation you make from my ideas are yours. You may print out this tutorial for your own personal use, but please do not copy it in any way to put online, pass out or rewrite without my permission or worse yet attempt to claim as your own.
This was written for psp 9 but will work in other versions.
For this tutorial you will need
Paint Shop Pro
My Supplies
Download *HERE*
Unzip and open in PSP.
Font Of Your Choice
I used Whisper which is a pay font so I am unable to supply.
Mask Of Your Choice
I used Vix_Mask189 which you can download from *HERE*. Thanks Vix.
Scroll down the page and you will need the 12th June 2008 set but while you are there you might want to grab them all as she has some great masks.
Unzip them and place in your Masks folder.
Tube of your Choice
I am using the beautiful art of Zindy S. D. Nielsen.
You can purchase a license to use her work from her store *HERE*.
Xenofex 2 - Burnt Edges
Filters Unlimited 2 - Paper Textures - Optional
Ok we are ready to start.
REMEMBER TO SAVE OFTEN
Step 1:
Open a new image 600 x 600 pixels.
Add a new Raster layer.
Set your Foreground to Pattern: Monti-CrushedVelvet.jpg - Angle: 0 - Scale: 100
Fill the new layer with this pattern.
Go to Layers - Load/Save Mask - Load Mask from Disk.
Apply Vix_Mask189 with the following options checked
Scource Luminence - Fit to Canvas - Hide All Mask.
Click on Load.
Go to Layers - Merge Group.
Step 2:
Change your Foreground to Monti-Satin-Blue-jpg and the Background to Null.
Activate your Preset Shapes Tool set to Rectangle with the following settings.
Create as Vector: Checked - Line Style: Solid - Line Width: 40 - Antialias: Checked.
Draw out a rectangle about 290 x 360 pixels.
NOTE:
If you look in the bottom right corner of your screen you should see some figures that move as you draw your rectangle. The one circled below gives you the size of your shape.
Go to Objects - Align - Center in Canvas and convert to Raster layer.
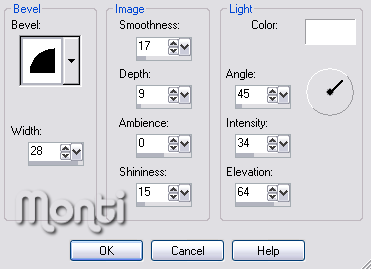
Go to Effects - 3D Effects - Inner Bevel and apply the following Inner Bevel.
Then go to Selections - Select All - Float.
Then go to Effects - 3D Effects - Cutout with the following settings
Vertical: 0
Horizontal: 0
Opacity: 100
Blur: 26
Colour: Black
Selections - Select None.
Rename this layer - Frame 1.
Step 3:
Change your Foreground to Colour: #5B5B6D and leave your Background as Null.
Activate your Preset Shapes Tool set to Rectangle with the same settings as before but change the Line Width to 50.
Draw out a rectangle about 340 x 410 pixels.
Go to Objects - Align - Center in Canvas and convert to Raster layer.
Go to Layers - Arrange - Move Down.
Apply a texture to this.
I used Filters Unlimited Paper Textures - Papyrus but if you don't have this filter you can use one of the texture effects that come with psp.
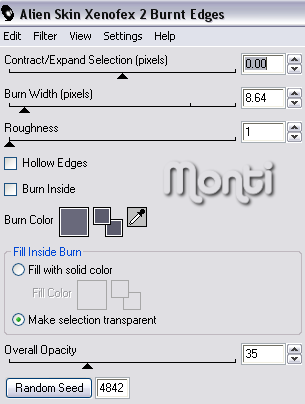
Once you are happy with your texture go to Effects - Plugins - Alien Skin - Xenofex 2 - Burnt Edges and apply with the following settings.
Rename this layer - Frame 2.
Duplicate this layer and rename - Frame 3.
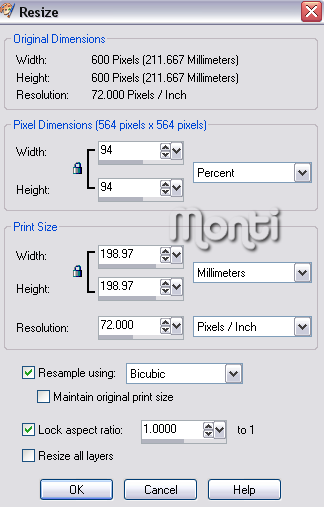
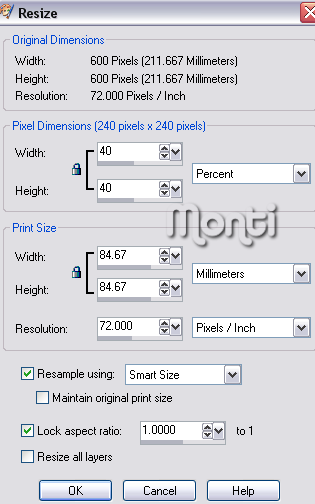
Go to Image - Resize with the following settings
NOTE: Make sure you uncheck the Lock Aspect Ratio before setting the percentage sizes.
Step 4:
Select your Magic Wand - Tolerance and Feather: 0 and click inside Frame 3.
Go to Selections - Modify - Expand by 5.
Add a new Raster Layer and move it down to beneath all 3 frame layers.
Set your Foreground back to Monti-CrushedVelvet.jpg pattern and flood fill the selection.
Do NOT deselect.
Copy and paste your tube as a new layer and resize if neccesary making sure the Lock Aspect Ratio is checked this time before setting the percentage sizes.
Go to Selections - Invert and press Delete on your keyboard.
Deselect.
Still on your tube layer add the following Drop Shadow.
Vertical: 0
Horizontal: -5
Opacity: 50
Blur: 5
Colour: Black
Activate Frame 3 layer and add the following Drop Shadow.
Vertical: 3
Horizontal: 3
Opacity: 50
Blur: 3
Colour: Black
Repeat but change the Vertical and Horizontal to -3.
Activate Frame 2 layer add the following Drop Shadow.
Vertical: 0
Horizontal: 0
Opacity: 50
Blur: 10
Colour: Black
Activate Frame 1 layer add the following Drop Shadow.
Vertical: 0
Horizontal: 0
Opacity: 50
Blur: 10
Colour: Black
Hide your Mask layer - by clicking on the eye next to the layer in the layer palette - and Merge All Visible.
Go to Image - Resize with the following settings
Leave those layers hidden for now.
Step 5:
Copy and paste the Monti-Teardrop.png as a new layer.
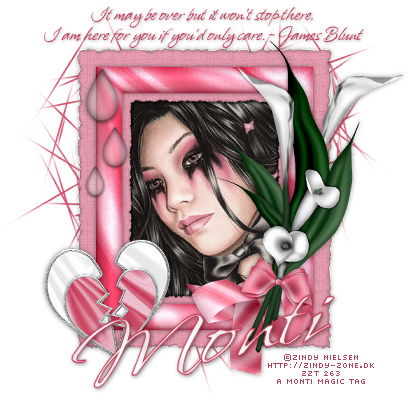
Move it into position on the left of the frame - see tag for a placement guide.
Duplicate and go to Image - Resize - 75% - All layers UNchecked.
Duplicate the resized Tear and resize again with the same settings.
Move both into position - see finished tag as a guide.
Once happy with the position, Merge All Visible and unhide the mask layer by clicking on the eye again.
Save this as a psp file and minimize for the time being.
Step 6:
Maximise the Monti-BrokenHeart.png.
Select your Magic Wand - Tolerance and Feather: 0 and click inside both parts of the heart.
Go to Selections - Modify - Expand by 5 and add a new Raster Layer.
Move this layer to the bottom.
Press Shift and D on the keyboard to make a duplicate so you have 2 hearts.
Activate one of the hearts and set your Foreground to Monti-Satin-Blue.jpg - Angle: 0 - Scale: 100
Fill the selection (on the new layer).
Deselect and Merge All Visible.
For the other heart change your Foreground to Monti-Satin-White.jpg - Angle: 0 - Scale: 100
Fill the selection (on the new layer).
Deselect and Merge All Visible.
Maximise your original Frame canvas and make sure you are on the top layer.
Copy and paste the White filled heart as a new layer onto the canvas.
Go to Image - Resize with the following settings
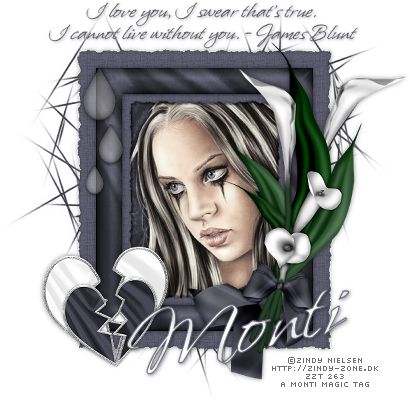
Position at the bottom left of the frame - see my tag for a guide.
Go to Adjust - Sharpen.
Add the following Drop Shadow
Vertical: 0
Horizontal: 0
Opacity: 50
Blur: 10
Colour: Black
Copy and paste the blue heart as a new layer and resize to 30% leaving all the other settings the same as for the white heart.
Position at the bottom left of the frame - see my tag for a guide.
Go to Adjust - Sharpen.
Add the following Drop Shadow
Vertical: 0
Horizontal: 0
Opacity: 50
Blur: 5
Colour: Black
Step 7:
We are going to do the lillies and bow now.
I have supplied the lillies and bows in white and blue so you can choose whichever combination you prefer.
I am using the white lillies with the blue bow.
Copy and paste the lillies of your choice onto the canvas.
Go to Image - Resize by 90% - Bicubic: selected - All layers: UNchecked.
Move into position on the right of the frame.
Copy and paste the bow as a new layer.
Go to Image - Resize by 80% - Bicubic: selected - All layers: UNchecked.
Move into position at the bottom of the lillies so the knot on the bow is just under the bottom lily.
In the layer palette hide all layers apart from the lillies and the bow.
Click on the lily layer to activate it.
Zoom in on your canvas by going to View - Zoom - Zoom in More.
At this point you might need to move the sliders at the bottom and sides of your canvas to find the bow area.
Make sure you can see all of the bow in the canvas.
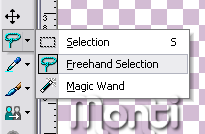
Activate your Freehand Selection Tool with the following settings
Selection Type: Point to Point - Mode: Add/Shift - Feather: 0 - Smoothing: 0 - Antialias: Checked.
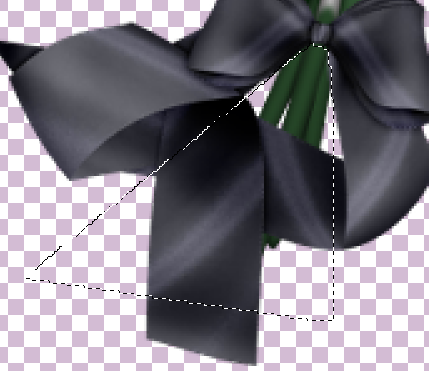
Make a selection around your bow area like I have below.
Go to Selections - Promote Selection to Layer.
Go to Layers - Arrange - Bring to top.
Deselect.
Are all your other layer still hidden? Good then Merge these Layers Visible.
Go to View - Zoom - Zoom to 100%
Add the following Drop Shadow
Vertical: 0
Horizontal: 0
Opacity: 50
Blur: 10
Colour: Black
Unhide all layers by going to Layers - View - All.
Step 8:
Select a font of your choice - I used Whisper - Size: 26 - Vector: Checked - Antialias: Smooth - Leading: -0.200 - Foreground: Null - Background: #5b5b6d
Type out the text of your choice.
I used:
I love you, I swear that's true. I cannot live without you. - James Blunt
Click apply.
Move the text into position at the top of the frame and go to Objects - Align - Horizontal Center in Canvas.
Convert to Raster layer and add the following Drop Shadow
Vertical: 1
Horizontal: 1
Opacity: 50
Blur: 6
Colour: Black
We are now going to crop and resize before we add our name and the artists copyright.
Select your Crop Tool and in the tool bar select Merged Opaque
Click on the tick in the tool bar.
As you can see the tag is still very big so go to Image - Resize with the following settings
Bicubuc: Selected - Resize All Layers: Checked.
Size is your choice, I choose to do mine at 70% so my final tag was 410 x 405 pixels.
To add your name activate your Text Tool again with the same font as before.
Foreground: #5B5B6D - Background: Monti-Satin-White.jpg - Size: 72 - Bold Selected.
Type out your name.
Before you convert to Raster layer go to Image - Rotate - Free Rotate - Left - 12 - Rotate Single Layer Around Canvas Center: Checked.
Move your text into position and convert to Raster layer.
Add the following Drop Shadow
Vertical: 1
Horizontal: 1
Opacity: 50
Blur: 6
Colour: Black
Finally add the artists copyright and your license number if the tube you used requires one and save your finished tag.





No comments:
Post a Comment