

This tutorial was written by Monti on February 20th 2011. It's concept is copyrighted to Monti. Any creation you make from my ideas are yours. You may print out this tutorial for your own personal use, but please do not copy it in any way to put online, pass out or rewrite without my permission or worse yet attempt to claim as your own.
This was written for psp 9 but will work in other versions.
For this tutorial you will need
Paint Shop Pro
Animation Shop
Font Of Your Choice
I used 2 Peas Mister Giggle which is a pay font so I am unable to supply.
Tube of your Choice
I am using the wonderful art of Suzanne Woolcott.
Unfortunately Suzanne is no longer selling her work so please use an artist you have permission for.
Scrap Kit
I used bits from several scrap kits from the Splish Splash Splosh Blog Train several years ago.
If you didn't collect these at the time most have disappeared or have gone PTU so please use a kit that you have.
Sand Fill
Save and open in PSP.

Plug Ins
Eye Candy 4000 - Gradient Glow - Optional.
Eye Candy 3 - Glass - Optional.
Ok we are ready to start.
REMEMBER TO SAVE OFTEN
Step 1:
Open new image 540 x 220 and fill with #3FC5EB.
Open up a wave element and copy and paste it into your canvas.
Duplicate and mirror then move and repeat until all the canvas is filled with waves.
Hide the background layer and merge visible.
Unhide the background layer.
In the Layer Palette right click on the Merged layer and change the blend mode to Luminance (Legacy).
Lower the opacity to 50.
I added Suzanne's Octopus tube to the image, mirrored it and moved it to the right hand side and changed the blend mode to Luminance (Legacy).
Step 2:
Copy and paste some seaweed onto the canvas. Resize if neccessary.
Position at one side then go to Layers - Duplicate - Image - Mirror.
Add a new raster layer and set your foreground to the Sand Beach pattern.
Set your paintbrush to Round - Size:80 - Hardness:55 - Step:32 - Density:50 - Thickness:100 - Opacity:100
Paint some sand on the image until it looks like the one below.

In the Layer Palette change the blend mode to Dissolve and then lower the opacity until you are happy with the sand.
Step 3:
Copy and Paste your main tube onto the canvas and postion to the left of the tag.
Add the following Drop Shadow
Vertical: 0
Horizontal: 4
Opacity: 60
Blur: 6
Colour: Black
Add any other elements you wish.
Several of my Gorjuss tubes came with fish so I used those and added a crab, some bubbles and a starfish. Feel free to add what you have from the scraps and resize them to fit.
I added the following Drop Shadow to the element tubes.
Vertical: 0
Horizontal: 2
Opacity: 20
Blur: 3
Colour: Black
Once you are happy with how your tag looks merge all layers visible.
Step 4:
Add a new raster layer.
Go to Selections - Select all - Selections - Modify - Contract: 10 - Selections - Invert and fill the selected area with the Sand Beach pattern.
Add the following Drop Shadow
Vertical: 0
Horizontal: 0
Opacity: 60
Blur: 9
Colour: Black
Add a new raster layer and add the artists copyright.
Step 5:
Click on the Background/Merged layer to activate it and copy and paste as a new image into Animation Shop.
Go to Effects - Insert Image Effect with the following settings
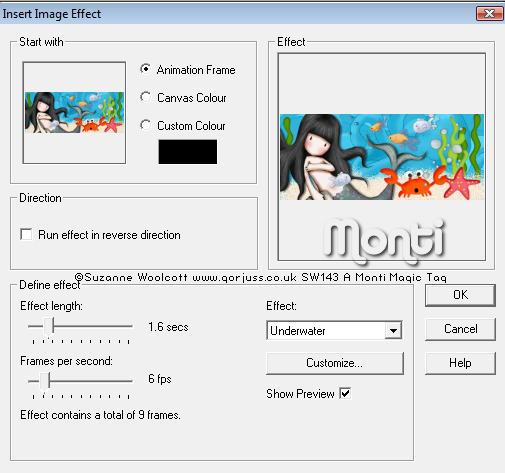
Click on Customise.
In the box that opens up, under Effects on the left click on Apply Both.
Change your Sunlight Intensity to 8 and the Wave Depth to 1.
For your waves in the top Wave drop down box, select Wave 1 and set x: 18 set y: 35
Again in the Wave drop down box, select Wave 2 and set x: -35 set y: -33
Repeat this with the rest of the wave settings shown below.
Wave 3 x: -45 y: 0
Wave 4 x: -19 y: 26
Wave 5 x: 34 y: 0
Wave 6 x: -29 y: -12
Wave 7 x: 39 y: -24
Wave 8 x: 0 y: 28
Wave 9 x: 34 y: 19
Wave 10 x: - 18 y: 8
Wave 11 x: -6 y: -47
Wave 12 x: -14 y: -28
Wave 13 x: 9 y: -26
Click OK then on the main box click OK again.
Click on Frame 1 to activate it and go to Edit - Delete.
Clic on View - Animaton. Happy with how it looks? Let's do the final part now.
Step 6:
You should have 9 frames left after deleting the 1st frame earlier.
Go to Edit - Select All.
In the top tool bar activate your Propagate Paste icon.

Go back to PSP and hide the Background/Merged layer.
Merge together your Sand frame and copyright layers and copy and paste into Animation Shop as a new Image.
In Animation Shop go to Edit - Copy and then paste into selected frames.
DO NOT move your mouse but left click and your frame will be positioned correctly.
Step 7:
Back in PSP select a font you wish to use.
Set your Foreground to #0B5567 and your Background to #4ED4FA.
Type your name and position to the right of the tag.
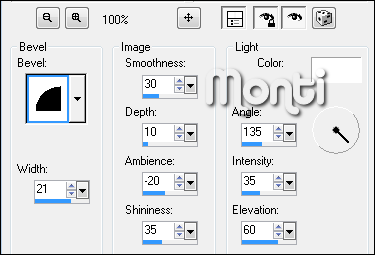
Convert to Raster layer and go to Effects - 3D Effects - Inner Bevel and apply with the following settings.
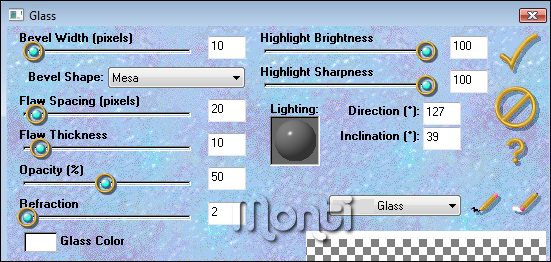
If you have Eye Candy 3 go to Effects - Eye Candy 3.0 - Glass and apply with the following settings.
Go to Effects - Eye Candy 4000 - Gradient Glow and apply with the following settings.
Glow Width: 3 - Soft Corners: 25 - Overall Opacity: 100 - Draw Only Outside Selection: Checked.
Under Colour choose Fat and change the first colour to #07262D. Click OK.
Add a Drop Shadow to your text.
Copy our text layer and paste as a new animation in Animation Shop.
Click back on the name to activate it and go to Edit - Copy.
Make sure all frames are selected on your animated image and go to Edit - Paste into Selected Frame.
Save your finished tag.
No comments:
Post a Comment