


This tutorial was written by Monti on September 13th 2009. It's concept is copyrighted to Monti. Any creation you make from my ideas are yours. You may print out this tutorial for your own personal use, but please do not copy it in any way to put online, pass out or rewrite without my permission or worse yet attempt to claim as your own.
This was written for psp 9 but will work in other versions.
For my original tag I used Template 227 from Missy at Divine Intentionz but when people asked me to tut it I decided to show you how to make the shapes so that every tag can be different shapes and sizes. That and I am not really a fan of cut and paste tuts.
For this tutorial you will need
Paint Shop Pro
Animation Shop
Fonts Of Your Choice
I used Century Gothic for the Star Of The Show text and Parisish for the name.
You can download Parisish *HERE*.
Tube of your Choice
I am using the gorgeous art of PinUpToons used with a license from CILM.
You can purchase a license to use his work from CDO.
Plug Ins
Eye Candy 4000 - Gradient Glow
Toadies - What Are You - Available *HERE* - Scroll Down
Mura Meister - Copies - Available *HERE*
Ok we are ready to start.
REMEMBER TO SAVE OFTEN
Step 1:
Open a new 700 x 600 White canvas in PSP.
Select your Preset Shapes tool set to Rectangle.
Set your Foreground to Null and your Background to a darker colour from your tube. I used the brown from the tubes top.
Draw out a rectangle about 420 x 190 pixels.
Go to Objects - Align - Center in Canvas and convert to raster layer.
Rename this layer Rectangle and apply the following Drop Shadow.
Vertical: 0
Horizontal: 0
Opacity: 40
Blur: 10
Colour: Black
Step 2:
Leave your Foreground as Null and change your Background to a light colour from your tube. I used the light blue from her jeans.
Select your Preset Shapes tool set to Star and draw out a star so that you can see the top and bottom over the rectangle.
See the screen shot below.

Go to Objects - Align - Center in Canvas and convert to raster layer.
Move over to one side of the rectangle. Use the screen shot below as a guide.

In the layer palette move this layer beneath the Rectangle layer.
Duplicate the star layer and go to Image - Mirror.
In the layer palette right click on the duplicate layer and choose Merge Down. This will merge it with the 1st star layer.
Rename Star.
Make sure your Background is still on the same colour we used for the star and that your Foreground is on Null.
This is important otherwise when you apply the Toadies filter you will get different colours in it.
Go to Effects - Plugins - Toadies - What Are You? with the X and Y dose both on 10 and click OK.
Step 3:
Click on the top layer to activate it.
Change your Foreground to the light colour you used on your stars and your background to Null.
Select your Preset Shapes tool set to Rectangle - Line Width: 6 - Anti-alias: Checked.
While holding down your Shift key to ensure you get a square, draw out a square in one side of the rectangle making sure you keep more or less an equal distance from the edges.
Go to Objects - Align - Vertical Center in Canvas and convert to raster layer.
In the layer palette right click on the square layer and duplicate, then go to Image - Mirror.
In the layer palette right click on the duplicate layer and choose Merge Down. This will merge it with the 1st square layer.
Rename Square.
Select your Magic Wand - Tolerance and Feather: 0 and click inside both squares.
Go to Selections - Modify - Expand by 4.
Add a new raster layer, name it Black and fill with black.
Deselect.
Select your Magic Wand with the same settings and click inside the left square.
Go to Selections - Modify - Expand by 4.
Activate your tube and go to Edit - Copy.
Activate your main canvas again and go to Edit - Paste as New Layer.
Move it below the square layer and position it so the part you want showing is inside the selections.
Once you are happy with the positioning go to Selections - Invert and press delete on your keyboard.
Deselect by going to Selections - Select None.
Right click on the tube layer and Duplicate. Go to Image - Mirror.
In the layer palette right click on the duplicate layer and choose Merge Down to merge it with the 1st square layer.
Rename Tube.
Apply the following Drop Shadow to the tube layer
Vertical: 0
Horizontal: 3
Opacity: 40
Blur: 4
Colour: Black
Repeat the Drop Shadow but change the Horizontal to -3.
Right click on the tube layer and duplicate.
On the duplicate layer go to Adjust - Blur - Gaussian Blur: 2 and change the Blend Mode to Overlay.
Hide all layers apart from the 2 tube layers and Merge All Visible.
Rename Tube and unhide all layers by going to Layers - View - All.
Activate your Square layer and add the following Drop Shadow
Vertical: 2
Horizontal: 2
Opacity: 40
Blur: 3
Colour: Black
Step 4:
Select your Font tool and a plain font of your choice - I used Century Gothic - Size: 20.
Set your Background to a colour from the tube - I used a colour from her hair and your Foreground to Null.
Type out the words "STAR OF THE SHOW" using capital letters.
Position it at the top left of the rectangle.
Convert to raster layer and add the following Drop Shadow
Vertical: 1
Horizontal: 1
Opacity: 40
Blur: 2
Colour: Black
Right click on this text layer and duplicate.
Use your Move/Pick tool move it into position on the bottom right of the rectangle.
In the layer palette right click on the duplicate layer and choose Merge Down to merge it with the 1st text layer.
Rename Text.
Select your Preset Shapes tool set to Star and set your background to a colour from your tube - I used black and your Foreground to Null.
Draw out a small star (about 30 x 30 pixels). Use my tag as a guide.
Go to Objects - Align - Horizontal Center in Canvas and convert to a raster layer.
It doesn't matter if it is not in the exact place as we can fix that later.
Go to Effects - Plugins - Mura Meister - Copies and apply it with the following settings:
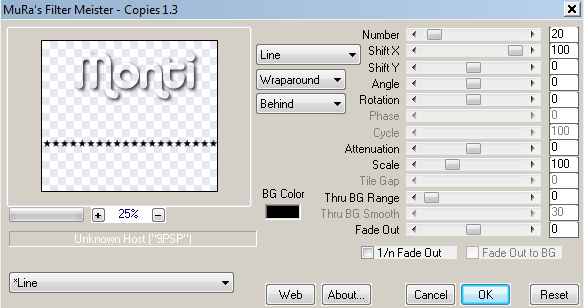
Activate your Selection Tool set to Rectangle and select 4 of the stars.
Go to Selections - Invert and press delete on the keyboard. This will leave you with just the 4 stars.
Deselect.
Using your Move/Pick tool move into position to the side of the "STAR OF THE SHOW" text.
Duplicate this small star layer and move to the side of the other text.
In the layer palette right click on the duplicate layer and choose merge down to merge it with the 1st star's layer.
Rename Small Stars and add the following Drop Shadow
Vertical: 0
Horizontal: 2
Opacity: 40
Blur: 4
Colour: Black
Step 5:
Copy and paste your main tube as a new layer making sure it is the top layer.
Resize as desired and move into position.
Rename Top Tube and add the following Drop Shadow
Vertical: 0
Horizontal: 4
Opacity: 40
Blur: 4
Colour: Black
Hide the white background layer and activate your Crop Tool. On the top tool bar click on Merged Opaque and then click on the tick to crop.
Unhide the white background layer.
Your tag is still really big so if you want to resize it do so now.
I resized mine by 62% - Smart Size - All Layers: Checked.
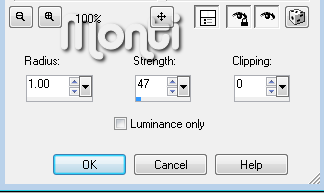
Activate your top tube layer and go to Adjust - Sharpen - Unsharp Mask with the following settings and click ok.
Add a new raster layer and add the artist's credits, your license number and your watermark.
Add your name using a font of your choice.
I used Parisish - Size: 36. Foreground: a darker colour from her jeans - Background: a lighter shade from her jeans - Vector: Selected.
Apply and position where you want it.
Convert to a raster layer and apply Eye Candy 4000 - Gradient Glow with the following settings:
Glow Width: 3 - Soft Corners: 25 - Overall Opacity: 100 - Draw Only Outside Selection: Checked. Under Colour select Fat and set the 1st colour to your Foreground - darker shade and leave the 2nd one as white.
Add a Drop Shadow of choice. I used
Vertical: 0
Horizontal: 2
Opacity: 40
Blur: 3
Colour: Black
Step 6: - Animation
Open Animation Shop.
Click on your Tube (inside square frames) layer to activate it and reduce the opacity of that layer to 80.
Go to Edit - Copy Merged and paste as a new animation in Animation Shop.
Back in PSP lower the opacity of the tube layer to 60 and go to Edit - Copy Merged.
Back in Animation Shop go to Edit - Paste after Current Frame.
Back in PSP lower the opacity of the tube layer to 40 and go to Edit - Copy Merged.
Back in Animation Shop click on Frame 2 to make sure it is the active frame then go to Edit - Paste after Current Frame.
back in PSP lower the opacity of the tube layer to 20 and go to Edit - Copy Merged.
Back in Animation Shop click on Frame 3 to make sure it is the active frame then go to Edit - Paste after Current Frame.
Staying in Animation Shop you should now have 4 frames to your animation.
Click on Frame 1 to make it active and holding down the shift key click on Frame 3.
This will make the first 3 frames active.
Go to Edit - Copy and paste as New Animation.
Working on the new 3 frame animation go to Edit - Select All and then go to Animation - Reverse Frames.
Go to Edit - Copy and copy this new 3 frame animation.
On your original animation click on Frame 4 to activate it and then go to Edit - Paste after Current Frame.
You can now close the 3 frame animation.
Go to Edit - Select All and then Animation - Frame Properties and change the display time to 30. Click OK.
Save your finished animation.
No comments:
Post a Comment