
This tutorial was written by Monti on December 21st 2006 and reworked on 12th October. It's concept is copyrighted to Monti. Any creation you make from my ideas are yours. You may print out this tutorial for your own personal use, but please do not copy it in any way to put online, pass out or rewrite without my permission or worse yet attempt to claim as your own.
This was written for psp 9 but will work in other versions.
For this tutorial you will need:
Paint Shop Pro
Animation Shop
Eye Candy 3.1
Glass: optional
Font of your choice
I used International Palms
A Tube of your choice
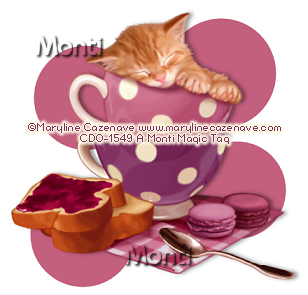
I am using the wonderfully cute art of Maryline Cazenave used with a license from CDO.
You can purchase a license to use her work from www.cdoestore.com.
We will be using our Manual Colour Correction tool in this tut. If you don't know where to find that Fi has an awesome tut on how to fix it to your tool bar. Thanks Fi. You can find the tut at http://justfi.co.uk/blog/2011/03/26/manual-color-correction/
Ok we are ready to start.
REMEMBER TO SAVE OFTEN
Step 1:
Open a new 500 x 500 pixel transparent image and flood fill with white.
Open your tube. Copy and Paste the tube as a new layer on your white canvas. Resize if neccessary.
Add a Drop Shadow of your choice. I used
Vertical: 0
Horizontal: 5
Opacity: 40
Blur: 8
Colour: Black
Step 2:
Click on your bottom layer to activate it.
Activate your Presets shapes and choose the circle or another shape of your choice. Experiment with different shapes.
Set your Background to a medium colour from your tube and null your Foreground.
Make sure Antialias and Create as Vector are checked.
Draw out 4 large Circles (or whatever shape you chose) around your tube, converting each one to a raster layer before doing the next.
Move them around until you are happy with their placement.
See the screen shot below for an example of placement.
Hide the tube and background layers, merge visible and rename Medium.
Add Drop Shadow NOTE: Make sure the "Shadow on a New Layer" is checked.
Vertical: 0
Horizontal: 0
Opacity: 30
Blur: 5
Colour: Black
Shadow on a New Layer: Yes
Step 3:
Change your Background to a dark colour from your tube and null your Foreground.
Use the same shape and settings and create smaller shapes varying the sizes slightly and converting each one to a raster layer before doing the next.
Move them around until you are happy with their placement.
Hide the Tube, Background and Medium layers. Merge visible and rename Dark.
Add Drop Shadow NOTE: Make sure the "Shadow on a New Layer" is checked.
Vertical: 0
Horizontal: 0
Opacity: 30
Blur: 5
Colour: Black
Shadow on a New Layer: Yes
Step 4:
Change your Background to a light colour from your tube and null your Foreground.
Use the same shape and settings and create smaller shapes to fill in the gaps, varying the sizes slightly and converting each one to a raster layer before doing the next.
Move them around until you are happy with their placement.
Hide the Tube, Background, Medium and Dark layers. Merge Visible and rename Light.
Add Drop Shadow NOTE: Make sure the "Shadow on a New Layer" is checked.
Vertical: 0
Horizontal: 0
Opacity: 30
Blur: 5
Colour: Black
Shadow on a New Layer: Yes
Step 5:
Hide your white background layer and Crop Merged Opaque. Resize your canvas now if desired.
Add your artists copyright on a new layer.
Click on the top tube layer to activate it.
Select your text tool - Vector selected with a font of your choice (I used International Palms) and set your Foreground to the dark colour you used and the background to the light colour - Stroke: 1 - Bold: Selected.
Type your name, use your nodes to stretch it to fit.
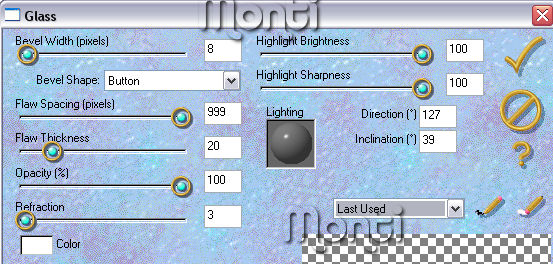
Convert to raster layer and add your favourite Inner Bevel.
I used the following Inner Bevel and Eye Candy 3.1 Glass setting.

Add the following Drop Shadow. but uncheck the "Shadow on a New Layer".
Vertical: 2
Horizontal: 2
Opacity: 40
Blur: 4
Colour: Black
Shadow on a New Layer: UNCheck
Step 6:
Open Animation Shop.
Pack in PSP Go to Edit - Copy Merged and paste as a new animation is Animation Shop.
Back in PSP Click on your Medium layer to activate it and activate your Manual Colour Correction tool.
Change the Medium colour to the dark colour. Rename Dark1.
Click on your Dark layer to activate it and activate your Manual Colour Correction tool.
Change the Dark colour to the light colour. Rename Light1.
Click on your Light layer to activate it and activate your Manual Colour Correction tool.
Change the Light colour to the medium colour. Rename Medium1.
Go to Edit - Copy Merged. In Animation Shop right click on the first image and choose Paste After Current Frame.
Step 8:
Back in PSP
Click on your Dark1 layer to activate it and activate your Manual Colour Correction tool.
Change the Dark colour to the light colour. Rename Light2.
Click on your Light1 layer to activate it and activate your Manual Colour Correction tool.
Change the Light colour to the Medium colour. Rename Medium2.
Click on your Medium1 layer to activate it and activate your Manual Colour Correction tool.
Change the Medium colour to your Dark colour. Rename Dark2.
Go to Edit - Copy Merged. In Animation Shop right click on the second frame and choose Paste After Current Frame.
Still in Animation shop go to Edit - Select All and change the Frame Properties to 25.
Save as a .gif

No comments:
Post a Comment