
For this tutorial you will need
Paint Shop Pro
The Following Colour Chart.
Save and open in PSP.

Ok we are ready to start.
REMEMBER TO SAVE OFTEN
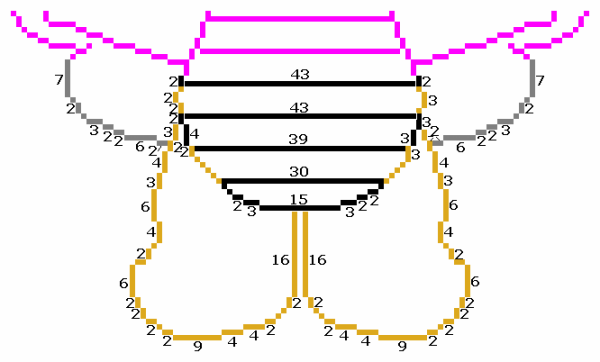
Step 1: Outline
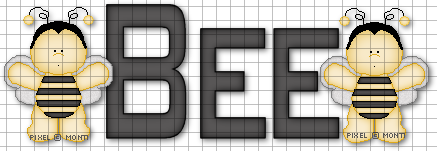
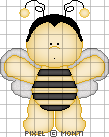
We will be be making the bee shown above. The outlines below have been resized a lot so you can see them clearly.
I have done the outline in 2 parts, we will be starting with the top half of the bee.
To make this easier I have numbered all pixels over 1.

Open a new image 200 x 200 transparent.
Select the brush tool with the following settings.
Size = 1
Hardness, Opacity and Density = 100
Zoom in to about 800% - 1000%
Set your foreground to colour 1 on the outline colour chart (#000000) and start at the top of your canvas.
I started on the left antenna.
Change colours as you go as indicated on the outline chart.
The yellow is colour 3 (#DDA91D) and the wings are colour 5 (#808080).
Step 2:
When you have completed that outline we will carry on with the outline below.
NOTE: The parts shown in pink are the parts you have already drawn from the first outline.
Step 3: Antenna
When your outline is complete, select your magic wand with the following settings and click inside the left antenna.
Select colour 4 (#F9ECCE) on your colour chart and flood fill this selection.
Keep selected.
Selections float, Effects 3D effects, Cutout with the following settings
Vertical= 0
Horizontal= 0
Opacity = 100
Blur = 5
Shadow colour = Use your antenna outline.(#DDA91D)
Make sure fill interior with colour is UNchecked.
Deselect.
Repeat for the right antenna.
Step 4: Head
Select your magic wand with the same settings and click inside the top of head (the black part) making sure you select the stray pixels shown in the screen shot below.
Select colour 2 (#595757) on your colour chart and flood fill this selection.
Keep selected.
Selections float, Effects 3D effects, Cutout with the following settings
Vertical= 0
Horizontal= 0
Opacity = 100
Blur = 8
Shadow colour = Use your head outline.(#000000)
Make sure fill interior with colour is UNchecked.
Deselect.
Step 5: Face
Select your magic wand with the same settings and click inside the face.
Select colour 4 (#F9ECCE) on your colour chart and flood fill this selection.
Keep selected.
Selections float, Effects 3D effects, Cutout with the following settings
Vertical= 0
Horizontal= 0
Opacity = 80
Blur = 22
Shadow colour = Use your face outline.(#DDA91D)
Make sure fill interior with colour is UNchecked.
Deselect.
Step 6: Arms
Select your magic wand with the same settings and click inside the left arm.
Select colour 4 (#F9ECCE) on your colour chart and flood fill this selection.
Keep selected.
Selections float, Effects 3D effects, Cutout with the following settings
Vertical= 0
Horizontal= 0
Opacity = 80
Blur = 10
Shadow colour = Use your arm outline.(#DDA91D)
Make sure fill interior with colour is UNchecked.
Deselect.
Repeat for the right arm.
Step 7: Legs
Select your magic wand with the same settings and click inside the left leg.
Select colour 4 (#F9ECCE) on your colour chart and flood fill this selection.
Keep selected.
Selections float, Effects 3D effects, Cutout with the following settings
Vertical= 0
Horizontal= 0
Opacity = 80
Blur = 12
Shadow colour = Use your leg outline.(#DDA91D)
Make sure fill interior with colour is UNchecked.
Deselect.
Repeat for the right leg.
Step 8: Stripes
Select your magic wand with the same settings and click inside the 1st stripe under his chin.
Select colour 4 (#F9ECCE) on your colour chart and flood fill this selection.
Keep selected.
Selections float, Effects 3D effects, Cutout with the following settings
Vertical= 0
Horizontal= 0
Opacity = 80
Blur = 4
Shadow colour = Use colour 3(#DDA91D)
Make sure fill interior with colour is UNchecked.
Deselect.
Select your magic wand with the same settings and click inside the 2nd stripe.
Select colour 2 (#595757) on your colour chart and flood fill this selection.
Keep selected.
Selections float, Effects 3D effects, Cutout with the following settings
Vertical= 0
Horizontal= 0
Opacity = 80
Blur = 5
Shadow colour = Use colour 1(#000000)
Make sure fill interior with colour is UNchecked.
Deselect.
Select your magic wand with the same settings and click inside the 3rd stripe.
Select colour 4 (#F9ECCE) on your colour chart and flood fill this selection.
Keep selected.
Selections float, Effects 3D effects, Cutout with the following settings
Vertical= 0
Horizontal= 0
Opacity = 90
Blur = 5
Shadow colour = Use colour 3(#DDA91D)
Make sure fill interior with colour is UNchecked.
Deselect.
Select your magic wand with the same settings and click inside the 4th stripe.
Select colour 2 (#595757) on your colour chart and flood fill this selection.
Keep selected.
Selections float, Effects 3D effects, Cutout with the following settings
Vertical= 0
Horizontal= 0
Opacity = 80
Blur = 5
Shadow colour = Use colour 1(#000000)
Make sure fill interior with colour is UNchecked.
Deselect.
Select your magic wand with the same settings and click inside the 5th stripe.
Select colour 4 (#F9ECCE) on your colour chart and flood fill this selection.
Keep selected.
Selections float, Effects 3D effects, Cutout with the following settings
Vertical= 0
Horizontal= 0
Opacity = 90
Blur = 5
Shadow colour = Use colour 3(#DDA91D)
Make sure fill interior with colour is UNchecked.
Deselect.
Select your magic wand with the same settings and click inside the 6th stripe.
Select colour 2 (#595757) on your colour chart and flood fill this selection.
Keep selected.
Selections float, Effects 3D effects, Cutout with the following settings
Vertical= 0
Horizontal= 0
Opacity = 80
Blur = 5
Shadow colour = Use colour 1(#000000)
Make sure fill interior with colour is UNchecked.
Deselect.
Select your magic wand with the same settings and click inside the 7th stripe.
Select colour 4 (#F9ECCE) on your colour chart and flood fill this selection.
Keep selected.
Selections float, Effects 3D effects, Cutout with the following settings
Vertical= 0
Horizontal= 0
Opacity = 90
Blur = 5
Shadow colour = Use colour 3(#DDA91D)
Make sure fill interior with colour is UNchecked.
Deselect.
Select your magic wand with the same settings and click inside the 8th stripe.
Select colour 2 (#595757) on your colour chart and flood fill this selection.
Keep selected.
Selections float, Effects 3D effects, Cutout with the following settings
Vertical= 0
Horizontal= 0
Opacity = 80
Blur = 5
Shadow colour = Use colour 1(#000000)
Make sure fill interior with colour is UNchecked.
Deselect.
Step 9: Wings
Select your magic wand with the same settings and click inside the left wing.
Select colour 6 (#E1DFDF) on your colour chart and flood fill this selection.
Keep selected.
Selections float, Effects 3D effects, Cutout with the following settings
Vertical= 0
Horizontal= 0
Opacity = 70
Blur = 5
Shadow colour = Use your wing outline.(#808080)
Make sure fill interior with colour is UNchecked.
Do NOT Deselect.
Go to Adjust / Add and Remove Noise / Add Noise with the following settings.
Uniform checked.
Noise 5%
Monochrome checked.
Deselect.
Repeat for the right wing.
Merge all visible and save.
No comments:
Post a Comment