


This tutorial was written by Monti on September 29th 2006. It's concept is copyrighted to Monti. Any creation you make from my ideas are yours. You may print out this tutorial for your own personal use, but please do not copy it in any way to put online, pass out or rewrite without my permission or worse yet attempt to claim as your own.
This tutorial was written for Claire
This was written for psp 9 but will work in other versions.
For this tutorial you will need:
Paint Shop Pro
Xenofex 2
Ok we are ready to start.
REMEMBER TO SAVE OFTEN
Step 1: The Heart
Open a new image 200 x 200 transparent image.
Select your preset shapes Heart 2. Set your foreground to #521810 and your background to #91180C.
Draw out a heart to fill the canvas. DO NOT convert to Raster.
Image Canvas size 300 x 300 then use your nodes to rotate the heart slightly. Convert to Raster Layer.
Go to Effects Xenofex 2 and apply Crumple - Subtle Texture only.
Select your Lighten/ Darken tool with the settings shown below.
To lighten you use the left click on the mouse and to darken you use the right click.
Brush size - 23
Hardness - 50
Density - 100
Thickness - 100
Opacity - 44
Darken around the edges of the heart. Use the lighten to highlight the curve of the heart and lighten the middle very slightly to give a depth to the heart.
Add a new Raster Layer. Change to your pen/ draw tool. Line width 2, colour black and draw two long scars on your heart.
Change the line width to 1 and add the stitches to the scars.
Activate your heart layer and darken the areas under the scars. Merge all visible.
Step 2: Making Nails
Change your foreground to #404040 and your background to #C0C0C0
Select your Preset shapes - Eclipse, create as vector selected.
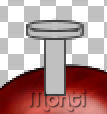
Draw a small eclipse about 30 pixels wide and about 15 high. Convert to Raster layer and duplicate.
Move the top one down so that you can see part of the top one. see Screen Shot below.

Move that layer below the original eclipse.
Select your pen tool, line width 1 and connect the edges. You might have to zoom in and use your light grey #C0C0C0 to just go over the side edges of the bottom eclipse.

Hide your heart layer and merge all visible.
Change your colours back to foreground #404040 and background #C0C0C0. Select your rectangle preset shape and draw a thin rectangle underneath the nail top, about 10 pixels wide by 30 pixels high.
Move this below the nail head layer and position in the centre of the nail head. Merge Visible and unhide the heart layer.
Make sure you are on the nail layer and select your lighten tool again. Change the size to 5.
On the nail head you will need to darken the left side of the nail and lighten the right.
On the rest of the nail you will need to lighten the left side of the nail and darken the right. See below.

Duplicate twice for a total of 3 nails and move them into position, flip one of them.
Use your Deform tool to rotate them and change the angles. Go to Adjust - Sharpen.
Activate the heart layer again and use your darken tool, size 10 to darken the area where the nails meet the heart. Make the shadows circular in shape.
Merge all visible, crop and save as a psp tube.
Alternatively add your name and save as a tag.

No comments:
Post a Comment