


This tutorial was written by Monti on January 2nd 2004 and reworked on October 7th 2014. It's concept is copyrighted to Monti. Any creation you make from my ideas are yours. You may print out this tutorial for your own personal use, but please do not copy it in any way to put online, pass out or rewrite without my permission or worse yet attempt to claim as your own.
This was written for psp 9 but will work in other versions.
For this tutorial you will need:
Paint Shop Pro
Animation Shop
Animation Shop
A tube of your choice
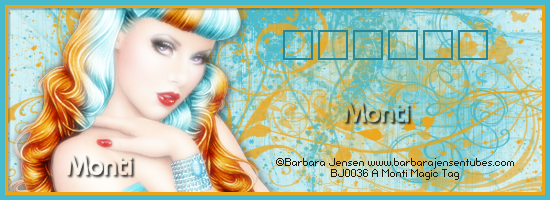
I am using the beautiful work of Barbara Jensen.
If you wish to use her work please visit http://www.barbarajensentubes.com to purchase a license.
I am using the beautiful work of Barbara Jensen.
If you wish to use her work please visit http://www.barbarajensentubes.com to purchase a license.
Masks
I used Forum Mask 14 MB and SW and Forum Mask 9 MB and SW both available from http://moonbeamsandspiderwebs.blogspot.co.uk/
I used Forum Mask 14 MB and SW and Forum Mask 9 MB and SW both available from http://moonbeamsandspiderwebs.blogspot.co.uk/
A font of your Choice
I used MeaCulpa
I used MeaCulpa
Ok we are ready to start.
REMEMBER TO SAVE OFTEN
Step 1:
Open a new transparent image 550 x 200 pixels. Flood fill with a light colour from your tube. Name this layer Background.
Add a new layer and fill with a darker shade of the same colour and apply Forum Mask 14 MB and SW and Merge Group.
Rename this layer Mask1.
Add a new raster layer and fill with a contrasting colour. Apply Forum Mask 9 MB and SW and Merge Group.
Rename this layer Mask2.
Step 2:
Copy and paste your tube as a new layer and position the tube so the part you want on show is visible. Duplicate your tube layer.
On the original tube layer go to Adjust - Blur - Gaussian Blur - Radius: 3. Rename this layer Tube
On the copy of tube layer, change the blend mode to either soft light or screen depending on which looks better with your tube. I used screen on the top tag and soft light on the tag at the bottom of the page. Rename this layer tube 1.
Crop the image merged opaque.
Activate the original tube layer and add the following Drop Shadow.
Vertical: 2
Horizontal: 2
Opacity: 60
Blur: 10
Colour: Black
Step 3:
Click on the top layer to activate it and add a new raster layer.
Fill with your contrast colour. Go to Selections - Select all - Float - Selections Modify - Contract by 8 and press delete on your keyboard.
Deselect and add the following Drop Shadow.
Vertical: 2
Horizontal: 2
Opacity: 25
Blur: 2
Colour: Black
Repeat the drop shadow changing the Vertical and Horizontal to -2
Rename this layer Edge.
Add another new layer and fill with your darker tube colour.
Go to Selections - Select all - Float - Selections Modify - Contract by 5 and press delete on your keyboard. Deselect.
Rename this layer Edge 1.
Go to Selections - Select all - Float - Selections Modify - Contract by 5 and press delete on your keyboard. Deselect.
Rename this layer Edge 1.
Step 4:
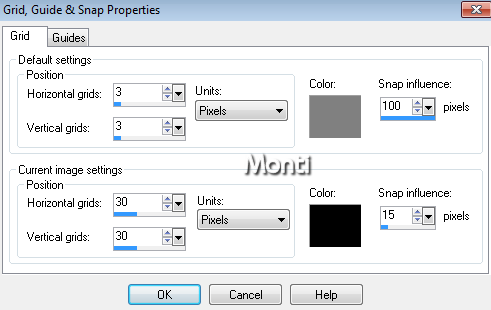
Go to View - Grid and you will see your image covered in a black grid. Go to View - Change Grid and Guide Properties and use the settings below.
Go to View - Grid and you will see your image covered in a black grid. Go to View - Change Grid and Guide Properties and use the settings below.
Your image will now look like this

Step 5:
Add a new raster layer and zoom in so you have a good view of one of the grid squares.
Set your foreground to a slightly darker colour from your tube. I used a slighly darker shade of my tube colour.
Select your paint brush - size 2 -Square.
Draw around the inside of one of the grid squares so you end up with a nice smooth square.
Go back to View - Change Grid and Guide properties and change the numbers in the lower boxes from 30 to 5.
Duplicate your square layer 5 times to give you a total of 6 squares.
Use your mover tool to line them up next to each other. Use your grid spacing to help you line them up with a 5 pixel count between each block.
It should now look similar to this
Step 6:
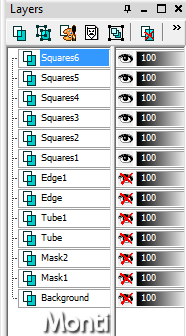
Hide all layers apart from the top 6 square layers and then merge all your square layers visible. Duplicate this layer and go to Image/Flip.
Leaving your other layers hidden merge together both square layers. Duplicate this square layer 5 times until you have a total of 6 square layers, rename as follows.
Leaving your other layers hidden merge together both square layers. Duplicate this square layer 5 times until you have a total of 6 square layers, rename as follows.
Activate Squares 1 and using your Magic Wand (tolerance 10, feather 0) select the bottom left and the top right squares holding
down your shift key to select both. Selections - Modify - Expand by 1.
Flood fill with the same colour you used for the square outline.
Deselect.
Activate Squares 2 and select the one next to the filled square on the left and the one next to the one on the right. Go to Selections - Modify - Expand by 1 and fill with the same colour. Deselect
Repeat this process until all squares are filled. Remember to change to a different Square layer each time.
Add the following drop shadow to each of the Square layers.
Vertical: 2
Horizontal: 2
Opacity: 20
Blur: 4
Colour: Black
Unhide all layers.
Activate your top layer and add your artists credits and license.
Add the following drop shadow to each of the Square layers.
Vertical: 2
Horizontal: 2
Opacity: 20
Blur: 4
Colour: Black
Unhide all layers.
Activate your top layer and add your artists credits and license.
Step 7:
Open Animation Shop.
Back in PSP Hide all Squares layers apart from Squares 1. Go to Edit Copy merged and paste as a new animation in animation shop.
Open Animation Shop.
Back in PSP Hide all Squares layers apart from Squares 1. Go to Edit Copy merged and paste as a new animation in animation shop.
Back in PSP hide Squares 1 and unhide Squares 2.
Copy merged. Back in animation shop paste after current frame.
Copy merged. Back in animation shop paste after current frame.
Back in PSP hide Squares 2 and unhide Squares 3.
Copy merged. Back in animation shop paste after current frame.
Copy merged. Back in animation shop paste after current frame.
Back in PSP hide Squares 3 and unhide Squares 4.
Copy merged. Back in animation shop paste after current frame.
Copy merged. Back in animation shop paste after current frame.
Back in PSP hide Squares 4 and unhide Squares 5.
Copy merged. Back in animation shop paste after current frame.
Copy merged. Back in animation shop paste after current frame.
Back in PSP hide Squares 5 and unhide Squares 6.
Copy merged. Back in animation shop paste after current frame.
Copy merged. Back in animation shop paste after current frame.
In animation shop go to Edit - Select All then copy and paste as a new image.
Go to Edit - Select All then Animation - Reverse Frames.
Click on Frame 1 to select it, right click and select Delete. Then go to Edit/ Select All again and copy.
Click on the original (6 frame image) click on Frame 6 to activate it , right click and select Paste after Current Frame.
You can now close the 5 frame image.
Still in animation shop go to Edit - Select All so all your frames are selected.
Go back into psp and add a new layer to the image you should still have open in there. Set your foreground to a darker shade of the contrast colour and your background to a lighter shade of your contrast colour.
Select your text and choose a nice Scripty font and type your name.
Convert to raster layer and add your favourite inner bevel and drop shadow.
I used the following drop shadow
Vertical: 2
Horizontal: 2
Opacity: 30
Blur: 3
Colour: Black
Edit - Copy and paste as a new image in animation shop. In animation shop on the top tool bar select Propagate Paste
Convert to raster layer and add your favourite inner bevel and drop shadow.
I used the following drop shadow
Vertical: 2
Horizontal: 2
Opacity: 30
Blur: 3
Colour: Black
Edit - Copy and paste as a new image in animation shop. In animation shop on the top tool bar select Propagate Paste
Go back to the name you just pasted in AS and copy, then right click on frame and choose paste into selected frame. Press view animation to see what it looks like and them save as a .gif.
No comments:
Post a Comment