

This tutorial was written by Monti on December 28th 2005. It's concept is copyrighted to Monti. Any creation you make from my ideas are yours. You may print out this tutorial for your own personal use, but please do not copy it in any way to put online, pass out or rewrite without my permission or worse yet attempt to claim as your own.
This was written for psp 9 but will work in other versions.
For this tutorial you will need:
Paint Shop Pro
Animation Shop
Fonts
A thick font of your Choice
A script font of your Choice
(I used Heavy Tripp and International Palms both of which are pay fonts so I am unable to share).
A Body Part tube of your Choice.
The image used in this tutorial is ©Barbara Jensen used with a license. You can get a license to use her tubes from www.barbarajensentubes.com
Feel free to use any artist you have permission for.
Mask of choice
I used MB and SW Banner Mask 2.png available from the link below.
DSB Flux
If you wish to do the animation part. Available at the link below.
Ok we are ready to start.
REMEMBER TO SAVE OFTEN
Step 1:
Open a new image 500 x 250 pixels.
Add a new raster layer.
Set your foreground to a very pale colour from your tube and your background to a medium colour. Set your foreground to Foreground/Background gradient with the following settings - Angle 0 - Repeats 2 and flood fill this new layer with the gradient.
Add a new raster layer and fill with a light colour from your tube.
Apply the mask of your choice by going to Layers - Load/Save Mask - Load Mask from Disk.
Merge Group
Step 2:
Open the tube you want to use and copy and paste as a new layer, resize if necessary and position in the centre of the canvas.
Add the following Drop Shadow
Vertical = 0
Horizontal = 0
Opacity = 65
Blur= 14
Colour= Black
Layers merge all visible and go to Image Add Border 2 Pixels - Symmetrical using a light colour from your tube.
Image Add Border 5 Pixels - Symmetrical using a medium colour from your tube.
Image Add Border 2 Pixels - Symmetrical using a light colour from your tube.
Step 3:
Animation - Optional.
If you wish to add glitter now is the time to do it.
Use your lasso tool (freehand selection) set to Point to Point - Add Shift - Feather 0
Zoom in on your image and click around the areas you wish to glitter. I am doing the stocking strap.
When it is all selected go to Selections - Promote Selection to layer.
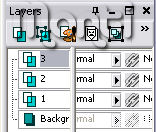
Deselect and duplicate the promoted layer twice.
You will now have your background layer and your 3 promoted selection layers.
Rename them 1, 2 and 3, see screenshot below.
Activate layer 1 and go to Effects DSB Flux Bright Noise
Intensity 22
Click the Mix button once.
Apply to layer 2 but click Mix twice.
Apply to layer 3 but click mix three times.
Step 4:
Now we need to apply the fonts.
Set your font style to the thick font you have chosen.
Set your Foreground to the medium/dark colour from your tube and the Background to the same Foreground/Background gradient we used earlier but change the repeats to 0 . Invert if necessary so the darker colour is at the top.
Type out your name making sure vector is selected, the font size will depend on what font you are using.
Use your nodes to stretch, shrink, etc until you are happy with it.
Add the following drop shadow
Vertical = 2
Horizontal = 2
Opacity = 60
Blur= 3
Colour = Black
Select your script font and set your foreground and background to the light colour from your tube.
Type out your name, again use the nodes to position it on top of the first name.
Apply the same drop shadow.
Add the artists copyright.
Open animation shop.
Step 5:
Back in Psp, hide layers 2 and 3 and click on the background layer to activate it.
Go to Edit - Copy Merged and paste as a new image in animation shop.
In Psp hide layer 1 and unhide layer 2.
Edit - Copy Merged and paste after current frame in animation shop.
In Psp hide layer 2 and unhide layer 3.
Edit - Copy Merged and paste after current frame in animation shop.
Save as a .gif.
No comments:
Post a Comment