PLEASE NOTE:
None of my tutorials or Scrap Kits are allowed to be used for any form of monetary gain.
This goes against the artists TOU that I use for my tuts and against my TOU.
This was written for PSP 9 but will work in other versions.
For this tutorial you will need:
Paint Shop Pro
A Font of your choice.
I used Dark Heart Script which is a Pay font but you could use A Quiet Scream which is available HERE.
5 Tubes of your choice.
Supplies
You will also need an oval frame of your choice, sorry I am unable to supply mine but any oval frame will do.
Mask
I am using Forum Mask 8 MB and SW from Moonbeams and Spiderwebs. Available Here
Why not download them all while you are there as they are great. Unzip and place in your mask folder.
PlugIns
Mura Meister - Cloud - Here
Penta.com - Color Dot - Here - scroll down to where it reads color dot Win/Mac
Toadies - What Are You? - I have included it Here as their official site is down. Place it in your PSP Plugins folder. If it doesn't work a google search for Toadies - What Are You? filter will give you a site where you can download it.
Ok we are ready to start.
REMEMBER TO SAVE OFTEN
Step 1:
Open a new image 600 x 250 pixels.
Set your Foreground to #5c0000 and your Background to #000000. Flood fill the layer with your Foreground colour.
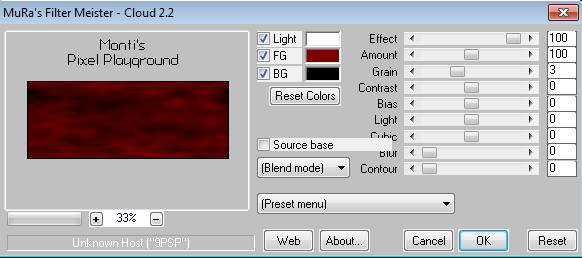
Go to Effects - Mura Meister - Cloud and apply with the following settings.
Add a new raster layer and flood fill with Black #000000.
Go to Layers - Load/Save Mask - Load Mask From Disk and find Forum Mask 8 MB and SW. Apply with the following settings
Merge Group.
Step 2:
Open your frame and resize to 202 pixels high.
Copy and paste the frame as a new layer on your canvas.
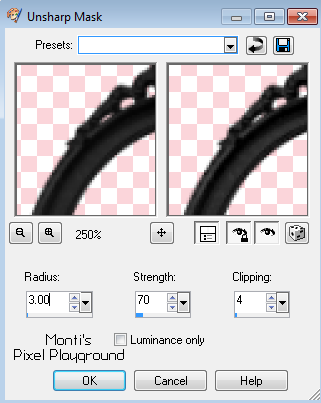
Go to Adjust - Sharpen - Unsharp Mask with the following settings
Duplicate the frame layer and go to Effects - Image Effects - OffSet with the following settings
Duplicate the duplicate of Frame and repeat offset.
Click back on the center/original frame and duplicate again.
Repeat Offset but this time delete the minus from in front of the Horizontal number.
Duplicate the duplicate of Frame and repeat offset.
In the layer palette right click on the bottom layer and rename Back.
Right click on the Mask layer and rename Mask.
Right click on the next layer up/ the Center Frame layer and rename Frame 1.
Right click on the next layer up/ the right Center Frame layer and rename Right Frame 1.
Right click on the next layer up/ the right Frame layer and rename Right Frame 2.
Right click on the next layer up/ the left Center Frame layer and rename Left Frame 1.
Right click on the next layer up/ the left Frame layer and rename Left Frame 2.
Step 3:
Click on Frame 1 to activate it. Copy and paste your tube as a new layer. Resize to fit. I resized mine by 30%. Move it beneath your Frame layer and Rename Tube 1.
Go to Adjust - Sharpen - Unsharp Mask. Change the strength to 30 but keep the other settings the same.
Apply a Drop Shadow. I used
Vertical = 1
Horizontal = 5
Opacity = 80
Blur = 13
Colour = Black
Click on Frame 1 to activate it.
Select your Magic Wand with the following settings
Mode: Add/Shift
Match Mode: RGB Value
Tolerance: 10
Feather: 0
Anti-alias: Checked.
and click inside the frame.
Go to Selections - Modify - Expand by 5 - Selections - Invert
Then click on your tube layer and press delete on your keyboard.
Deselect
Duplicate the tube layer and go to Adjust - Blur - Gaussian Blur with the Radius set to 7.
Change the blend mode to Hard Light or whichever you prefer.
Add the same drop shadow we used earlier to the frame.
Repeat these steps until all frames are filled.
Step 4:
Click on Frame 1 to activate it.
Open the heart in PSP, resize to 25% and copy and paste it as a new layer onto your canvas.
Position in the top center of the frame.
Go to Adjust - Sharpen - Unsharp Mask with the same settings.
Apply the same drop shadow we have used throughout.
Repeat these steps for the outer 2 frames.
Click on the top layer of your image in the layer palette.
Open the Blood Splatter in PSP. Copy and paste as a new layer onto your canvas.
Change the Blend mode to Hard Light and position where you want.
Activate the Crop tool and crop Merged Opaque.
Step 5:
Add a new raster layer and Flood Fill with Black #000000
Go to Selections - Select All - Float - Selections - Modify - Contract by 5
Press delete on your keyboard.
Deselect.
Add a new raster layer
Go to Selections - Select All - Selections - Modify - Contract by 4
Flood Fill with #5c0000
Selections - Modify - Contract by 5
Press delete on your keyboard.
Deselect.
Add a new raster layer
Go to Selections - Select All - Selections - Modify - Contract by 8
Flood Fill with Black #000000
Selections - Modify - Contract by 3
Press delete on your keyboard.
Deselect.
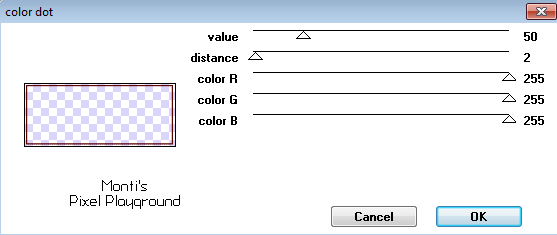
Activate the red layer of the Frame and go to Effects - Penta.com - Color Dot - and apply with the following settings.
Duplicate this red layer and go to Effects - Toadies - What Are You? - and apply with the default settings.
Step 6:
Add the artists copyright.
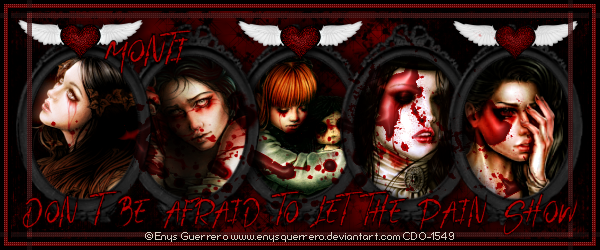
Then using a font of your choice write "Don't Be Afraid To Let The Pain Show" along the bottom of the canvas.
Use your nodes to push it in or pull it out to make it fit.
Go to Objects - Align - Horizontal in Canvas and then when you are happy with the placement convert to Raster layer.
Add the same drop shadow we have used throughout.
Duplicate this layer and in the layer palette change the blend mode to Screen.
At the top of your image add your name and position it where you like it.
Add the same Drop Shadow.
Duplicate this layer and in the layer palette change the blend mode to Screen.
Save your finished tag.


No comments:
Post a Comment