

This tutorial was written by Monti on March 20th 2015. It's concept is copyrighted to Monti. Any creation you make from my ideas are yours. You may print out this tutorial for your own personal use, but please do not copy it in any way to put online, pass out or rewrite without my permission or worse yet attempt to claim as your own.
This was written for psp 9 but will work in other versions.
For this tutorial you will need:
Paint Shop Pro
Eye Candy 5 - Nature - Fire and Smoke
This tutorial will only show you how to make the fire and smoke effect on the dragon.
To make the tag ready for the animation please go to Fi's tut site and do her wonderful Fire Breathing Dragon tut.
Thank you Fi for letting me use your tut as a base for this one.
Once you have made your tag following Fi's tut we are ready to start this one.
REMEMBER TO SAVE OFTEN
Step 1:
Open your tag in Paint Shop Pro.
Select your Magic Wand with the following settings:
Mode: Add (shift) - Match Mode: RGB Value - Tolerance: 10 - Feather: 0 - Anti-alias: Checked - Outside selected.
Click inside each of the Dragon's nostrils and go to Selections - Promote Selection to Layer.
Deselect.
Duplicate this layer 5 times for a total of 6 layers (plus your original). Rename the bottom original promoted layer to Fire 1, rename the 1st copy Fire 2, rename the 2nd copy Fire 3, rename the 3rd copy Smoke 1, rename the 4th copy Smoke 2 and finally rename the 5th copy Smoke 3.
Step 2:
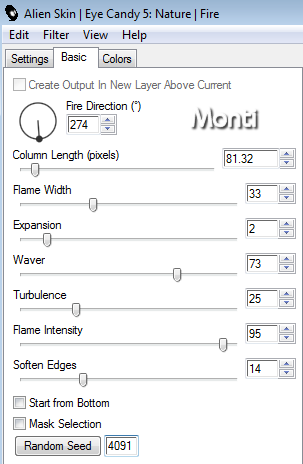
Click on Fire 1 layer to activate it.
Apply Eye Candy 5: Nature - Fire with the following settings.
If you are using a different tube, change the direction of the fire to suit your tube.
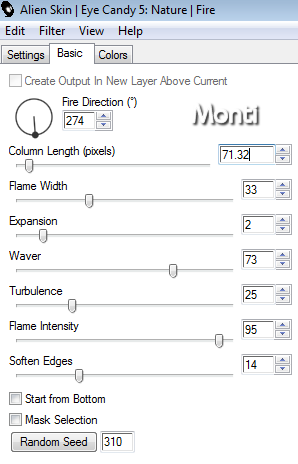
Click on Fire 2 and repeat Fire effect with the following settings and also press the Random seed once.
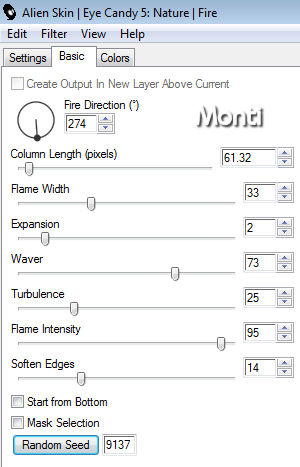
Click on Fire 3 and repeat Fire effect with the following settings and also press the Random seed once.
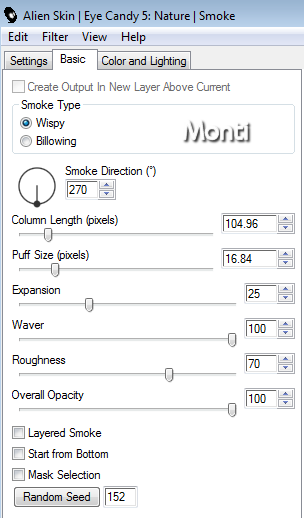
Click on Smoke 1 and go to Effects - Eye Candy 5: Nature - Smoke with the following settings.
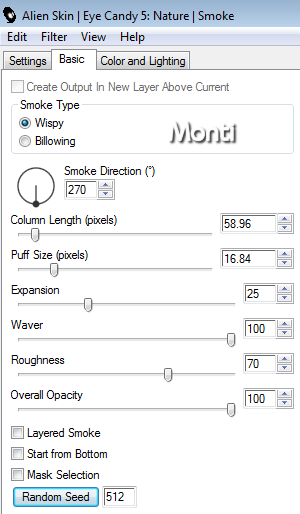
Click on Smoke 2 and repeat Smoke effect with the following settings and also press the Random seed once.

Click on Smoke 3 and repeat Smoke effect with the following settings and also press the Random seed once.
Hide the following layers. Fire 1, Fire 2, Fire 3, Smoke 1, Smoke 2 and Smoke 3.
Step 3:
Open Animation Shop.
In PSP go to Edit - Copy Merged and in Animation Shop go to Edit - Paste as New Animation.
_______________________________________________________
Back in PSP, unhide Fire 1. Go to Edit - Copy Merged and in Animation Shop right click on the image and choose Paste after Current Frame.
_______________________________________________________
Back in PSP, hide Fire 1 and unhide Fire 2. Go to Edit - Copy Merged and in Animation Shop right click on the 2nd frame of your image and choose Paste after Current Frame.
_______________________________________________________
Back in PSP, hide Fire 2 and unhide Fire 3 and Smoke 1. Go to Edit - Copy Merged and in Animation Shop right click on the 3rd frame of your image and choose Paste after Current Frame.
_______________________________________________________
Back in PSP, hide Fire 3, Smoke 1 and unhide Smoke 2. Go to Edit - Copy Merged and in Animation Shop right click on the 4th frame of your image and choose Paste after Current Frame.
_______________________________________________________
Back in PSP, hide Smoke 2 and unhide Smoke 3. Go to Edit - Copy Merged and in Animation Shop right click on the 5th frame of your image and choose Paste after Current Frame.
You should now have a total of 6 frames.
Go to Edit - Select All and then go to Animation - Frame Properties and set it to 25.
Click on the 1st Frame to animate it and go to Animation - Frame Properties and for this frame only set it to 80.
Save your Finished tag.
No comments:
Post a Comment