


This tutorial was written by Monti on 1st March, 2015. It's concept is copyrighted to Monti. Any creation you make from my ideas are yours.
You may print out this tutorial for your own personal use, but please do not copy it in any way to put online, pass out or rewrite without my permission or worse yet attempt to claim as your own.
This was written for psp 9 but will work in other versions.
For this tutorial you will need:
Paint Shop Pro
Eye Candy 4000 - Gradient Glow - Optional
Xero - Porcelain and Radiance - Available HERE
Tube of your Choice
I am using a tube by Enamorte.
You can find the tube and more of her work at CDO.
Scrap Kit of your Choice
I am using ScrapMonti_IB-Enamorte-24-2.
This is available at CDO
Font of your Choice
I used Inspiration
Mask of your Choice
I used Mask 22 by Moonbeams and SpiderWebs - Available HERE.
Place in your Mask folder.
They have loads of beautiful Masks so you may want to check them all out while you are there.
Ok we are ready to start.
REMEMBER TO SAVE OFTEN
Step 1:
Open a new image 500 x 500 pixels and flood fill with white.
Select your Preset Shapes set to Rectangle with the following settings:
Create as vector - Line Width 10
Draw out a rectangle on the canvas 150 pixels wide and 350 high.
Go to Objects - Align - Horizontal in Canvas.
Duplicate this vector layer and then convert the original to a raster layer.
Working on the duplicate vector layer hold down the Ctrl key on the keyboard and move the upper right corner up slightly. This will also make the bottom corner move down.
When you are happy with the size convert to raster layer.
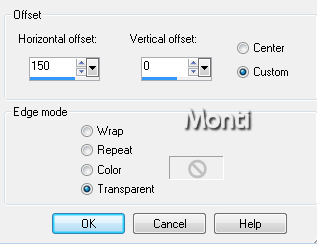
Go to Effects - Image Effects - Offset - with the following settings:
Duplicate this layer and go to Image - Mirror.
Hide the white background layer and merge all visible. Rename Frame.
Add an Inner Bevel of your choice. I used the one below.


Go to Image - Canvas Size and resize to Width 600 pixels - Height 500 pixels - Center placement.
Resize your frame layer by 80% - Bicubic selected.
Select your Magic Wand with the following settings:
Click inside each section of the frame and go to Selections - Modify - Expand by 4.
Add a new raster layer and move it beneath the frame layer in the layer palette.
Set your foreground to white and your background to a light colour from your tube.
Change your Foreground to Gradient - Foreground/Background - Angle 136 - Repeats 1 - Invert if needed so that the white is in the middle of the gradient.
Flood fill the selections on the new layer.
Deselect.
Rename Mirror.
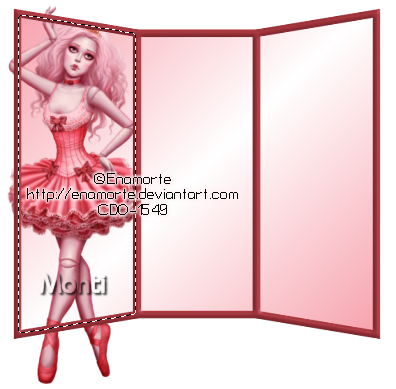
Select your Magic Wand again and activate the Frame layer.
Click inside the left hand frame. Go to Selections - Modify - Expand by 3.
Copy and paste your tube as a new layer and move beneath the Frame layer. Resize if necessary.
I resized mine by 70% - Weighted Average- All layers UNchecked.
If resizing go to Adjust - Sharpen.
Move the tube so the part you want to see in the selection is visible.
Once happy with the placement go to Selections - Invert and making sure you are on your tube layer hit delete on your keyboard.
Repeat this for the other 2 frame areas.
Hide all layers apart from the tube layers and merge them visible. Rename tubes.
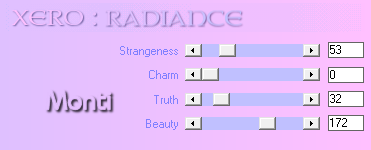
Apply Xero Radiance with the following settings.
Lower the opacity of the tube layer to 55.
Select your frame layer and add a drop shadow of choice.
I used
Vertical: 1
Horizontal: 3
Opacity: 38
Blur: 5
Colour: Black.
Step 2:
Now it is time to add our elements. Feel free to make the tag your own by using whichever elements you want.
I used the following.
Element 1. Copy and paste as a new layer.
Resize by 45% - Weighted Average.
Adjust - Sharpen.
Apply the same drop shadow we used earlier.
Element 9. Copy and paste as a new layer.
Resize by 26% - Weighted Average.
Adjust - Sharpen and move to the top left of the frame.
Duplicate - Image Mirror, line up with right frame and drop shadow both layers.
Element 18. Copy and paste as a new layer.
Resize by 45% - Weighted Average.
Adjust - Sharpen and move to the right of the frame.
Apply the same drop shadow we used earlier.
Element 27. Copy and paste as a new layer.
Resize by 19 % - Weighted Average.
Adjust - Sharpen and place on the right.
Apply the same drop shadow we used earlier.
Element 41. Copy and paste as a new layer.
Resize by 40% - Weighted Average.
Adjust - Sharpen and place on the left.
Duplicate - Image Mirror. I moved the one on the right in a bit so it didn't cover the ballet bag.
I didn't add a drop shadow to these layers as it made the lace look dirty.
Element 8. Copy and paste as a new layer.
Resize by 18% - Weighted Average.
Adjust - Sharpen and move to the left in front of the ribbons.
Apply the same drop shadow we used earlier.
Element 17. Copy and paste as a new layer.
Resize by 25% - Weighted Average.
I placed mine at bottom left.
Adjust - Sharpen and add the same drop shadow we used earlier.
Step 3:
Add your tube as a new layer. I resized mine by 75%.
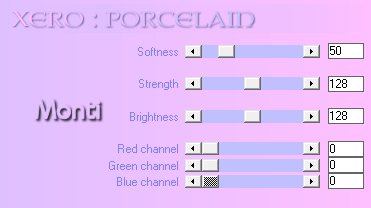
Go to Effects - Xero - Porcelain with the following settings.
Add the same drop shadow we used earlier.
Duplicate the tube layer.
On the duplicate go to Adjust - Blur - Gaussian Blur set to 5.
In the layer palette change this layers blend mode to Soft Light or Hard Light, whichever suits your tube colours best.
If you want to add a mask on the background click on the white background layer to activate it and add a new raster layer.
Go to Selections - Select all - Float - Defloat and copy and paste a paper of your choice into the selection - I used Paper 3.
Deselect.
Go to Layers - Load/Save Mask - Load Mask from Disk.
I used MB and SW Mask 22 with the following settings.
Source Luminence - Fit to Layer - Hide all mask and click load.
In the layer palette right click and choose merge group.
I resized my mask by 90%.
Delete the white background layer.
Select your crop tool and crop Merged Opaque.
Resize if needed. I resized mine by 80% - Bicubic - All Layers Checked.
Add the artist's copyright and your license number.
Add your name using a font of your choice. I used Inspiration.
Apply your text and go to Objects - Align - Horizontal in Canvas.
Convert to Raster layer and add a Gradient Glow.
I used Eye Candy 4000 with the following settings:
Glow Width: 3 - Soft Corners: 25 - Overall Opacity: 100. Under colour choose Fat and then change the colours to a light shade from your tag.
Add the same drop shadow to name.
Save your finished tag.

No comments:
Post a Comment