

This tutorial was written by Monti on August 12th 2006 and reworked on 12th October 2014. It's concept is copyrighted to Monti. Any creation you make from my ideas are yours. You may print out this tutorial for your own personal use, but please do not copy it in any way to put online, pass out or rewrite without my permission or worse yet attempt to claim as your own.
This was written for PSP 9 but will work in other versions.
For this tutorial you will need
Paint Shop Pro
MuraMeisters Cloud
Available www.oocities.org/murakuma/mmplugins.html
Flaming Pear Flood
You can get a demo at www.flamingpear.com/flood.html
Font of your Choice
I used Zipty Do which is a pay font so I can't supply it.
A Tube of your choice
The tube used in this tutorial is ©Ismael Rac used with a license.
You can get a license to use his work from www.store.xeracx.net
My Zip File
This contains my Beach Ball and my Sea Pattern.
Download Here
An Edge Mask of Your Choice
I used 179InsatiableDreams. You can find this mask and more at http://insatiabledreams.net/Cat_s_Masks.html
Ok we are ready to start.
REMEMBER TO SAVE OFTEN
Step 1:
Put your mask in your mask folder. Open the Monti Beach Sea and my Beach Ball in psp and minimize for now.
Open a new image 400 x 400 pixels.
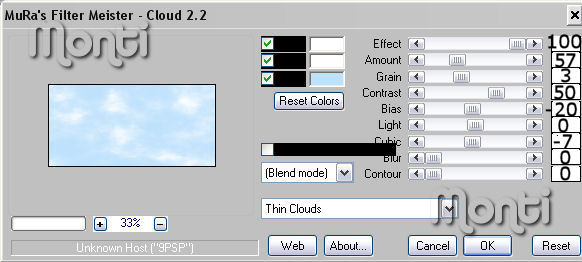
Open another new image 400 x 400 transparent and apply Mura Meisters Cloud with the settings shown below.
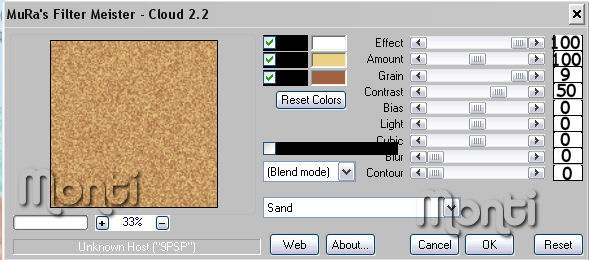
Set your Foreground to pattern and find the sand pattern we just made. Set the scale to 50.
On our blank image add a new Raster layer and flood fill with the sand.
Step 2:
Add a new Raster Layer.
Set your foreground to the Monti Beach Sea, Scale 25 and flood fill this layer.
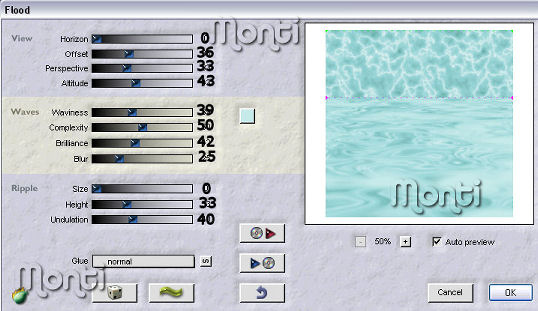
I added Flaming Pear Flood to this layer to make the water look more wavy.
If you wish to do this do it now using the settings shown below.
(Don't worry about the top part as we will be covering this in a minute).
Select your Lasso tool and set the feather to 20.
Draw a wavy line around the bottom part of the layer to make it look like waves on the beach and hit delete on the keyboard.
See my example below.
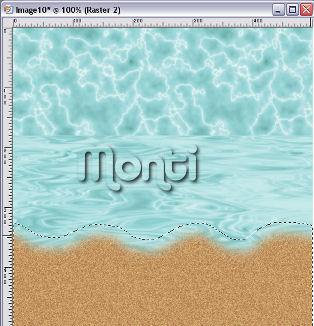
Deselect.
Step 3:
Add a new Raster layer.
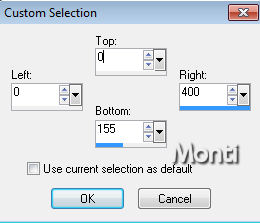
Click on your selection tool and click on Custom selection.

Use the settings shown below.
Go to effects Mura Meisters Cloud with the settings shown below.
Top 2 colours = White
Bottom Colour = #bfe2fc
Deselect.
Step 4:
Copy and paste my Beach Ball as a new layer and resize to 50%.
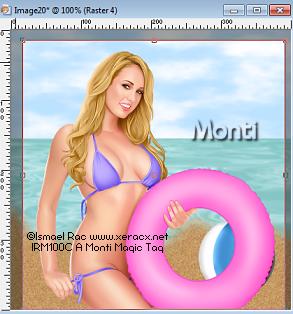
Copy and paste your tube as a new layer and position towards the bottom of your image.
When you are happy with the positioning use your crop tool to crop off any major excess you have. Make sure you leave a bit of room at the sides and the top for your mask, just not too much.
See my example below.
Duplicate your main tube layer and hide the duplicate.
Add a Drop Shadow to your original Tube layer. I used
Vertical: 0
Horizontal: 0
Opacity: 60
Blur: 15
Colour: Black
Make sure the duplicate tube is hidden and Merge - All Visible so we can add the sunburst.
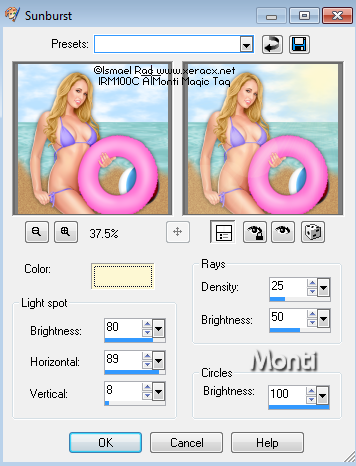
On the merged layer go to Effects - Illumination Effects - Sunburst and use the settings shown below.
Colour = #f8f8d9
Step 5:
Go to Layers - Load/Save Mask - Load from Disk and find the edge mask you wish to use with the following settings - Source Luminance - Fit to Canvas - Hide all Mask. Merge Group.
Unhide your duplicate tube layer
Use your Lasso tool - Point to Point - Feather: 20 and draw around the hard edges of the tube as shown in my sample below.

Press Delete on the keyboard and then Deselect.
Set your Foreground and Background to colours from your tube.
Apply your text making sure Vector is checked.
Image Rotate - Right: 20 - make sure All layers is UNchecked.
Position it where you want and convert to raster layer.
Go to Effects Drop Shadow with the following settings.
Vertical: 2
Horizontal: 2
Opacity: 50
Blur: 5
Colour: Black
Crop - Merged Opaque and add the artists copyright on a new layer.
Save.
No comments:
Post a Comment