

This tutorial was written by Monti on November 1st 2008. It's concept is copyrighted to me. Any creation you make from my ideas are yours. You may print out this tutorial for your own personal use, but please do not copy it in any way to put online, pass out or rewrite without my permission or worse yet attempt to claim as your own.
This was written for psp 9 but will work in other versions.
For this tutorial you will need
Paint Shop Pro
My Santas Friends Scrap Kit
This is available to purchase from Taggers Delight.
A Font of your Choice
I used Christmas Card.
My Supplies
This includes my mask and the snow added to the tree.
Download *Here*.
Extract and place the mask in your PSP mask folder. Open the snow in PSP.
Plug Ins
Mura Meister - Copies
Eye Candy 4000 - Gradient Glow (Optional)
Ok we are ready to start.
REMEMBER TO SAVE OFTEN
Step 1:
Open a new transparent image 600 x 500 pixels.
Add a new Raster layer and go to Edit - Select All.
Copy one of my papers - I used Monti-SF-Paper-GreenSnowFlakes.jpg - and go to Edit - Paste Into Selection.
Deselect.
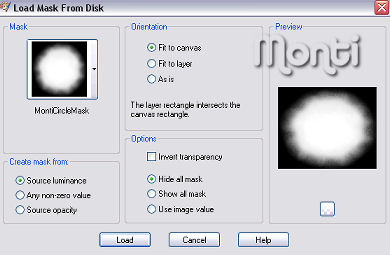
Go to Layers - Load/Save Mask - Find MontiCircleMask.jpg and apply with the following settings.
Copy and paste one of my Poinsettias as a new layer.
Go to Image - Resize - 20% Smart Size - All Layers UNChecked.
Go to Adjust - Sharpness - Sharpen.
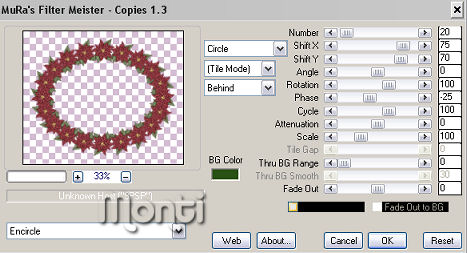
Go to Effects - PlugIns - Mura Meisters Copies - Encircle and apply with the following settings.
Step 2:
Activate your Preset Shapes set to Rectangle - Line Style: Solid - Line Width: 6.
Draw out a rectangle about 500 x 200 pixels in size.
Go to Objects - Align - Center in Canvas and convert to Raster layer.
Activate your Magic Wand - tolerance and Feather: 0 - and click inside the rectangle.
Go to Selections - Modify - Expand: 4 and add a new raster layer.
Move this layer below your rectangle in the layer palette.
Open the paper you want to use for the fill - I used Monti-SF-Paper-RedStar.jpg.
Set your Foreground to Pattern and find the paper you want to use. Set the size to 50.
Fill the selection and then Deselect.
Activate the Rectangle layer and add the following Drop Shadow.
Vertical: -1
Horizontal: 1
Opacity: 65
Blur: 2
Colour: Black
Repeat but change the Vertical to 1 and the Horizontal to -1.
Step 3:
Copy and paste my Monti-SF-ChristmasTreeWithPot.png as a new layer.
Go to Image - Resize by 80% - Bicubic selected - All Layers UNchecked and move into position. See my tag for a placement guide.
I wanted snow on mine. If you do too then copy and paste my snow as a new payer and position on the tree making sure you line it up.
In the layer palette right click the snow layer and choose Merge Down to merge it with the tree.
Alternatively if you want you can decorate with my baubles. Resize each one by 10% Smart Size and sharpen then paste as a new layer to decorate the tree. Move into position.
Step 4:
Copy and paste one of my Double Star Frames as a new layer and move beneath the tree layer on the layer palette.
Go to Image - Resize by 80% - Bicubic selected - All Layers UNchecked and move into position. See my tag for a placement guide.
Add the following Drop Shadow.
Vertical: -1
Horizontal: 1
Opacity: 65
Blur: 2
Colour: Black
Repeat but change the Vertical to 1 and the Horizontal to -1.
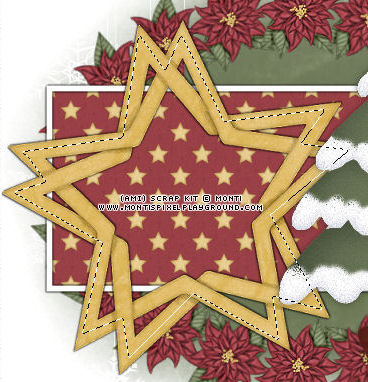
Activate the Freehand Selection Tool - Point to Point - Feather: 0.
Draw around so ALL the holes are selected. See below.
Open the paper you want to use for the fill - I used Monti-SF-Paper-GreenRedStripe1.jpg.
Set your Foreground to Pattern and find the paper you want to use. Set the size to 50.
Add a new raster layer and fill the selection. Deselect.
Move this layer beneath the Double Star Frame layer.
Step 5:
Open a bow of your choice from my kit. Resize by 50% - Smart Size then go to Adjust - Sharpness - Sharpen.
Copy and paste as a new layer onto your canvas and position.
Add a Drop Shadow of your choice. I used
Vertical: 0
Horizontal: 4
Opacity: 40
Blur: 4
Colour: Black
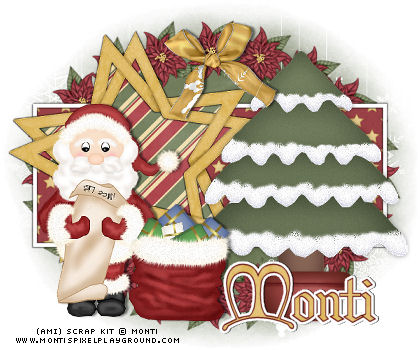
Add a Santas Friend of your choice. I used Santa and a Sack of Presents above but you can see other examples of this tag at the bottom of the tutorial.
Add any other elements you want, resizing and drop shadowing as required.
If you want to resize your tag do it now. I resized mine 80% Bicubic - All Layers Selected.
Add the credits. If you are just using my kit please add the following
Scrap Kit ©Monti www.montispixelplayground.com
Add your name. I used a dark colour for my Foreground and a paper for my Background.
Once I had converted this to a Raster Layer I added Eye Candy 400 Gradient Glow with the following settings.
Glow Width: 3.00 - Soft Corners: 0 - Overall Opacity: 100 - Draw Only Outside Selection: Checked - Under Colour choose Fat.
Add a Drop Shadow and save.

No comments:
Post a Comment