
This tutorial was written by Monti on February 16th 2008. It's concept is copyrighted to Monti. Any creation you make from my ideas are yours. You may print out this tutorial for your own personal use, but please do not copy it in any way to put online, pass out or rewrite without my permission or worse yet attempt to claim as your own.
This was written for psp 9 but will work in other versions.
For this tutorial you will need
Paint Shop Pro
My Supplies
Download Here
These were made by me for this tutorial and are not to be shared or used elsewhere without my permission.
Mehdi Fur Filter
Download Here
NOTE: If you don't already have this plugin you can now only download Fur 2. I used the original Fur but have given settings for a similar look using Fur 2.
DSB Flux - Linear Transmission
Download Here
Fonts of your Choice
I used Vivaldi for the letter and Feena Casual for the name.
A Screw of your choice
A Tube of your Choice
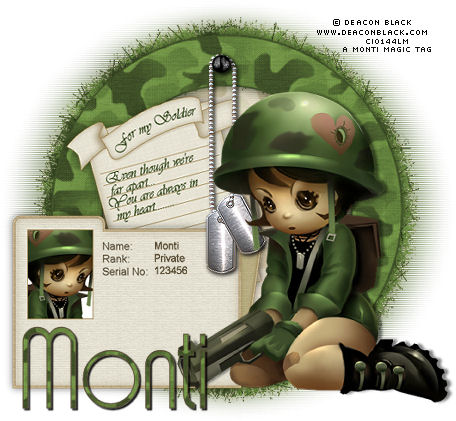
I am using the wonderful art of Deacon Black used with a license from CILM.
You can purchase a license to use his work from CDO.
Ok we are ready to start.
REMEMBER TO SAVE OFTEN
Step 1:
Open a new transparent image 600 x 600 pixels. Open my supplies in PSP and activate the Monti-camoflague.jpg. Press Shift D to make a duplicate and minimize the original for now.
On the copy go to Adjust - Brightness - Contrast with the following settings.
Brightness: -65 - Contrast: 0
Then go to Adjust - Hue - Saturation with the following settings.
Hue: 61 - Saturation: 89
Set your Foreground to #3e4f28 and your Background to Null.
Select your Preset Shapes tool set to Ellipse, Line Width 70.
Whilst holding down your Shift key draw out a medium sized circle.
Go to Objects - Align - Centre in Canvas and then convert to Raster layer.
Go to Selections - Select All - Float - Selections - Modify - Contract by 2 .
Set your Foreground to the coloured Camoflague paper and the size to 80. Fill the selection.
Deselect.
Duplicate this layer and on the original go to Effects - Mehdi - Fur.
Set the Density to 76 and the Length to 12.
FUR 2 Settings
Shape: Line - Mode: Solid - Density: 76 - Thickness: 1.5 - Length: 20.
Duplicate this layer and on the original go to Adjust - Blur - Gaussian Blur - Radius: 14.
On this blur layer go to Effects - DSB Flux - Linear Transmission with the following settings.
Slice Size: 1 - Offset: 4 - Blend: 50 - Horizontal: Checked.
In the layer palette activate the top layer which should be your original Ring and go to Image - Resize - 95% - All layers UNchecked.
Select your Magic Wand and click in the middle of the ring.
Go to Selections - Modify - Expand by 4.
Set your Foreground to the original UNcoloured Camoflague - Size 80
Add a new Raster layer and fill the selection with the camoflague.
Deselect and lower the opacity of this layer to 55.
Move this layer to the bottom of the layer palette.
Activate the top Ring layer again and add the following Drop Shadow.
Vertical: 0
Horizontal: 0
Opacity: 56
Blur: 15
Colour: Black
Copy and paste your tube as a new layer and add a drop shadow of your choice. I used
Vertical: 0
Horizontal: 5
Opacity: 50
Blur: 5
Colour: Black
Step 2:
Go to Image - Canvas size and change the width to 700 and the height to 600 and under placement select the right arrow.
Activate Monti-ArmyFolder and click inside the rectangle area with your Magic Wand.
Copy and paste your tube as a new layer (I mirrored mine) and use your mover tool to line it up so the part you want showing is in the selections.
Go to Selections - Invert and press Delete on your keyboard.
Deselect and move beneath your folder layer.
Select your Text tool - Font: Arial - Colour: #53472f - Size: 20 and add your name, rank and serial number (make them up).
Go to Edit - Copy Merged and paste as a new layer onto your canvas.
Go to Image - Resize by 50% - Smart Size checked - All layers UNchecked.
Position it where you want and add the following Drop Shadow.
Vertical: 0
Horizontal: 0
Opacity: 56
Blur: 15
Colour: Black
Move it beneath your tube layer.
Step 3:
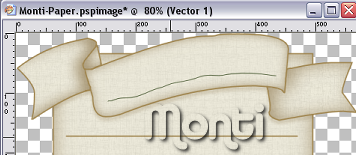
Activate Monti-Paper
If you want to add text to the banner at the top, select your pen tool with the following settings.
Mode: Draw Freehand - Create as Vector: Checked - Line Style: Solid - Line Width: 1.
Set your Foreground to any colour you want and the Background to Null.
Draw a line to follow the curve of the banner making sure you draw from LEFT to RIGHT. As you can see from my sample below it doesnt have to be perfect.
DO NOT convert to Raster.
Add a new Raster layer and select your Text Tool set to Create as Vector with the font and colours of your choice.
I used Vivaldi - Size 36 - Foreground and Background - #3e5028.
Move your mouse over the line you just drew until you get an A with a curve under it.
Click and type your text, I added For my Soldier.
Go to Objects - Align - Horizontal in Canvas and then convert to raster. You can now delete the vector layer.
Add any other text you want in the main part.
I added each line as a new vector layer so I could line them up with the lines on my paper.
Once done Copy Merged and paste onto your canvas.
Go to Image - Resize and resize between 40% and 50% - Smart Size - All layers UNchecked.
Go to Image - Rotate - 15 degrees Left - All layers UNchecked.
Go to Adjust - Sharpen.
Move beneath the folder layer and position. Add the following Drop Shadow.
Vertical: 0
Horizontal: 0
Opacity: 56
Blur: 15
Colour: Black
Copy and paste my Monti-DogTags-Small.png as a new layer and resize by 75% Bicubic - All layer UNchecked.
Repeat resize and go to Adjust - Sharpen and add the following Drop Shadow.
Vertical: 2
Horizontal: 2
Opacity: 91
Blur: 7
Colour: Black
Move this layer beneath your tube layer.
Add a new Raster layer and add a screw of your choice.
Add the same Drop Shadow we used on the Dogtags.
Crop to size using Merged Opaque. Resize if neccessary.
Add the artist credits and your watermark.
Finally add your name in a font of your choice. I used Feena Casual with the Foreground set to #3e5028 and the background set to the coloured camoflague.
Add a Drop Shadow of choice and save your tag.
No comments:
Post a Comment