

This tutorial was written by Monti on June 3rd 2007. It's concept is copyrighted to Monti. Any creation you make from my ideas are yours. You may print out this tutorial for your own personal use, but please do not copy it in any way to put online, pass out or rewrite without my permission or worse yet attempt to claim as your own.
For this tutorial you will need
Paint Shop Pro
The Following Colour Chart
Save and then open in PSP
Of course you are free to use any colours you want.

Ok we are ready to start.
REMEMBER TO SAVE OFTEN
Step 1:
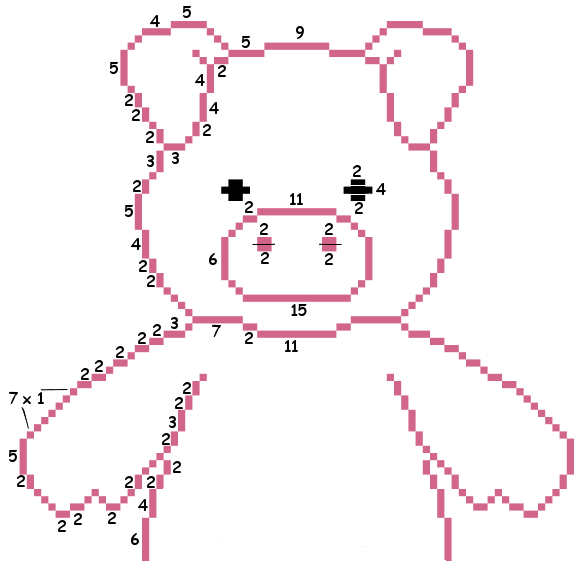
We will be be making the pig shown above. The outlines below have been resized a lot so you can see them clearly.
I have done the outline in 2 parts, we will be starting with the top half of the pig.
To make this easier I have numbered all pixels over 1.
NOTE: The outline is symmetrical so I have only numbered one side.
Open a new image 150 x 150 transparent.
Flood fill with white so you can see what you are working on. Delete this layer at the end.
Add a new Raster Layer.
Select the brush tool with the following settings.
Size: 1 - Hardness, Opacity and Density: 100
Zoom in to about 800% - 1000%
Set your foreground to colour 1 on the outline colour chart (#D2668A) and start at whichever point you prefer. I find it easier to start the highest point, in this case his left ear, as you look at him. (You can move the image later using your move tool if you need to).
Do all of the pig outline in that colour.
Add the eyes using the guide above and set the colour to Black.
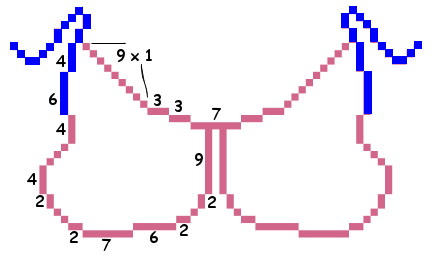
Change back to colour 1 on the outline colour chart (#D2668A) and draw in the rest of the pig outline using the guide below.
NOTE: The parts shown in blue are the parts you have already drawn from the first outline.
Step 2:
When your outline is complete, select your magic wand with the following settings and click inside the head.
Select colour 2 (#FEE6EB) on your pig colour chart and flood fill that selection.
Keep selected.
Selections float, Effects 3D effects, Cutout with the following settings
Vertical: 0
Horizontal: 0
Opacity: 60
Blur: 10
Shadow colour: Use your pig outline.(#D2668A).
Make sure fill interior with colour is UNchecked.
Deselect.
Step 3:
Select your magic wand and click inside the left (as you look at it) ear.
Select colour 2 (#FEE6EB) on your pig colour chart and flood fill that selection.
Selections float, Effects 3D effects, Cutout with the following settings
Vertical: 0
Horizontal: 0
Opacity: 60
Blur: 5
Shadow colour: Use your pig outline.(#D2668A).
Make sure fill interior with colour is UNchecked.
Deselect.
REPEAT for the other ear.
Step 4:
Select your magic wand and click inside the main body.
Select colour 2 (#FEE6EB) on your pig colour chart and flood fill that selection.
Selections float, Effects 3D effects, Cutout with the following settings
Vertical: 0
Horizontal: 0
Opacity: 60
Blur: 15
Shadow colour: Use your pig outline.(#D2668A).
Make sure fill interior with colour is UNchecked.
Deselect.
Step 5:
Select your magic wand and click inside the left (as you look at it) leg.
Select colour 2 (#FEE6EB) on your pig colour chart and flood fill that selection.
Selections float, Effects 3D effects, Cutout with the following settings
Vertical: 0
Horizontal: 0
Opacity: 60
Blur: 8
Shadow colour: Use your pig outline.(#D2668A).
Make sure fill interior with colour is UNchecked.
Deselect.
REPEAT for the other leg.
Step 6:
Select your magic wand and click inside the pigs snout.
Select colour 3 (#E5ABB0) on your pig colour chart and flood fill that selection.
Selections float, Effects 3D effects, Cutout with the following settings
Vertical: 0
Horizontal: 0
Opacity: 100
Blur: 7
Shadow colour: Use your pig outline.(#D2668A).
Make sure fill interior with colour is UNchecked.
Deselect.
Merge all visible and save as a png.
No comments:
Post a Comment