


This tutorial was written by Monti on July 26th 2006 and reworked on 12th October 2014. Its concept is copyrighted to Monti. Any creation you make from my ideas are yours. You may print out this tutorial for your own personal use, but please do not copy it in any way to put online, pass out or rewrite without my permission or worse yet attempt to claim as your own.
This was written for PSP 9 but will work in other versions.
For this tutorial you will need:
Paint Shop Pro
Eye Candy Gradient Glow
Eye Candy 3.1 - Glass
Fonts of your Choice
I am using Angie Impressing and Bank Gothic
Tubes of your choice (1 full length and 3 others).
The images used in this tutorial are ©Arthur Crowe used with a license.
You can purchase a license to use his work from www.arthurcrowesfactory.com/store.
Grunge and splat brushes of your choice.
My Template
You can download it Here
Ok we are ready to start.
REMEMBER TO SAVE OFTEN
Step 1:
Open your tubes and my template in psp.
Open a new image 600 x 600 pixels.
Activate my template tube and copy and paste it as a new layer onto your white canvas.
Select your Magic Wand - Tolerance and Feather: 0 and click inside each of the black shapes.
Go to Selections - Modify - Contract by 5 and add a new raster layer. Flood fill the selected areas with white.
Deselect.
Step 2:
Open the full length tube and select 2 colours from it for your Foreground and Background.
Set your Foreground to Gradient: Foreground-Background - Linear and change the angle to 45 and the Repeats to 1.
Copy and paste your tube onto the canvas and resize if necessary (she should be about the length of the vertical shape) and move into position.
Add the following Drop Shadow
Vertical: 2
Horizontal: 5
Opacity: 50
Blur: 5
Colour:Black
Activate your template layer and with your Magic Wand click inside the white area in the vertical box.
Go to Layers - New Raster layer and flood fill with the gradient we prepared earlier. You can lower the opacity on this if you want.
Deselect.
Step 3:
Maximize the tube you want in the top horizontal box.
Select 2 colours from it for your Foreground and Background.
Set your Foreground to Gradient: Foreground-Background - Linear and change the angle to 45 and the Repeats to 1.
Activate your template layer and with your magic wand click inside the white area in the top horizontal box.
Go to Layers - New Raster layer and flood fill with the gradient we prepared earlier. You can lower the opacity on this if you want.
Copy and paste the tube you want to show in the top box as a new layer on your canvas. Resize if necessary to get the part you want showing in the box so it will fit.
Activate the tube layer, go to Selections - Invert and hit delete on your keyboard.
Repeat the drop shadow we used earlier.
Deselect.
Step 4:
Maximize the tube you want in the middle horizontal box.
Select 2 colours from it for your Foreground and Background.
Set your Foreground to Gradient: Foreground-Background - Linear and change the angle to 45 and the Repeats to 1.
Activate your template layer and with your magic wand click inside the white area in the middle horizontal box.
Go to Layers - New Raster layer and flood fill with the gradient we prepared earlier. You can lower the opacity on this if you want.
Copy and paste the tube you want to show in the middle box as a new layer on your canvas. Resize if necessary to get the part you want showing in the box so it will fit.
Activate the tube layer, go to Selections - Invert and hit delete on your keyboard.
Repeat the drop shadow we used earlier.
Deselect.
Step 5:
Maximize the tube you want in the bottom horizontal box.
Select 2 colours from it for your Foreground and Background.
Set your Foreground to Gradient: Foreground-Background - Linear and change the angle to 45 and the Repeats to 1.
Activate your template layer and with your magic wand click inside the white area in the bottom horizontal box.
Go to Layers - New Raster layer and flood fill with the gradient we prepared earlier. You can lower the opacity on this if you want.
Copy and paste the tube you want to show in the bottom box as a new layer on your canvas. Resize if necessary to get the part you want showing in the box so it will fit.
Activate the tube layer, go to Selections - Invert and hit delete on your keyboard.
Repeat the drop shadow we used earlier.
Deselect.
Click on the bottom template layer to activate it and add the following Drop Shadow:
Vertical: 3
Horizontal: 3
Opacity: 50
Blur: 3
Colour: Black
Step 6:
Activate your text tool and select Bank Gothic font. Size 26 - Stroke 0 - Bold - Kerning: -(minus)100 - Vector selected - Colour: black.
Using all capital letters type in "ALLOW ME TO INTRODUCE MYSELVES"
Use your nodes to pull in the edges so it lines up underneath your template.
Convert to raster layer.
Move this layer beneath the template layer.
Step 7:
Activate your background layer and then add a new raster layer.
Select your brush tool and add grunge and splat brushes of your choice using colours from your tubes.
Go to Crop - Merged Opaque
If you want to resize, do so now.
On a new layer add your artist copyright.
Step 8:
Set your Foreground to black and your Background to a colour from your tubes.
Activate your text tool and select Angie Impressing font (or a font of your choice). Size between 48 and 72 depending on the length of the name - Stroke Width: 1 - Vector: Checked - Kerning: 0
Type your name.
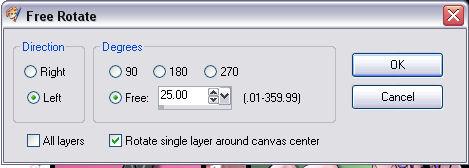
Go to Image Rotate - Free Rotate with the following settings.
Move your text into position and convert to raster layer.
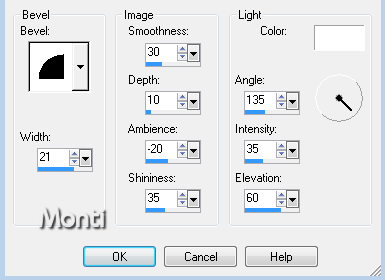
Add the following Inner Bevel.
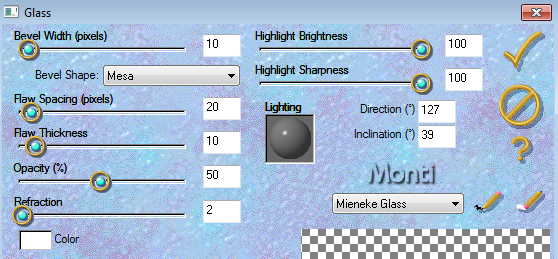
Then apply Eye Candy 3.1 Glass with the following settings.
Apply a glow of your choice.
Apply the following Drop Shadow
Vertical: 3
Horizontal:
Opacity: 85
Blur: 4
Colour: Black
Save your tag.
No comments:
Post a Comment