


This tutorial was written by Monti on August 1st 2007. It's concept is copyrighted to Monti. Any creation you make from my ideas are yours. You may print out this tutorial for your own personal use, but please do not copy it in any way to put online, pass out or rewrite without my permission or worse yet attempt to claim as your own.
This was written for psp 9 but will work in other versions.
For this tutorial you will need
Paint Shop Pro
Animation Shop
Mask
Becky's Mask 009 (formerly Secrets of the Imagination)
You can download it HERE
A Font of your Choice
I used Barbara Hand
A Tube of your Choice
I am using the wonderful art of Suzanne Woolcott.
Unfortunately Suzanne is no longer selling her work so please use an artist you have permission for.
Ok we are ready to start.
REMEMBER TO SAVE OFTEN
Step 1:
Open and minimize your font. Place the mask in your mask folder and open the tube of your choice in psp and minimize.
Open a new 500 x 500 pixel image with a white background.
Add a new Raster Layer and fill with #A4C1CE.
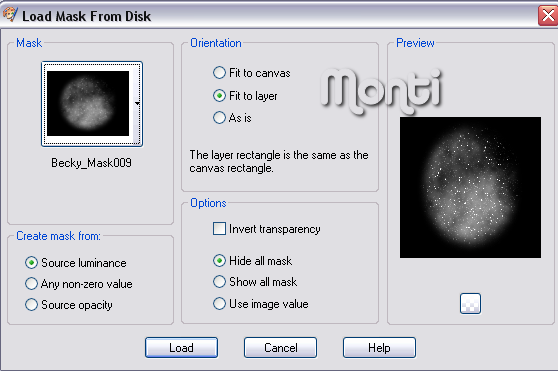
Go to Layers - Load/Save mask - Load Mask From Disk and apply Becky-Mask009 with the following settings.
Step 2:
Copy and paste your tube as a new layer on your canvas. Rename Tube.
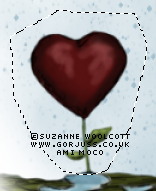
If you are using the same tube as I am then select your Lasso tool and draw around your heart flower as shown below, promote this selection to layer and click on the original tube layer and press Delete on your keyboard.
Deselect.
Rename the promoted layer to Heart.
On your original tube layer add the following Drop Shadow.
Vertical: 0
Horizontal: 0
Opacity: 48
Blur: 6
Colour: Black
Shadow on a New Layer: Checked
Select your Eraser tool with the settings shown below and on your shadow layer erase the shadow around the grass area.
Activate the tube layer, right click and choose Merge Down, this will merge the tube and shadow layer. Rename Tube.
Step 3:
Activate the Heart layer and go to Image Resize 115% - Bicubic Selected - All layers UNchecked.
Use your mover tool to move it back into position.
Duplicate this layer and go to Image Resize 85% - All other settings as above.
Rename Heart1 and use your mover tool to line it up with the other heart.
Duplicate this layer and go to Image Resize 80% - All other settings as above.
Rename Heart2 and use your mover tool to line it up with the other heart.
Duplicate this layer and go to Image Resize 80% - All other settings as above.
Rename Heart3 and use your your mover tool to line it up with the other heart.
Add the following Drop Shadow to each of the heart layers making sure Shadow on New Layer is UNchecked.
Vertical: 4
Horizontal: 0
Opacity: 48
Blur: 6
Colour: Black
Shadow on a New Layer: UNChecked
Move your original tube layer to the top.
Step 4:
Select your Preset Shape Tool, Eclipse. Foreground - any colour, Background - Null, Line Width - 1 and draw out an Elipse so that it goes around your umbrella at the top.
DO NOT convert to Raster.
Add a new Raster layer and activate your Text tool.
Change your Background to Black, Foreground - Null, Font - Barbara Hand, Size 28.
Move your cursor over the top center point of the Eclipse shape. Once you see the A with the little arrow underneath left click and type your saying. I used
"Love grows by giving. The love we give away is the only love we keep."
Click apply and convert to Raster layer. Rename Text and apply the same Drop Shadow we used earlier.
Delete the Eclipse layer and Raster 1.
Step 5:
Add a new Raster layer and rename Rain. Fill with Black and change the blend mode to Screen.
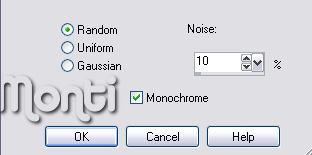
Go to Adjust - Add/Remove Noise - Add Noise with the following settings
Go to Effects - Edge Effects - Dilate.
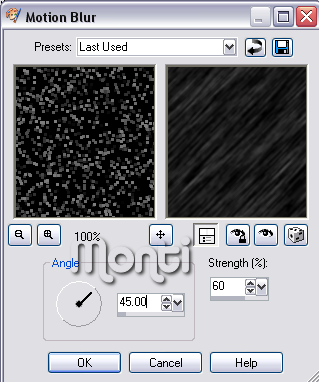
Go to Adjust - Blur - Motion Blur with the following settings
Add a new Raster layer and rename Rain1. Fill with Black and change the blend mode to Screen.
Go to Adjust - Add/Remove Noise - Add Noise with the settings above BUT change the Noise to 11.
Go to Effects - Edge Effects - Dilate.
Go to Adjust - Blur - Motion Blur with the settings above BUT change the Strength to 65.
Add a new Raster layer and rename Rain2. Fill with Black and change the blend mode to Screen.
Go to Adjust - Add/Remove Noise - Add Noise with the settings above BUT change the Noise to 12.
Go to Effects - Edge Effects - Dilate.
Go to Adjust - Blur - Motion Blur with the settings above BUT change the Strength to 70.
Add a new Raster layer and rename Rain3. Fill with Black and change the blend mode to Screen.
Go to Adjust - Add/Remove Noise - Add Noise with the settings above BUT change the Noise to 13.
Go to Effects - Edge Effects - Dilate.
Go to Adjust - Blur - Motion Blur with the settings above BUT change the Strength to 75.
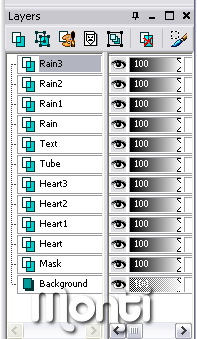
Your layer palette should now look like the one below.
Step 6:
Select your text tool again. Barbara Hand font, size 72, Bold and Vector Selected. Foreground Black, Background - a colour from your tube.
Type your name and go to Objects - Align - Horizontal in Canvas.
Convert to Raster layer and apply the same Drop Shadow we used earlier.
Add a new Rater layer and add the artists copyright.
Step 7: Animation
Open Animation Shop.
In PSP Hide Rain, Rain1 and Rain2 layers. Also Hide Heart, Heart 1 and Heart 2 layers.
Go to Edit - Copy Merged and paste as a new image in Animation Shop.
Back in PSP Hide Rain3 and Unhide Rain2. Hide Heart3 and Unhide Heart2.
Go to Edit - Copy Merged and right click the image in Animation Shop. Paste after Current Frame.
Back in PSP Hide Rain2 and Unhide Rain1. Hide Heart2 and Unhide Heart1.
Go to Edit - Copy Merged and right click the last frame in Animation Shop. Paste after Current Frame.
Back in PSP Hide Rain1 and Unhide Rain. Hide Heart1 and Unhide Heart.
Go to Edit - Copy Merged and right click the last frame in Animation Shop. Paste after Current Frame.
Back in PSP Hide Rain and Unhide Rain3. Leave Heart layer showing.
Go to Edit - Copy Merged and right click the last frame in Animation Shop. Paste after Current Frame.
Back in PSP Hide Rain3 and Unhide Rain2. Leave Heart layer showing.
Go to Edit - Copy Merged and right click the last frame in Animation Shop. Paste after Current Frame.
Back in PSP Hide Rain2 and Unhide Rain1. Leave Heart layer showing.
Go to Edit - Copy Merged and right click the last frame in Animation Shop. Paste after Current Frame.
Back in PSP Hide Rain1 and Unhide Rain. Leave Heart layer showing.
Go to Edit - Copy Merged and right click the last frame in Animation Shop. Paste after Current Frame.
In Animation Shop go to Edit - Select All, then Animation - Frame Properties and change the frame properties to 30.
Save as a .gif.
No comments:
Post a Comment