


This tutorial was written by Monti on July 30th 2008. It's concept is copyrighted to Monti. Any creation you make from my ideas are yours. You may print out this tutorial for your own personal use, but please do not copy it in any way to put online, pass out or rewrite without my permission or worse yet attempt to claim as your own.
This was written for psp 9 but will work in other versions.
For this tutorial you will need
Paint Shop Pro
Tag Template 12 and Life in Colour FTU Scrap Kit
Both by Dee of Creative Delusionz.
Please leave a thank you.
Cream and Sugar Font
4 or 5 Tubes of your Choice
I am using the colourful art of Lix used with a license from CILM.
You can purchase a license to use her work from Lix Store.
Ok we are ready to start.
REMEMBER TO SAVE OFTEN
Step 1:
Open the Template in PSP and press Shift D to make a copy. Close the original.
Delete the top copyright layer on the open template.
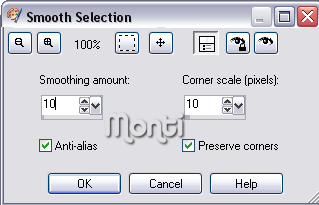
Activate Strip 2 layer on the Layer Palette and go to Selections - Select All - Float - Defloat - Selections - Modify - Smooth with the following settings.
Copy and Paste a paper from the kit (I used paper 5) as a new layer onto the canvas.
Go to Selections - Invert and press Delete on the keyboard.
Deselect and add the following Drop Shadow
Vertical: 0
Horizontal: 0
Opacity: 50
Blur: 5
Colour: Black
Repeat the above for Strip 1.
In the Layer Palette delete the layers called Strip 1 and Strip 2.
Step 2:
In the layer palette activate the Rounded Rectangle layer and go to Selections - Select All - Float - Defloat - Selections - Modify - Smooth with the same settings we used earlier.
Copy and paste another paper of choice (I used paper 12 resized at 80% Smart Size) as a new layer onto the canvas.
Go to Selections - Invert and press Delete on the keyboard.
Deselect and add the following Drop Shadow
Vertical: 0
Horizontal: 0
Opacity: 50
Blur: 5
Colour: Black
In the layer palette activate the Rounded Rectangle layer and go to Edit Cut.
Back in the layer palette right click on the paper layer we just did (it should be Raster 3) and choose Merge Down.
Step 3:
In the layer palette activate the Circle layer and go to Selections - Select All - Float - Defloat - Selections - Modify - Smooth with the same settings we used earlier.
Copy and paste another paper of choice (I used paper 11 resized at 80% Smart Size) as a new layer onto the canvas.
Go to Selections - Invert and press Delete on the keyboard.
Deselect and add the following Drop Shadow
Vertical: 0
Horizontal: 0
Opacity: 50
Blur: 5
Colour: Black
In the layer palette activate the Circle layer and go to Edit Cut.
Back in the layer palette right click on the paper layer we just did (it should be Raster 3) and choose Merge Down.
Step 4:
In the layer palette activate the Frame Fill layer and go to Selections - Select All - Float - Defloat - Selections - Modify - Smooth with the same settings we used earlier.
Copy and paste another paper of choice (I used paper 14) as a new layer onto the canvas.
Go to Selections - Invert and press Delete on the keyboard.
Deselect.
In the layer palette right click on the paper layer we just did (it should be Raster 3) and choose Merge Down.
Step 5:
In the layer palette activate the Fill for Round Frame layer and go to Selections - Select All - Float - Defloat - Selections - Modify - Smooth with the same settings we used earlier.
Copy and paste another paper of choice (I used paper 14 again) as a new layer onto the canvas.
Go to Selections - Invert and press Delete on the keyboard.
Deselect.
In the layer palette right click on the paper layer we just did (it should be Raster 3) and choose Merge Down.
Step 6:
In the layer palette activate the Frame layer and go to Selections - Select All - Float - Defloat - Selections - Modify - Smooth with the same settings we used earlier.
Copy and paste another paper of choice (I used paper 16) as a new layer onto the canvas.
Go to Selections - Invert and press Delete on the keyboard.
Deselect.
In the layer palette activate the Frame layer and go to Edit Cut.
In the layer palette right click on the paper layer we just did (it should be Raster 3) and choose Merge Down.
Copy and paste one of the Wrapping Bows as a new layer onto the canvas and go to Image - Mirror.
Resize by 64% Smart Size - All Layers UNchecked then go to Adjust - Sharpness - Sharpen.
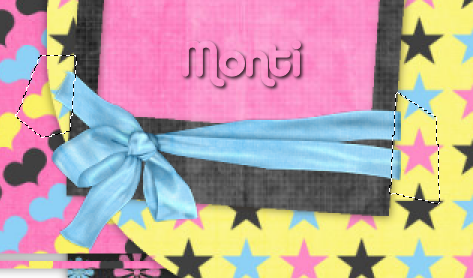
Arrange on top of the frame (see my tag as a guide) then zoom in and use your Selection tool set on Freehand Selection to select the edges of the bow that stick past the Frame.
Once selected press Delete on the keyboard (see below).
Deselect and add the following Drop shadow to the bow.
Vertical: 0
Horizontal: 2
Opacity: 40
Blur: 6
Colour: Black
Step 7:
In the layer palette activate the Round Frame 1 layer and go to Selections - Select All - Float - Defloat - Selections - Modify - Smooth with the same settings we used earlier.
Copy and paste a paper of choice (I used paper 16) as a new layer onto the canvas.
Go to Selections - Invert and press Delete on the keyboard.
Deselect.
In the layer palette activate the Round Frame 1 layer and go to Edit Cut.
In the layer palette right click on the paper layer we just did (it should be Raster 4) and choose Merge Down.
Repeat the step for Round Frame 2 and Round Frame 3.
Step 8:
We are now gong to resize the whole image.
Go to Image - Resize 80% Bicubic - All layers checked then go to Image - Canvas Size - 700 x 700 pixels.
Hide the white background layer and go to Edit - Copy Merged.
Unhide the white background layer and activate it.
Go to Edit - Paste - As New Layer so the merged layer is now just above the white background.
On this merged layer go to Adjust - Blur - Gaussian Blur: 30.
Go to Adjust - Hue and Saturation and colourize to match your tube. I used Hue: 136 - Saturation: 162.
Move the blurred layer over to the right slightly.
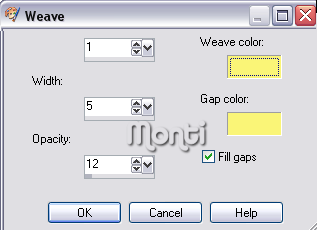
Still on the blurred layer go to Effects - Texture Effects - Weave with the following settings.
I used the yellow colour from the papers as my fill: #FAF577
Step 9:
Activate the Frame Fill layer.
Go to Selections - Select All - Float - Defloat.
Copy and paste the tube you would like in the frame as a new layer and position it so the part of the tube you want showing is in the selections, then go to Selections - Invert and press Delete on the keyboard.
Deselect.
Add a Drop Shadow and lower the opacity of the tube to between 60% and 70%.
Step 10:
Activate the Round Frame 1 layer.
Click inside with your Magic Wand and go to Selections - Modify - Expand by 3.
Copy and paste another tube and position inside the selections, resize if necessary.
Once happy with the positioning go to Selections - Invert and press Delete on the keyboard.
Add a Drop Shadow and move beneath your Frame layer.
Repeat this for Round Frames 2 and 3 using different tubes.
Copy and paste your main tube as a new layer and add a Drop Shadow. Position to the right of the large frame.
Hide your white background layer and crop to size.
Step 11:
Now is the time to add any other elements.
Open up one of the Flowers - I used Flower Multi and go to Image - Canvas Size - 200 x 200 pixels.
Copy and paste one of the other flowers (I used Flower Blue) as a new layer and go to Image - Rotate - Left - 20 Degrees - All layers UNchecked.
Resize the top flower by 85% Bicubic - All Layers UNchecked.
Copy and paste one of the buttons as a new layer on the flowers - I used Button 4.
Resize 80% Bicubic - All Layers UNchecked and add the following Drop Shadow
Vertical: 0
Horizontal: 0
Opacity: 40
Blur: 9
Colour: Black
Go to Edit - Copy Merged and paste as a new layer onto your template canvas.
Go to Image - Resize - 50% Smart Size - All layers UNchecked and position on your canvas.
Add the same Drop Shadow. Duplicate and position them on your tag - see my tag as sample.
I added a bow at the top of each round frame.
Copy and paste it as a new layer and resize by 40% Smart Size - All layers UNchecked.
Go to Adjust - Sharpness - Sharpen. Add the following Drop Shadow.
Vertical: 0
Horizontal: 3
Opacity: 44
Blur: 4
Colour: Black
I also added a blue and a pink knot at the top and added the same drop shadow.
Finally copy and paste one of the doodles as a new layer.
Go to Image - Rotate - Left - 20 Degrees - All Layers UNchecked. Add the following Drop Shadow.
Vertical: 0
Horizontal: 1
Opacity: 44
Blur: 7
Colour: Black
Copy a contrasting colour doodle and paste as a new layer.
Go to Image - Rotate - Left - 20 Degrees - All Layers UNchecked. Add the following Drop Shadow.
Vertical: 0
Horizontal: 1
Opacity: 44
Blur: 7
Colour: Black
Go to Image - Flip - Image - Mirror and position. See my tag as a guide.
IMPORTANT
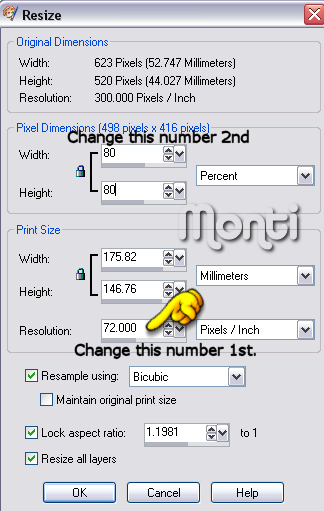
As we used the template for your canvas the DPI are not right for artists TOU so we will fix that now as we resize out tag.
Go to Image - Resize with the following settings.
Activate the top layer and add your artists copyright.
Step 12:
Now we need to add your name.
Select your Text tool with the Cream and Sugar font.
Set your Foreground to Black and your Background to a blue from the scrap kit - I used #99D6F5
Check Create Text as Vector - Stroke 1 - Antialias checked - Font size: 60.
Type out your name.
D0 NOT apply yet.
While your text entry box is still open highlight the 2nd letter of your name and change the background colour to a yellow from the kit - I used #FBF583
Then highlight the 3rd letter of your name and change the background colour to a pink from the kit - I used #FB81C0
Repeat this pattern for however long your name is then click Apply and position your text where you want it.
Convert to raster layer.
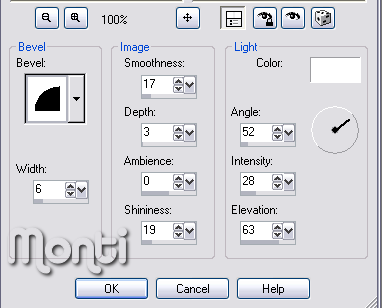
Go to Effects - 3D Effects - Inner Bevel with the settings shown below.
Add the following Drop Shadow
Vertical: 2
Horizontal: 3
Opacity: 50
Blur: 4
Colour: Black
Save your finished tag.
No comments:
Post a Comment