


This tutorial was written by Monti on April 29th 2007. It's concept is copyrighted to me. Any creation you make from my ideas are yours. You may print out this tutorial for your own personal use, but please do not copy it in any way to put online, pass out or rewrite without my permission or worse yet attempt to claim as your own.
This was written for psp 9 but will work in other versions.
For this tutorial you will need
Paint Shop Pro
Xenofex 2 - Burnt Edges
My Supplies - HERE.
All the supplies were made by me, please do not share or change the fle names.
Unzip and then open the tubes and papers in PSP.
Install the Brush in your brush folder.
Font of your Choice
I used Sandy Text Hmk Bold.
A Tube of your Choice
I am using the wonderful art of Jamie Kidd used with a license from CILM.
You can purchase a license to use her work from CDO.
Ok we are ready to start.
REMEMBER TO SAVE OFTEN
Step 1:
Activate your main tube and press Shift D to make a duplicate.
Resize the duplicate to about 185 pixels (width) by 255 pixels (height).
Add the following Drop Shadows.
Vertical: 5
Horizontal: 0
Opacity: 50
Blur: 5
Colour: Black
Vertical: 0
Horizontal: 5
Opacity: 50
Blur: 5
Colour: Black
Add a new Raster Layer and fill with Monti Heart Paper or a paper of your choice - set to Scale 70.
Move this layer beneath your tube layer.
Merge all Visible.
Go to Image - Add Borders and add a 1 pixel Black border.
Then add a 4 pixel border using colour #AB794E.
Set this to one side for now.
Open a new image about 150 pixels (width) by 65 pixels (height).
Copy and paste the image you just set aside as a new layer and use your mover tool to move it around until you have the part you want showing is in the image.
Merge all Visible.
Go to Image - Add Borders and add a 1 pixel Black border.
Then add a 4 pixel border using colour #AB794E.
Set this to one side for now.
Open a new image about 130 pixels (width) by 140 pixels (height).
Copy and paste the first image you just set aside as a new layer and use your mover tool to move it around until you have the part you want showing is in the image.
Merge all Visible.
Go to Image - Add Borders and add a 1 pixel Black border.
Then add a 4 pixel border using colour #AB794E.
Set this to one side for now.
Step 2:
Open a new image 600 x 600 pixels.
Open the Monti Heart Paper and resize to 360 x 360 pixels, Smart Size and All Layers Checked.
Copy and paste this as a new layer on your white canvas.
Go to Image - Rotate - left - 25, making sure all layers is UNchecked.
Add the following Drop Shadow.
Vertical: 0
Horizontal: 0
Opacity: 50
Blur: 10
Colour: Black
Open the Monti Card Paper, Press Shift D to duplicate.
Minimize your original as we will need it later and resize the duplicate to 400 x 390 pixels, Smart Size and All Layers Checked.
Copy and paste this as a new layer on your white canvas.
Add the same Drop Shadow we used on the other paper.
Use the mover tool to move it up slightly.
Step 3:
Copy and paste your 3 tube images we made at the start as new layers on your canvas and arrange as shown below.

Add the following Drop Shadow to each of the tube layers.
Vertical: 2
Horizontal: 2
Opacity: 50
Blur: 5
Colour: Black
Step 4:
Copy and paste the MontiStudded.png as a new layer. Resize by 80% - Bicubic selected - All layers UNchecked.
Move into position just below your tube images.
Add the same Drop Shadow we used on the tube layers.
Activate Layer 2 (the Monti Card Paper layer) and select your magic wand, Tolerance 10 - Feather 0 and click on the clear area around the card paper.
Selections - Modify - Expand by 7.
Activate the MontiStudded.png layer and press Delete on your keyboard.
Merge all visible.
Use your mover tool to move the image up to the top of the canvas.
Step 5:
Open a new image 375 pixels (width) by 90 pixels (height).
Copy and paste the Monti Card Paper as a new layer.
Resize by 80%, All layers UNchecked.
Select your Crop tool and click on Merged Opaque and Crop.
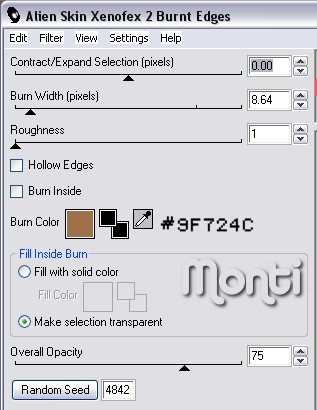
Apply Xenofex 2 - Burnt Edges with the following settings.
Copy and paste this as a new layer onto your canvas and move beneath the main image. See my tag as a guide.
Add the following Drop Shadow.
Vertical: 0
Horizontal: 0
Opacity: 50
Blur: 10
Colour: Black
Open the MontiStudded.png and resize by 80%, Bicubic selected, All layers Checked.
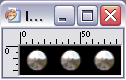
Activate your selection tool, set to Rectangle and select an area that includes three of the studs as shown below.
Copy and Paste this as a new layer on your canvas and Go to Image - Rotate - Right - 90, making sure all layers is UNchecked.
Move it into position so you have one stud on the top image, one stud on the bottom tag area and one stud in the middle. See my tag as a guide.
Duplicate and Mirror.
Add the following Drop Shadow to each of these layers.
Vertical: 2
Horizontal: 2
Opacity: 50
Blur: 5
Colour: Black
Step 6:
Copy and paste the SpikeBall as a new layer. Resize by 80%, Bicubic selected, All layers UNchecked.
Move it so it is below your Studded band. (See my tag as a guide).
Add the same Drop Shadow we used on the tube layers.
Copy and paste the ChainSpike as a new layer. Resize by 80%, Bicubic selected, All layers UNchecked.
Move it so it is at the top of the tube images. (See my tag as a guide).
Add the same Drop Shadow we used above.
Add a new Raster layer and select your Brush tool.
Set your Foreground to White and find the Licensed Dominatrix Brush, set to size 183.
Click once to place it on your tag, I placed mine over the larger tube image.
Add the artists copyright and your watermark.
Add your name using a font of your choice, colour Black and place on the hanging tag.
Add the following Drop Shadow to your name.
Vertical: 2
Horizontal: 2
Opacity: 50
Blur: 5
Colour: Black
Crop to size using Merged Opaque and Save.

No comments:
Post a Comment