

This tutorial was written by Monti on February 25th 2011. It's concept is copyrighted to Monti. Any creation you make from my ideas are yours. You may print out this tutorial for your own personal use, but please do not copy it in any way to put online, pass out or rewrite without my permission or worse yet attempt to claim as your own.
This was written for psp 9 but will work in other versions.
For this tutorial you will need
Paint Shop Pro
Animation Shop
Fonts
For the lips you will need Luv N Kisses font which you can get from Dafont.
I used 2Peas Permanent Wave for the text which is a pay font so I am unable to supply.
Tube of your Choice
I am using the art of Jessica Dougherty.
You can purchase a license to use her work from CDO.
Template
You will need Template 8 by Lady Hawk Designs. You can download that *HERE*.
Manual Colour Correction Tool
Thanks to Fi from Just Fi for this tip. I use this tool all the time so found it easier to add it to my toolbar.
To do this go to: View - Customise - Commands. After this the location can vary as we found with the tut testers.
Try either - Un-Unused Tools - Manual Colour Correction OR Adjust - Manual Colour Correction OR All Commands - Manual Colour Correction.
Drag it onto your bar so you can use it easily.
Tramages - Tow The Line - Optional.
This is so hard to find so I have included it and you can download it *HERE*.
Ok we are ready to start.
REMEMBER TO SAVE OFTEN
Step 1:
Open the template in PSP and press Shift and D to make a copy.
Close the original.
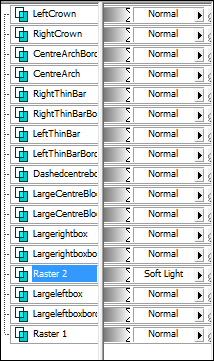
Delete the following layers from the template:
Raster 2
Wordart
UpperPlatform
UpperPlatformFill
LowerPlatform
LowerPlatform Fill
Once those layers are deleted go to Image - Resize and use the following settings changing them in the order shown below:
Change the Resolution to 72.000 Pixels/Inch
Change the Dimensions to 80 Percent
Resample using Bicubic
Resize all layers Checked.
Step 2:
Open the tube you wish to use as we will be using colours from the tube.
Go back to your template and we will be working from the bottom layer upwards.
Hide Raster 1.
Activate Largeleftboxborder layer.
Select your Manual Colour Correction Tool from the toolbar and use with the following settings
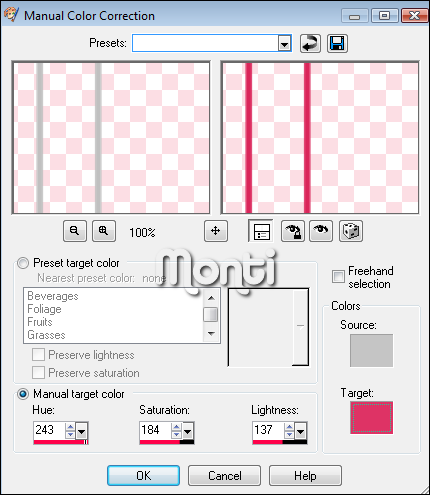
Make sure the Source is the colour you are changing it from - if you click on the object on your canvas it will set the source colour.
Click on the Target box and in the colour box that opens click on a colour from your tube that you want to change it to - I used #DD3063.
Click OK in the colour box and then click OK in the Manual Colour Correction Tool box.
In the Layer Palette click on Largeleftbox layer.
Using your Manual Colour Correction Tool again change the colour to a dark one from your tube. I used #241A1C.
Still on that layer go to Selections - Select All - Float - Defloat.
Copy and paste your tube as a new layer and position so the part you want showing is in the Selections.
Once you are happy with it's placement go to Selections - Invert and press delete on your keyboard.
Then go to Selections - Select None.
In your Layer Palette change the blend mode of the tube layer to Soft Light or a blend mode that works for your colours.
Move the Largeleftboxborder layer to above the Raster 2 -Tube - layer.
Repeat these steps for the right hand side, layers Largerightboxborder and Largerightbox.
Step 3:
Click on LargeCentreBlockborder to activate it and use your Manual Colour Correction Tool again. I changed mine to the dark colour from my tube.
Click on LargeCentreBlock to activate it. Set your Foreground to the colour you want to change it to - I used my dark colour.
In the Tool Bar activate your Change to Target tool.

Set the Shape to Square and the size to 200. Paint the LargeCentreBlock.
Click on Dashedcentreborder to activate it.
Use your Manual Colour Correction Tool to change it to the contrasting colour from your tube - I used #DD3063.
Step 4:
Click on LeftThinBarBorder to activate it.
Using your Manual Colour Correction Tool again change the colour to a dark one from your tube. I used #241A1C.
Click on LeftThinBar to activate it.
Set your Foreground to the colour you want to change it to - I used my pink colour #DD3063.
In the Tool Bar activate your Change to Target tool and paint this layer.
Repeat these steps for RightThinBarBorder and RightThinBar layers.
Step 5:
We will now make a pattern to fill in the center part. Open a new image 400 x 10 pixels and add a new Raster Layer.
I set my Foreground to a dark pink and my Background to a light pink - use a light and dark shade of colours from your tube.
Set your Foreground to Gradient with the following settings:
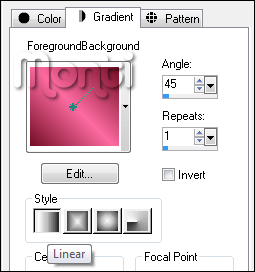
Flood fill your new image.
Still on the new image go to Image - Canvas Size with the following settings:
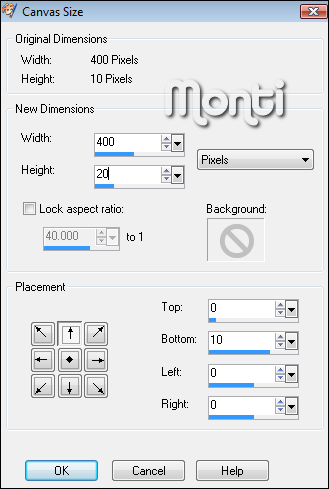
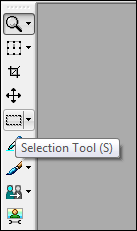
Click on your Selection Tool to activate it - mine is in the left hand tool bar.
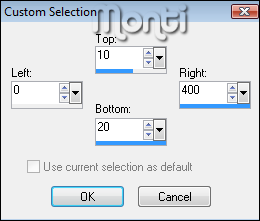
Then click on Custom Selection - Mine is on the top tool bar.

Use the following settings:
My Fill pattern now looks like this.

Change your Foreground to a different dark contrasting colour and your Background to a different light contrasting colour from your tube.
Select Gradient with the same settings you used before but with the new colours and flood fill the Selection.
Deselect and Minimize your pattern.
Mine now looks like the one below - obviously without the black border.
Back on our main Canvas activate CentreArch layer.
Go to Selections - Select All - Float - Defloat.
Set your Foreground to Pattern and find the pattern we just made. Set the Angle to 90 and the Size to 100.
Flood Fill the Selection.
Deselect.
Activate CentreArchBorder layer.
Using your Manual Colour Correction Tool again change the colour to a dark one from your tube. I used #241A1C.
Set your Foreground to the contrasting colour - in my case the pink and activate your Change to Target tool.
Activate the RightCrown layer and paint this with the Change to Target brush.
Repeat for the LeftCrown layer.
Step 6:
Leave your Foreground on the contrasting colour and set your Background to Null.
Activate your Rectangle tool with the following settings:
Create as Vector: Checked - Horizontal Radius: 2 - Vertical Radius: 2 - Width: 10.
As you are drawing your Rectangle, keep an eye in the bottom right hand corner where it tells you the size - see below.
Draw out a Rectangle 550 x 85 pixels and then go to Objects - Align - Horizontal in Canvas.
Convert to Raster Layer and rename Rectangle.
Select your Magic Wand with the following settings and click inside the Rectangle.
Go to Selections - Modify - Expand by 5.
Add a new Raster layer and move it beneath the rectangle frame in the layer palette.
Fill this with a colour taken from the LargeCentreBlock layer.
If you have it apply Tramges - Tow The Line with the default settings.
If you do not have this plug in or it refuses to work for you then go to Effects - Texture Effects - Blinds with the following settings:
Width: 5 - Opacity: 58 - Colour: A light shade of the one you used to fill with - Horizontal and Light From Left/Top: UNchecked
Deselect.
Step 7:
Before we add the tube let's add Drop Shadows to the layers where they are needed.
Add the following Drop Shadow to layers Largeleftboxborder - Largerightboxborder - LargeCentreBlockborder - LeftThinBarBorder - RightThinBarBorder - CentreArchBorder - Rectangle.
Vertical: 2
Horizontal: 2
Opacity: 50
Blur: 3
Colour: Black
Activate layer Dashedcentreborder and add the following Drop Shadow
Vertical: 1
Horizontal: 1
Opacity: 70
Blur: 2
Colour: Black
Activate Right Crown layer and add the following Drop Shadow
Vertical: 0
Horizontal: 0
Opacity: 55
Blur: 9
Colour: Black
Repeat for the Left Crown layer.
Copy and paste your tube onto the canvas and resize if necessary.
Move it beneath the Rectangle Fill layer.
Erase any parts that show at the bottom of the Rectangle.
Add the following Drop Shadow
Vertical: 0
Horizontal: 4
Opacity: 40
Blur: 6
Colour: Black
Step 8:
Find your Luv N Kisses font.
Select a colour of your choice for the lips and set it as your Background colour. Set your Foreground to Null.
Activate your font tool and using Love and Kisses font - Size: 60 type the letter "v".
Rotate slightly and position in the top left. Use my tag as a guide.
Convert to Raster Layer and rename Left Kiss.
Duplicate and Mirror. Rename the duplicate Right Kiss.
Use a font of your choice - 2Peas Permanent Wave - write the word "Kiss".
Position above the lips - see my tag as a guide and convert to raster layer.
Repeat for the other side.
If you wish to resize it, do so now.
Add the artists credits and your license number.
Hide the white background layer and Crop to size. Unhide the white layer.
Step 9: - Animation
Open Animation Shop.
In the layer palette hide the Right Kiss layer.
Go to Edit - Copy Merged and then paste as a New animation in Animation Shop.
_______________________________________________
Back in PSP lower the opacity of the Left Kiss layer to 75.
Copy Merged. In Animation Shop right click on F:1 and choose Paste After Current Frame.
_______________________________________________
Back in PSP lower the opacity of the Left Kiss layer to 50.
Copy Merged. In Animation Shop right click on F:2 and choose Paste After Current Frame.
_______________________________________________
Back in PSP lower the opacity of the Left Kiss layer to 25.
Copy Merged. In Animation Shop right click on F:3 and choose Paste After Current Frame.
_______________________________________________
Back in PSP hide the Left Kiss layer and unhide the Right Kiss layer.
Copy Merged. In Animation Shop right click on F:4 and choose Paste After Current Frame.
_______________________________________________
Back in PSP lower the opacity of the Right Kiss layer to 75.
Copy Merged. In Animation Shop right click on F:5 and choose Paste After Current Frame.
_______________________________________________
Back in PSP lower the opacity of the Right Kiss layer to 50.
Copy Merged. In Animation Shop right click on F:6 and choose Paste After Current Frame.
_______________________________________________
Back in PSP lower the opacity of the Right Kiss layer to 25.
Copy Merged. In Animation Shop right click on F:7 and choose Paste After Current Frame.
_______________________________________________
Back in PSP hide the Right Kiss layer.
Copy Merged. In Animation Shop right click on F:8 and choose Paste After Current Frame.
In Animation Shop go to Edit - Select All - Animation - Frame Properties - Set it to 15 and Click ok.
If you are happy with the animation save the blank tag so that you can add names seperately and not redo the whole tag each time.
Step 10:
Back in PSP add your name using a font and colour of your choice making sure it fits inside the rectangle.
Go to Objects - Align - Horizontal Center in Canvas and convert to raster layer.
Add the following Drop Shadow.
Vertical: 2
Horizontal: 2
Opacity: 85
Blur: 2
Colour: Black
Copy and paste the name into animation Shop.
You should still have all frames selected in Animation Shop. If not Select All.
In the top tool bar activate your Propagate Paste icon.

Copy and Paste your name into the selected frames.
Save your finished tag.

No comments:
Post a Comment